Tutorial
Additional Recommended Steps for New CentOS 7 Servers

Introduction
After setting up the bare minimum configuration for a new server, there are some additional steps that are highly recommended in most cases. In this guide, we’ll continue the configuration of our servers by tackling some recommended, but optional procedures.
Prerequisites and Goals
Before you start this guide, you should run through the CentOS 7 initial server setup guide. This is necessary in order to set up your user accounts, configure privilege elevation with sudo, and lock down SSH for security.
Once you have completed the guide above, you can continue with this article. In this guide, we will be focusing on configuring some optional but recommended components. This will involve setting our system up with a firewall and a swap file, and configuring Network Time Protocol synchronization.
Configuring a Basic Firewall
Firewalls provide a basic level of security for your server. These applications are responsible for denying traffic to every port on your server with exceptions for ports/services you have approved. CentOS ships with a firewall called firewalld. A tool called firewall-cmd can be used to configure your firewall policies. Our basic strategy will be to lock down everything that we do not have a good reason to keep open. First install firewalld:
The firewalld service has the ability to make modifications without dropping current connections, so we can turn it on before creating our exceptions:
Now that the service is up and running, we can use the firewall-cmd utility to get and set policy information for the firewall. The firewalld application uses the concept of “zones” to label the trustworthiness of the other hosts on a network. This labelling gives us the ability to assign different rules depending on how much we trust a network.
In this guide, we will only be adjusting the policies for the default zone. When we reload our firewall, this will be the zone applied to our interfaces. We should start by adding exceptions to our firewall for approved services. The most essential of these is SSH, since we need to retain remote administrative access to the server.
If you have not modified the port that the SSH daemon is running on, you can enable the service by name by typing:
If you have changed the SSH port for your server, you will have to specify the new port explicitly. You will also need to include the protocol that the service utilizes. Only type the following if your SSH server has already been restarted to use the new port:
This is the bare minimum needed to retain administrative access to the server. If you plan on running additional services, you need to open the firewall for those as well.
If you plan on running a conventional HTTP web server, you will need to enable the http service:
If you plan to run a web server with SSL/TLS enabled, you should allow traffic for https as well:
If you need SMTP email enabled, you can type:
To see any additional services that you can enable by name, type:
When you are finished, you can see the list of the exceptions that will be implemented by typing:
When you are ready to implement the changes, reload the firewall:
If, after testing, everything works as expected, you should make sure the firewall will be started at boot:
Remember that you will have to explicitly open the firewall (with services or ports) for any additional services that you may configure later.
Configure Timezones and Network Time Protocol Synchronization
The next step is to adjust the localization settings for your server and configure the Network Time Protocol (NTP) synchronization.
The first step will ensure that your server is operating under the correct time zone. The second step will configure your system to synchronize its system clock to the standard time maintained by a global network of NTP servers. This will help prevent some inconsistent behavior that can arise from out-of-sync clocks.
Configure Timezones
Our first step is to set our server’s timezone. This is a very simple procedure that can be accomplished using the timedatectl command:
First, take a look at the available timezones by typing:
This will give you a list of the timezones available for your server. When you find the region/timezone setting that is correct for your server, set it by typing:
For instance, to set it to United States eastern time, you can type:
Your system will be updated to use the selected timezone. You can confirm this by typing:
Configure NTP Synchronization
Now that you have your timezone set, we should configure NTP. This will allow your computer to stay in sync with other servers, leading to more predictability in operations that rely on having the correct time.
For NTP synchronization, we will use a service called ntp, which we can install from CentOS’s default repositories:
Next, you need to start the service for this session. We will also enable the service so that it is automatically started each time the server boots:
Your server will now automatically correct its system clock to align with the global servers.
Create a Swap File
Adding “swap” to a Linux server allows the system to move the less frequently accessed information of a running program from RAM to a location on disk. Accessing data stored on disk is much slower than accessing RAM, but having swap available can often be the difference between your application staying alive and crashing. This is especially useful if you plan to host any databases on your system.
Advice about the best size for a swap space varies significantly depending on the source consulted. Generally, an amount equal to or double the amount of RAM on your system is a good starting point.
Allocate the space you want to use for your swap file using the fallocate utility. For example, if we need a 4 Gigabyte file, we can create a swap file located at /swapfile by typing:
After creating the file, we need to restrict access to the file so that other users or processes cannot see what is written there:
We now have a file with the correct permissions. To tell our system to format the file for swap, we can type:
Now, tell the system it can use the swap file by typing:
Our system is using the swap file for this session, but we need to modify a system file so that our server will do this automatically at boot. You can do this by typing:
With this addition, your system should use your swap file automatically at each boot.
Where To Go from Here?
You now have a very decent beginning setup for your Linux server. From here, there are quite a few places you can go. First, you may wish to snapshot your server in its current configuration.
Take a Snapshot of your Current Configuration
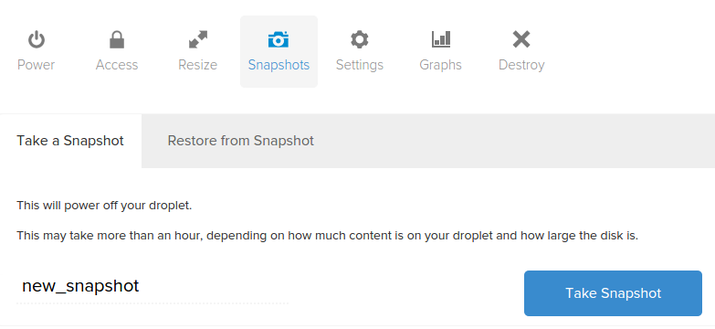
If you are happy with your configuration and wish to use this as a base for future installations, you can take a snapshot of your server through the DigitalOcean control panel. Starting in October of 2016, snapshots cost $0.05 per gigabyte per month based on the amount of utilized space within the filesystem.
To do so, shutdown your server from the command line. While it is possible to snapshot a running system, powering down ensures that the files on disk are all in a consistent state:
Now, in the DigitalOcean control panel, you can take a snapshot by visiting the “Snapshots” tab of your server:
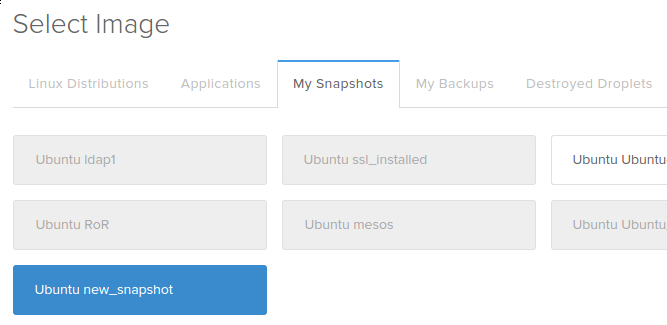
After taking your snapshot, you will be able to use that image as a base for future installations by selecting the snapshot from the “My Snapshots” tab for images during the creation process:
Additional Resources and Next Steps
From here, your path depends entirely on what you wish to do with your server. The list of guides below is in no way exhaustive, but represents some of the more common configurations that users turn to next:
- Setting up a LAMP (Linux, Apache, MySQL/MariaDB, PHP) stack
- Setting up a LEMP (Linux, Nginx, MySQL/MariaDB, PHP) stack
- Installing the WordPress CMS
- Installing Node.js
- Installing Puppet to manage your infrastructure
Conclusion
By this point, you should know how to configure a solid foundation for your new servers. Hopefully, you also have a good idea for your next steps. Feel free to explore the site for more ideas that you can implement on your server.
Thanks for learning with the DigitalOcean Community. Check out our offerings for compute, storage, networking, and managed databases.
Tutorial Series: New CentOS 7 Server Checklist
When creating a new CentOS 7 server, there are some basic tasks that you should take to ensure that your server is secure and configured properly. This tutorial series will go over connecting to your server and general security best practices, and will also provide links to articles that will help you to start running your own web server or application.
About the author(s)
This textbox defaults to using Markdown to format your answer.
You can type !ref in this text area to quickly search our full set of tutorials, documentation & marketplace offerings and insert the link!
Congratulations on unlocking the whale ambience easter egg!
Click the whale button in the bottom left of your screen to toggle some ambient whale noises while you read.

Thank you to the Glacier Bay National Park & Preserve and Merrick079 for the sounds behind this easter egg.

Interested in whales, protecting them, and their connection to helping prevent climate change? We recommend checking out the Whale and Dolphin Conservation.

Become a contributor for community
Get paid to write technical tutorials and select a tech-focused charity to receive a matching donation.

DigitalOcean Documentation
Full documentation for every DigitalOcean product.

Resources for startups and SMBs
The Wave has everything you need to know about building a business, from raising funding to marketing your product.
The developer cloud
Scale up as you grow — whether you're running one virtual machine or ten thousand.

Get started for free
Sign up and get $200 in credit for your first 60 days with DigitalOcean.*

*This promotional offer applies to new accounts only.
Nice tutorial, just one error/typo
should be
Absolutely. Good catch.
lel good one, got em there.
In “Initial Server Setup with CentOS 7” you mention that you cover fail2ban in this tutorial. I see no mention of that here at all. Did you miss it or omit it for a reason?
I noticed that as well…
When I try to run this command: firewall-cmd --permanent --add-service=http
I got: Error: INVALID_ZONE
How to fix this?
Is there any chance you have an old version of
firewalld? This sounds similar to your issue, but was fixed a year ago.Try updating your system with:
Let us know if your issues persist.
You gotta check under what zone your interface is listed. For example:
firewall-cmd --list-active-zonesusage: see firewall-cmd man page firewall-cmd: error: unrecognized arguments: --list-active-zones
It is --list-active not -list-active, and -–permanent not -permanent, and –-add-service=http not –add-service=http
This is a good writeup! Someone asked us, so just to clarify a bit for any 'nix newcomers:
This is adding a line in /etc/fstab file to mount & use the newly created swap area at every boot. The command sh is basically copying the following into that file:
You could manually edit that line (or others in the future) by using:
Hope that helps :) PS your comment editor is throwing me to the bottom of page footer when using code button (Chrome 39.0.2171.71)
A simpler command for appending to /etc/fstab is:
Also, if you do that first you can simply run
sudo swapon -ainstead of explicitly mentioning the swapfile again.I would love to get this all working with Cloudconfig but unfortunately it seems that cloudconfig isn’t working on centos7 at all (even the simplest things don’t work such as creating a new user).
Droplet is created, but thats it… no new user, no key imported, nothing… Any Hints on this? (BTW: belows settings works well on ubuntu)
How about running “sudo yum update” every time, you get new droplet. Is it not recommended?
you might want consider using cloud-init for initial config. By doing so, you get an “updated” system per default on first boot. However, you may disable it by adding
package_update: false.Should you want to upgrade (aka distribution upgrade) then add
package_upgrade: true(its set to ‘false’ by default).You might also want to see some samples for further configurations and options here.
What is the CentOS 7.x alternative for fail2ban? I understand this program is only compatible with the old default firewall “iptables” shipped with 6.x and earlier.
I think you misunderstood the purpose of firewalld (which is very similar to UFW that does about the some under ubuntu). It is basically a “layer” to manage iptables but not replacing them.
In any case you should enable the EPEL repo if not done already:
Further details about installing fail2ban on centos7, covering ssh & related firewalld config: https://krash.be/node/28
Thank you for that clarification, frankis, this has puzzled me for some time.
Centos/RHEL 7 now uses chrony as the default daemon for NTP.
13. CONFIGURING NTP USING THE CHRONY SUITE - 13.1.2. Choosing Between NTP Daemons
Heads up in case you decide to change the default SSH port. IIRC, there is no need to specify the port number to
firewalldif you change it correctly withsemanage port -a -t ssh_port_t -p tcp 4444. You have to do this anyway on RHEL/CENTOS; then adding the ssh service to firewalld automagically adds both the default (22) and your new (4444) to the firewall rule.What is the benefit of setting timezone and enable ntp? What should I set timezone for an Amsterdam droplet? Should I set the timezone to my local timezone?
@Sudhir: As always: it depends what you are usung the droplet for…
Very basic examples why its good to have ntp managed:
sudo poweroffdoes not appear to “power off” the droplet enough for the DO console to register it so I can take a snapshot. What do I need to run from the command line to do so?Do it through the site. Log into your account, Select your droplet, Go to Power option, and select Power Off.
The console says “We recommend powering off your Droplet through the command line, as this action is the same as hard resetting the server and may cause data corruption.” under the Power Off option, so I’m not inclined to use that in production.
The documentation above, and elsewhere, states that it can be done from the command line, but the offered commands
poweroffandshutdown -hdo not appear to register with the console.Any ideas?
For anybody having the same problem: I was able to lower down the issue to only NY3 droplets with Private Networking enabled. Perhaps it affects other regions with other settings, but it is consistently broken for me with that setup.
The result of a Support Ticket was that they can’t replicate it so they won’t or can’t address it.
after
catch error
Do you use XFS? If so, use this:
instead of:
mark some addition:
df -hto find the block we used, and then useblkidto find the block type.xfs, we should allocate space like this:sudo dd if=/dev/zero of=/swapfile count=4096 bs=1MiB.Since the standard DigitalOcean image uses xfs, this document should be updated to reflect this and use the dd procedure rather than the fallocate procedure. I ran into this issue yesterday (since I by default do not read the comments anywhere…).
I got it working creating the swapfile following this guide: http://www.faqs.org/docs/linux_admin/x1762.html
Does NTP need to be allowed through with firewall-cmd?
As you are asking I assume you were reading some related tutorial on firewall config. Most likely ntp hasn´t been covered there, therefore the answer is ‘Yes’.
Hi Justin,
Very nice tutorial indeed, super useful!
I have a question though, regarding the creation of a swap file part. It is recommended here, but i’ve just read that other DigitalOcean article that discourages enabling swap on DO:
“Although swap is generally recommended for systems utilizing traditional spinning hard drives, using swap with SSDs can cause issues with hardware degradation over time. Due to this consideration, we do not recommend enabling swap on DigitalOcean or any other provider that utilizes SSD storage. Doing so can impact the reliability of the underlying hardware for you and your neighbors.”
So is it or is it not a good idea to create the swap file on DO?
Thanks for your answer
I installed firewalld and tried to start it, but this is what I get:
I just can’t see what I did wrong…
Why don’t you use systemd’s built-in NTP client instead of
ntpd? You’re already usingtimedatectlto set the timezone. It’s perfectly sufficient for network time synchronization, and 99% of people don’t need the full-blownntpd.Enable systemd’s NTP client like this:
I followed the tutorial and when I run the command ‘sudo timedatectl’ (after setting my timezone) I see an error:
Warning: The system is configured to read the RTC time in the local time zone. This mode can not be fully supported. It will create various problems with time zone changes and daylight saving time adjustments. The RTC time is never updated, it relies on external facilities to maintain it. If at all possible, use RTC in UTC by calling ‘timedatectl set-local-rtc 0’.
Is this something to be ignored, or is there some resolution to this warning?
Hi, when i tried to start firewall in first step, I got this
How can I fix it? Thanks
It looks like firewalld is no installed, however, it´s a good idea always running the full commands in any case
Therefore: What are the results of the following command?
If that returns the same system message, also run the following - just because I am curious.
In any case: I´d recommend checking https://www.digitalocean.com/community/tutorials/an-introduction-to-digitalocean-cloud-firewalls which might be a lot more convenient to use and maintain.
Hi, I just fixed it by installing through
I’m using CentOS 7.4. Thanks for your info
Very good article! Thx
CentOS 7 didn’t come with firewalld so…
easy peasy
After following the steps above, I find my “/etc/firewalld/zones/public.xml” now looks like:
<?xml version=“1.0” encoding=“utf-8”?> <zone> <short>Public</short> <description>For use in public areas. You do not trust the other computers on networks to not harm your computer. Only selected incoming connections are accepted.</description> <service name=“ssh”/> <service name=“dhcpv6-client”/> <service name=“http”/> <service name=“https”/> </zone>
But the dhcpv6-client was not added by me. Is it required? I use this server for a Wordpress website.
I followed the steps here for firewalld. Now my /etc/firewalld/zones/public.xml contains:
<?xml version=“1.0” encoding=“utf-8”?> <zone> <short>Public</short> <description>For use in public areas. You do not trust the other computers on networks to not harm your computer. Only selected incoming connections are accepted.</description> <service name=“ssh”/> <service name=“dhcpv6-client”/> <service name=“http”/> <service name=“https”/> </zone>
But “dhcpv6-client” was not added by me. Is this required / recommended for a regular Wordpress website?
firewalld is not installed by default on a new build of CentOS 7.5. You need to first do sudo yum install firewalld
I agree the following updates to the tutorial would be helpful:
I ran into these issues with a fresh default droplet install of Centos7 in July 2018
Thanks for the tutorial!
Great tutorial! When running the command
swapon /swapfileI had the error “swapfile has holes”. I created it as described in this guide:Then I ran the
swapon /swapfileagain. Hope this helps someone with the same issue.Thank you so much; this is very helpful!
In-case anyone else had issues with doing the swapfile thing on CentOS 7. I used this post to help guide me.
https://unix.stackexchange.com/questions/294600/i-cant-enable-swap-space-on-centos-7
An easier to type method (instead of sudo sh -c) is:
echo "/swapfile none swap sw 0 0" | sudo tee -a /etc/fstabhello, I want to know how can I put a static route, for example in a virtual-machine I make a route-eth0 .txt and add the following: ##remote source devise 10.26.4.0/24 via 192.168.2.201 dev eth0
but in the centos 7 digitalocean ,what is corrent way?
thank you