Inside a container registry: The mechanics of push and pull
By Nayan Das
- Published:
- 9 min read
If you have packaged your code and deployed it in a cloud or on-prem server, you must have come across containers. That’s how ubiquitous containers have become today. You must have written that infamous Dockerfile, ran Docker build command to create the image and pushed it to a registry. Conversely, you must also have pulled that image (often using shell script or k8s manifests) and ran your image as a container. But have you ever thought about how the image is actually pushed or pulled from a registry? We are going to talk just about that in this blog. From here on out, “clients” will be used to refer to the cli tools which can pull images – like Docker, nerdctl, ctr etc. – and “registry” to refer to the backend which serves these images. Also, we will take an example curlimages/curl:8.9.1 image stored in DigitalOcean Container Registry. We will use nerdctl as the client to get a better understanding of the image internals.
Prerequisites
Use a Linux VM (Optional)
I have used an Ubuntu (24.04) AMD64 DigitalOcean Droplet for this blog. You can create such a Droplet by following the instructions in our documentation. Using a Linux VM is optional and any platform such as Windows and MacOS can be used.
If you have a DigitalOcean Managed Kubernetes cluster, you can use a debug pod on any one of the nodes as:
> k debug node/<any node> -it --image=zmmdv/nerdctl:1.7.6 -- /bin/bash
> alias nerdctl="nerdctl -a /host/run/containerd/containerd.sock"
Also, you would have to use /host/var/lib/containerd in upcoming sections, if you choose this path, as the node’s root filesystem is mounted in /host path of the pod.
Install Docker/containerd and nerdctl
We can install Docker/containerd by performing the steps from Docker’s official install page. For our blog, we can get by with installing just containerd since we will be using nerdctl as the image client. We can do so by adding the Docker’s apt repository and do sudo apt-get install containerd.io.
Nerdctl can be installed from its official GitHub release page. I have used version 1.7.6. For this blog, the minimal nerdctl archive should be sufficient, but if you want to run containers, you will require the full nerdctl archive.
Using DigitalOcean Container Registry
You can create a container registry in DigitalOcean by following the steps or if you already have one you can follow the steps here to push/pull an image.
What an image consists of
It’s important to talk about what an image consists of before finding out how it’s transferred between the client and registry. First let’s try to pull an image using nerdctl:
> nerdctl image pull [registry.digitalocean.com/coolreg/curlimages/curl:8.9.1](http://registry.digitalocean.com/coolreg/curlimages/curl:8.9.1)

registry.digitalocean.com/coolreg/curlimages/curl:8.9.1:
index-sha256:4d3d08d1019a4b4507f18f5700f13dd7e106ed8214229b878417805094f21376:
done
manifest-sha256:d795b5d334f78dc8dbe55ba4332213a937b86ca193f4091e60963517f32340c4:done
config-sha256:5f48a11a4b51dd9f8eddd97396069a65d9c8bd1ba2dbc4dffe98954a5078ad51:   done
layer-sha256:4ca545ee6d5db5c1170386eeb39b2ffe3bd46e5d4a73a9acbebc805f19607eb3:    done
layer-sha256:c6a83fedfae6ed8a4f5f7cbb6a7b6f1c1ec3d86fea8cb9e5ba2e5e6673fde9f6:    done
layer-sha256:4007b551d63a39f6c3235cb5af643f633cf6e0bf5a161465b074eaf60ab43f44:    done
Container images consist of index, manifest, configs and layers as can be seen from the output of above command. These are described in the next sections in a top down manner.
Index
The index is the first component which is fetched from the registry when an image is pulled. It is a JSON file outlining the manifest digests for each platform in the format {os}/{arch} such as linux/amd64, linux/arm64, and linux/386 etc. For each of the platforms, the image contents would be different and this JSON file describes which manifest belongs to which platform. All the image contents are stored in /var/lib/containerd/io.containerd.content.v1.content/blobs path (for Docker it is different). We can examine the index JSON file as:
> cat /var/lib/containerd/io.containerd.content.v1.content/blobs/sha256/4d3d08d1019a4b4507f18f5700f13dd7e106ed8214229b878417805094f21376 | jq '.manifests'

[
  {
    "mediaType": "application/vnd.oci.image.manifest.v1+json",
    "digest": "sha256:d795b5d334f78dc8dbe55ba4332213a937b86ca193f4091e60963517f32340c4",
    "size": 860,
    "platform": {
      "architecture": "amd64",
      "os": "linux"
    }
  },
  {
    "mediaType": "application/vnd.oci.image.manifest.v1+json",
    "digest": "sha256:7d3aecfe1d39dda61edefcdcead38a4eaa7c292734df00e9381504c0d699cab1",
    "size": 860,
    "platform": {
      "architecture": "arm64",
      "os": "linux"
    }
  }
]
I am using a Droplet in DigitalOcean which is linux/amd64, so the manifest to pull next is sha256:d795b5d334f78dc8dbe55ba4332213a937b86ca193f4091e60963517f32340c4 which can be seen from the output of the nerdctl pull command before.
Having an index is optional and is applicable only for multi-platform images. It is not used while uploading images for only one platform. In that case, only manifest is used (discussed in next section).
Manifests
Manifests are also JSON files which specify the layers (described next) and config comprising the image. Our manifest contains below contents:
> cat /var/lib/containerd/io.containerd.content.v1.content/blobs/sha256/d795b5d334f78dc8dbe55ba4332213a937b86ca193f4091e60963517f32340c4 | jq .

{
  "schemaVersion": 2,
  "mediaType": "application/vnd.oci.image.manifest.v1+json",
  "config": {
    "mediaType": "application/vnd.oci.image.config.v1+json",
    "digest": "sha256:5f48a11a4b51dd9f8eddd97396069a65d9c8bd1ba2dbc4dffe98954a5078ad51",
    "size": 1486
  },
  "layers": [
    {
      "mediaType": "application/vnd.oci.image.layer.v1.tar+gzip",
      "digest": "sha256:c6a83fedfae6ed8a4f5f7cbb6a7b6f1c1ec3d86fea8cb9e5ba2e5e6673fde9f6",
      "size": 3622892
    },
    {
      "mediaType": "application/vnd.oci.image.layer.v1.tar+gzip",
      "digest": "sha256:4007b551d63a39f6c3235cb5af643f633cf6e0bf5a161465b074eaf60ab43f44",
      "size": 5758798
    },
    {
      "mediaType": "application/vnd.oci.image.layer.v1.tar+gzip",
      "digest": "sha256:4ca545ee6d5db5c1170386eeb39b2ffe3bd46e5d4a73a9acbebc805f19607eb3",
      "size": 42
    }
  ]
}
Config
The config is a JSON file describing how to run the image when we use commands like nerdctl run (or docker run). The CMD, ENTRYPOINT, ENV, USER etc directives in a Dockerfile makes its way to this config JSON file:
>cat /var/lib/containerd/io.containerd.content.v1.content/blobs/sha256/5f48a11a4b51dd9f8eddd97396069a65d9c8bd1ba2dbc4dffe98954a5078ad51 | jq '{config: .config, rootfs: .rootfs}'

{
  "config": {
    "User": "curl_user",
    "Env": [
      "PATH=/usr/local/sbin:/usr/local/bin:/usr/sbin:/usr/bin:/sbin:/bin",
      "CURL_CA_BUNDLE=/cacert.pem"
    ],
    "Entrypoint": [
      "/entrypoint.sh"
    ],
    "Cmd": [
      "curl"
    ],
    "WorkingDir": "/home/curl_user",
    "Labels": {
      ...
    },
    "OnBuild": null
  },
  "rootfs": {
    "type": "layers",
    "diff_ids": [
     "sha256:78561cef0761903dd2f7d09856150a6d4fb48967a8f113f3e33d79effbf59a07",
     "sha256:b138805d27824c78d3d19b77cf24caf06839c64f54f70439f84c96160fb4d928",
     "sha256:5f70bf18a086007016e948b04aed3b82103a36bea41755b6cddfaf10ace3c6ef"
    ]
  }
}
Here, the layer digests are also somewhat different from what we saw in our manifest before and what the nerdctl client actually pulled. These are actually the uncompressed digest of the layers.
Layers
A layer is a filesystem (or a directory structure in simple terms) containing the binaries and the required dependencies of the image such as system libs etc. in a compressed format (usually tar,gzip). An image might have one or many such layers. All of these layers are combined by the container runtime to create the final filesystem for the runnable container. The layers are referenced by their digests.
Our example image curlimages/curl:8.9.1 contains 3 layers: c6a83fedfae6, 4007b551d63a and 4ca545ee6d5d. We said these layers are actually compressed filesystems. Let’s find out:
> rm -rf test && mkdir test
> tar zxf /var/lib/containerd/io.containerd.content.v1.content/blobs/sha256/c6a83fedfae6ed8a4f5f7cbb6a7b6f1c1ec3d86fea8cb9e5ba2e5e6673fde9f6 -C ./test
> ls ./test
bin  dev  etc  home  lib  media  mnt  opt  proc  root  run  sbin  srv  sys  tmp  usr  var
We can see that the layer c6a83fedfae6 is a compressed generic filesystem of a linux distro (alpine in our case).
Bonus Content:
Layers are the compressed digests. To get the uncompressed digests we can use ctr content ls and check the containerd.io/uncompressed label for the layer:
> ctr content ls | awk '$1 ~ /c6a83fedfae6|4007b551d63a|4ca545ee6d5d/ { print }' | sed "s/^.*containerd.io\/uncompressed=//"

sha256:b138805d27824c78d3d19b77cf24caf06839c64f54f70439f84c96160fb4d928
sha256:5f70bf18a086007016e948b04aed3b82103a36bea41755b6cddfaf10ace3c6ef
sha256:78561cef0761903dd2f7d09856150a6d4fb48967a8f113f3e33d79effbf59a07
This matches with that of rootfs entry in the config JSON file.
Pulling an image
Pulling an image consists of fetching the tag index digest, index itself, platform manifest, config and the layers in this order. But in the case of a private registry, where does the client get the authorization information (in other words, a token) from? There is a specific sequence to get each of the components of an image mentioned before, and it goes like this, when taking the example of fetching index digest for a tag:
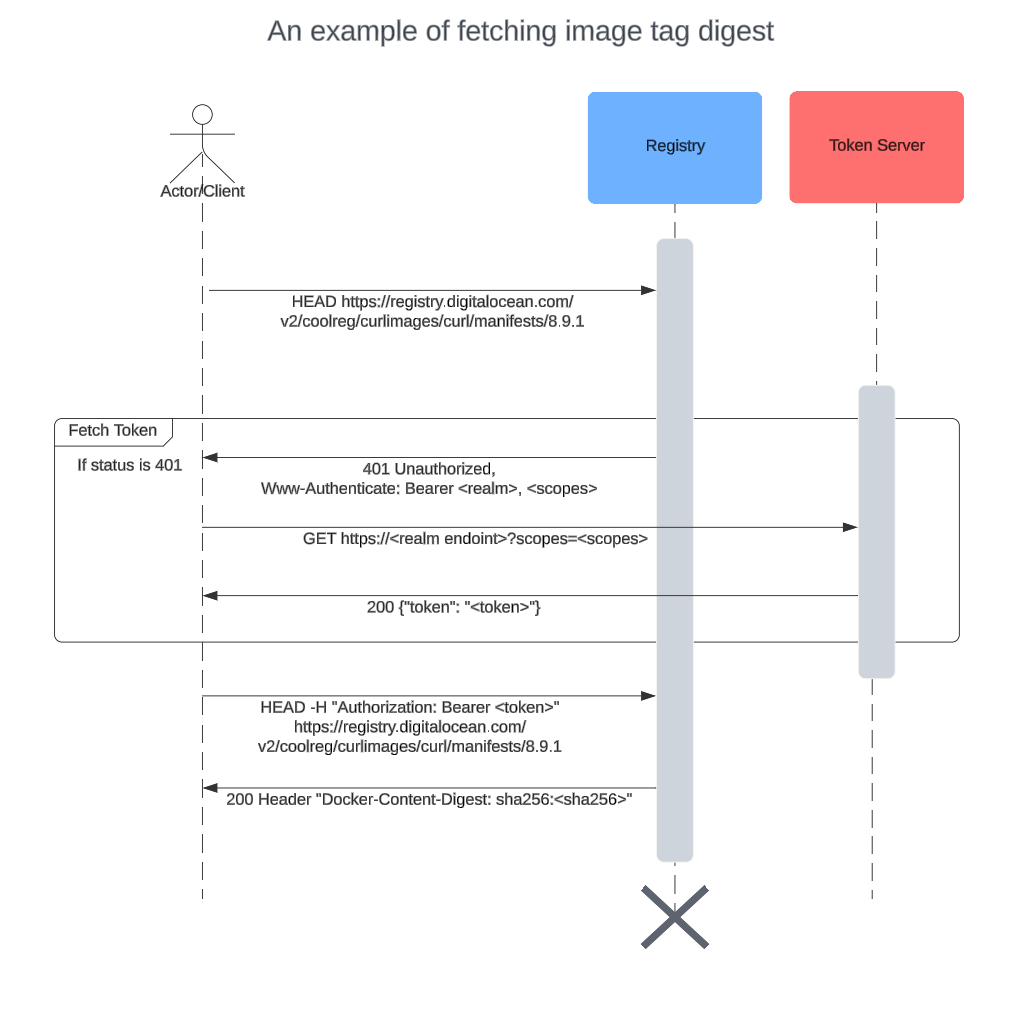
- Client tries to get the manifest digest without any authorization token by doing a HEAD request. The url is something like:
https://registry.digitalocean.com/v2/coolreg/curlimages/curl/manifests/8.9.1
- The registry responds 401 Unauthorized with a response header
www-authenticatewhich contains details about how the client can get the authorization token. This header is of format:<scheme> realm="<realm>", service=”<service>”, scope=”<repository scopes>”. The realm field tells which token server to reach out to further get the token and scheme field specifies what is the token type.
- Client uses the auth info stored during
nerdctl login(ordocker login) to authenticate (basic) to the token server endpoint obtained from step 1.a with the scopes and service.
-
If the basic auth info is valid, the token server returns a token.
-
If the basic auth info is invalid, a 403 Forbidden is returned
- Client tries to call the same url as in step 1 using the token obtained from 2.a and this time it fetches the index digest for the tag.
These steps are repeated for fetching each of the tags, manifests and individual layers of the image. The client can reuse the token for the subsequent HTTPS fetch calls, thus reducing calls to the token server. We can use --debug flag in nerdctl to check those HTTPS calls in details:
> nerdctl image pull --debug --quiet [registry.digitalocean.com/coolreg/curlimages/curl:8.9.1](http://registry.digitalocean.com/coolreg/curlimages/curl:8.9.1)
--quiet is to suppress the progress bars.
Pushing an image
Pushing an image is uploading the image components in the reverse order as that in image pull. That is, first all the layers and config (JSON) are pushed. Finally, the manifest and index (if present) are pushed at the end. The authentication mechanism remains the same as in pulling images. The part where it differs is in the layer upload process. The client might choose to do either of below:
-
Monolithic upload
-
Chunked upload
Let’s dig into them.
Monolithic upload
As the name suggests, a monolithic upload tries to upload the whole layer in one HTTPS call. But there are still a couple of other HTTPS calls to complete this upload.
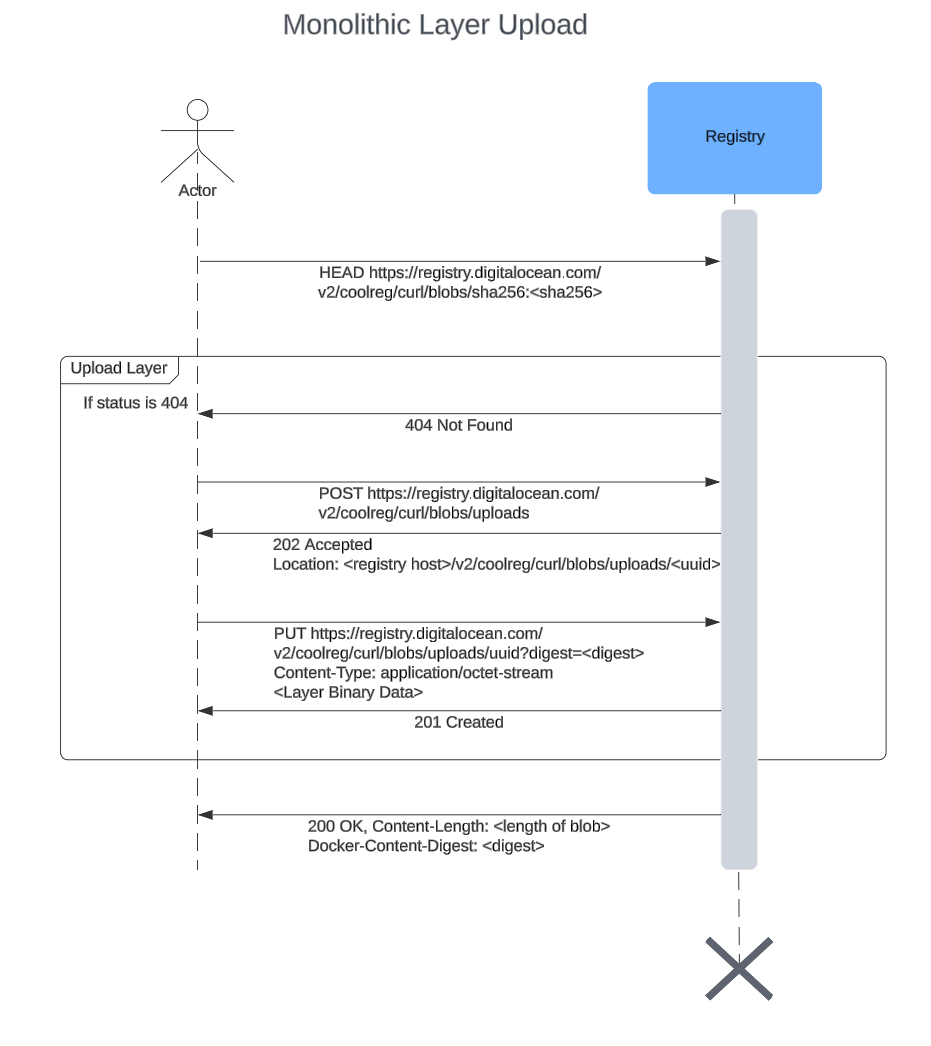
-
Client first checks if the layer exists by doing a HEAD request for the layer.
-
If the layer is not present i.e. a 404 Not found is received in step 1,
- Start the upload process by doing a POST request to
/v2/ / /blobs/uploads. This will return a Location header which will contain the url to which the actual layer should be uploaded. - Upload the layer to the location url returned in step 2.a. This is a PUT request with Content-Type header application/octet-stream with the layer binary data as body. Also, the digest of the layer should be sent as a digest query in the url. Upon successful upload, a 201 response will be returned. This means the registry server has the uploaded layer now.
- If the layer is present, do nothing.
In this way, after all the layers have been uploaded, the manifest is uploaded referencing the uploaded layers in its JSON body and similarly the index as well.
Chunked upload
This kind of upload sends the layers by breaking it down into smaller parts. Each of the parts are sent in separate PATCH http calls. Also, the start and end of the upload process is similar to the monolithic upload, as we will see next.
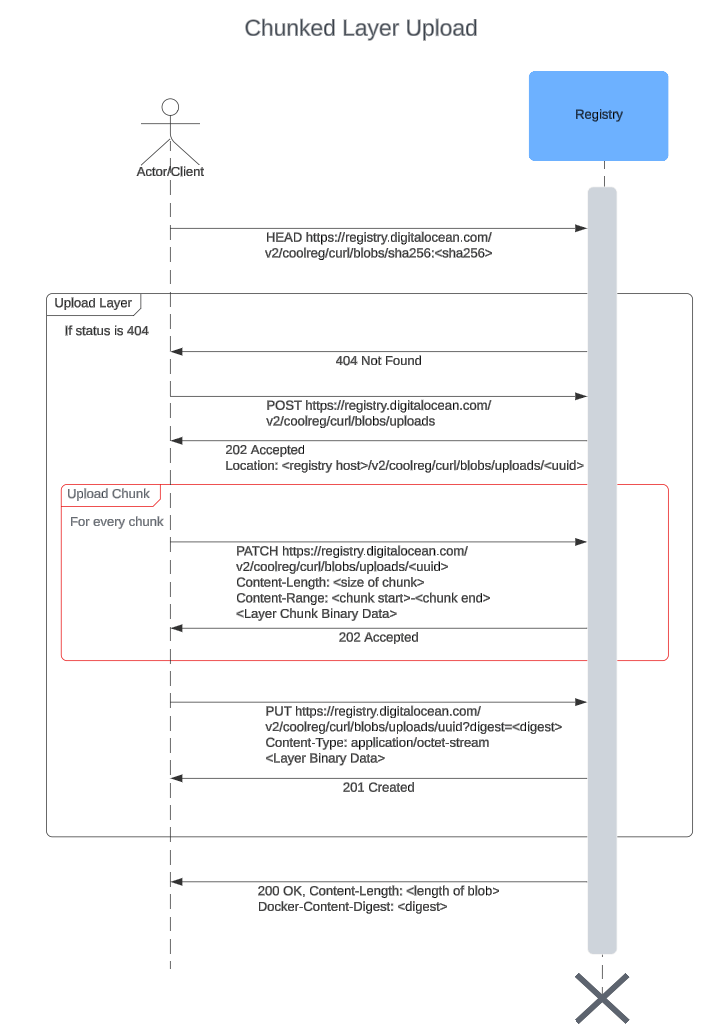
As we can see in this sequence diagram, the only difference from the monolithic upload is the chunk uploads (outlined in red). The upload starts with a POST request which returns an upload UUID (same as monolithic). Then, for each chunk:
- Upload chunk with a PATCH request to
/v2/ / /blobs/uploads/ . The header Content-Length specifies the size of the chunk and Content-Range dictates which byte range of the whole layer this chunk belongs to. A 201 is returned after successful upload. The chunks must be sent in the correct order.
After the chunks are uploaded, a PUT request is made to mark the end of chunked upload.
Conclusion
Containers have leveled up the “Build once and run everywhere” paradigm. They are now used not only in production, but also in dev environments to facilitate compatibility across those environments. Although containers can be run everywhere, there are many intricate mechanisms which help them run everywhere such as cgroups, namespaces etc. We have not covered those but we have seen in detail the components which the images (which later become containers when run) are made of and how they are related to each other. We have gone through how each of those components are pulled/pushed from the registry and the authentication mechanism. We have also seen how container clients can push images using a monolithic and chunked approach.
About the author
Related Articles
Under the Hood: Serving Kimi K3
Jonathan Dieu
- July 30, 2026
- 12 min read
Outperforming Fable 5 at half the price: meet model synthesis, a new server-side tool on DigitalOcean Inference Engine
- July 23, 2026
- 8 min read
Upcoming GPU Pricing Updates
- July 21, 2026
- 2 min read