
Status: Deprecated
This article covers a version of Ubuntu that is no longer supported. If you are currently operate a server running Ubuntu 12.04, we highly recommend upgrading or migrating to a supported version of Ubuntu:
- Upgrade to Ubuntu 14.04.
- Upgrade from Ubuntu 14.04 to Ubuntu 16.04
- Migrate the server data to a supported version
Reason: Ubuntu 12.04 reached end of life (EOL) on April 28, 2017 and no longer receives security patches or updates. This guide is no longer maintained.
See Instead: This guide might still be useful as a reference, but may not work on other Ubuntu releases. If available, we strongly recommend using a guide written for the version of Ubuntu you are using. You can use the search functionality at the top of the page to find a more recent version.
Introduction
Syncing folders and files between computers and devices can be done in many different ways. One method for automatically syncing content is BitTorrent Sync. BitTorrent Sync is a method of synchronizing content based on the popular BitTorrent protocol for file sharing.
Unlike traditional BitTorrent, files shared using BitTorrent Sync are encrypted and access is restricted based on a shared secret that is auto-generated. While BitTorrent proper is often used to distribute files in a public way, BitTorrent Sync is often used as a private method to sync and share files between devices due to its added security measures.
In this guide, we will discuss how to install and configure BitTorrent Sync on two Ubuntu 12.04 VPS instances.
Install BitTorrent Sync
To begin, we will need to install BitTorrent Sync on both of our Ubuntu 12.04 instances. If you would like to install BitTorrent Sync on your local computer to allow you to sync with your server, you can find the binary packages here.
BitTorrent Sync is relatively easy to install on Ubuntu 12.04, but it is not included in the default repositories. We can use a PPA (personal package archive) so that we can have access to a maintained BitTorrent Sync repository and manage it with our normal apt tools.
Ubuntu 12.04 includes the PPA tools in a package called python-software-properties, which we can download through apt:
sudo apt-get update
sudo apt-get install python-software-properties
After this is installed, we can add the PPA that contains updated Ubuntu packages:
sudo add-apt-repository ppa:tuxpoldo/btsync
Press “enter” to add the new PPA.
Once the new repository is added, we should update apt to build a package index for the new source, and then install the BitTorrent Sync software:
sudo apt-get update
sudo apt-get install btsync
Initial Configuration During Installation
During the installation phase, you will be asked a number of questions that can assist you in configuring the service. The first question asks if you’d like to do this configuration to define a default BitTorrent Sync instance. Select “Yes”.
We want operate BitTorrent Sync with its own user and group for security purposes. Select btsync for the next question.
The next question will be about the port you wish to use to communicate between instances. You can leave the selection at 0 to have btsync choose a random port each time it starts. If you are configuring a firewall for your server (which is highly recommended), you probably want to define a specific port.
The next question asks about configuring a UPNP request, which we don’t need. Select “No”.
Next, define your download and upload limits. If you do not wish to limit either of these, leave the default of 0 to allow maximum throughput.
Next, you’ll be asked which interface you wish to configure the service for. If you leave it at 0.0.0.0, the BitTorrent Sync service will use any available interface. If you wish to restrict it to one network, such as the DigitalOcean private network, you can specify the appropriate IP address here. Note that you will not be able to sync to your home computer using the private network.
Next, select a port to access the web interface. The default value is 8888, but you can change that to any open port.
Finally, select a username and password to secure the web interface.
The installation will complete and your service will be started.
If you need to change the configuration at some point in the future, you can run through the configuration menus at any time by issuing:
sudo dpkg-reconfigure btsync
The configuration directory for the service is:
/etc/btsync
Do not edit the config file generated by the menu system by hand. You can, however, copy the configuration to use as a template for another configuration if you’d like to adjust details not covered in the menu configuration.
How To Configure Shared Folders
In order to sync folders with BitTorrent Sync, the btsync user or group needs write access to the folders. There are a few different ways to achieve this.
First, let’s create the folder:
sudo mkdir /shared
We need to complete these steps on both of your VPS instances that will be syncing.
Giving the btsync Process Full Ownership
One way to give the btsync user access is to simply give ownership of the folder to the btsync user:
sudo chown btsync:btsync /shared
This will allow the BitTorrent Sync service to correctly serve the contents of this directory, but we are not able to write to this as a normal user. This may be what you want, but it usually is not.
Give Your Normal User Ownership and the btsync Process Group Ownership
If you have only one normal user on the system, you can give that user ownership of the folder and give the btsync group ownership of the folder:
<pre> sudo chown <span class=“highlight”>your_user</span>:btsync /shared </pre>
You would then have to give the group write permissions:
sudo chmod 775 /shared
This will allow the btsync service to access the folder. However, any files created inside the directory will be owned by your user and group.
For instance, if we add a file to this folder called test, it would be completely owned by our user:
<pre> cd /shared touch test ls -l </pre> <pre> -rw-rw-r-- 1 <span class=“highlight”>your_user your_user</span> 6 Jan 16 14:36 test </pre>
This will cause problems for the syncing, because the btsync process cannot modify the file. We want to give it the same group permissions as the folder it is in so that the process has write access.
We can do this by setting the SGID bit on the directory. This will set the group on all new files created inside of the directory to the group of the directory itself. This will allow proper write access to modify things:
sudo chmod g+s /shared
Now, when we create a file, it will be given the permissions of the directory:
<pre> cd /shared touch test2 ls -l </pre> <pre> -rw-rw-r-- 1 your_user your_user 6 Jan 16 14:36 test -rw-rw-r-- 1 <span class=“highlight”>your_user btsync</span> 0 Jan 16 14:41 test2 </pre>
This goes a long way towards getting the appropriate functionality, but it isn’t quite right yet.
Delete the test files we created before continuing:
rm /shared/test*
Add Your User to the btsync Group and Give the Root User Ownership
The method above works somewhat, but files that are transferred with BitTorrent Sync are owned by the btsync user and group. This means that currently, any files synced by the service will not be editable by us.
We can change this by adding our user to the btsync group. This will allow us to modify files that are writeable by the btsync group, which is what we want.
Add any username that you wish to be able to use btsync to the btsync group:
<pre> sudo usermod -a -G btsync <span class=“highlight”>your_user</span> </pre>
This will append the btsync group to your user’s group definition. This will allow you to edit files created in the shared folder by the btsync process.
However, the directory is still owned by our user, which is not a good way of going about things if we have multiple users on the system. We should transfer ownership to the root user to avoid regular users changing folder settings. We should also allow group write permissions so that anyone in the btsync group can add content:
sudo chown root:btsync /shared
sudo chmod g+w /shared
You may have to log out and log back in for these changes to take affect.
In the end, the process for creating a shared folder that works well for BitTorrent Sync goes something like this:
<pre> sudo mkdir <span class=“highlight”>shared_folder</span> sudo chown root:btsync <span class=“highlight”>shared_folder</span> sudo chmod 2775 <span class=“highlight”>shared_folder</span> sudo usermod -a -G btsync <span class=“highlight”>your_user</span> </pre>
The first “2” in the chmod command sets the SGID bit in the same way that the “g+s” did previously. This is just a more succinct way of combining these commands.
Accessing the BitTorrent Sync Web Interface
Now that we have a folder that is configured appropriately for BitTorrent Sync sharing, we can access the web interface to add our folder to begin syncing.
Again, we will have to do this on each of the servers that we wish to configure syncing on.
Access the web interface by going to your droplet’s IP address, followed by the port you configured during install. By default, this is 8888:
<pre> <span class=“highlight”>your_ip_or_domain</span>:8888 </pre>
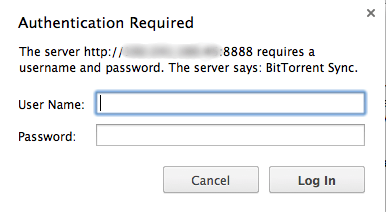
You will have to sign in using the credentials you configured during installation. The default username is admin if you didn’t change it.
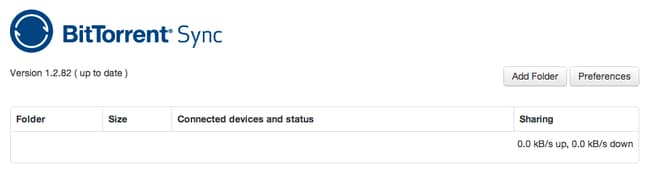
You will be presented with a rather simple interface to start:
Adding the Shared Folder to the First Droplet
Now that we are in our web interface, we can add our shared folder so that the btsync process can register it.
On your first machine, click on the “Add Folder” button in the upper-right corner. This will bring up a box that allows you to select a directory to share:
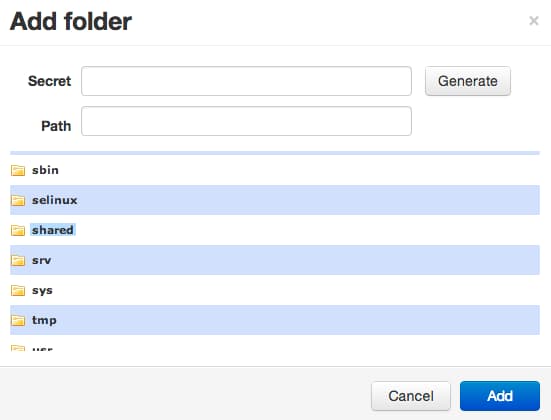
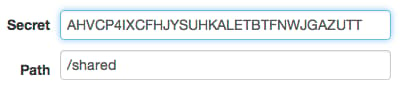
Find the folder that you configured for sharing. In our case, this is the /shared folder. Once you have a folder selected, you should click on the “Generate” button to generate a secret for the folder.
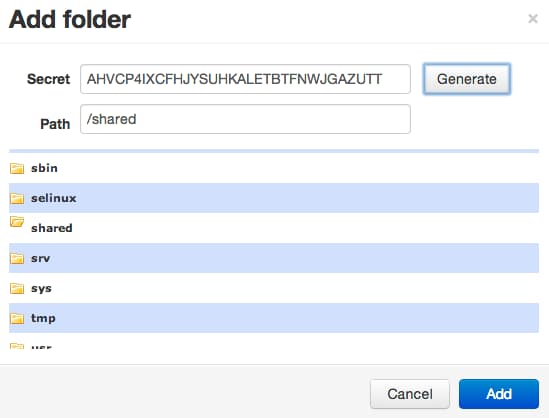
The secret that is generated allows you to sync this folder with another instance of BitTorrent Sync. This unique value is basically a password to allow the two services to connect to each other.
Click the “Add” button when you have completed these steps. This will add our folder to the interface and give you some buttons on the side to manage this folder.
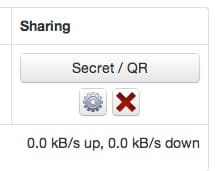
Right now, we are only interested in the “Secret/QR” button. Click this to bring up a box that will allow you to choose how you want to share this folder.
We can grant access to the folder with read/write permissions through “Full access”. If we only want to sync one way, like a backup, we can allow only read access. The secrets that are provided for each kind of access differ.
Copy the secret for the type of access you want. We will be using full access in this tutorial.
Adding the Shared Folder and Secret to the Second Droplet
Now that we have our secret from our first VPS, we can add the shared folder that we created on our second VPS and use the secret to sync our files.
First, you must log into the web interface just like you did with the first server:
<pre> <span class=“highlight”>second_ip_or_domain</span>:8888 </pre>
Once you are to the interface for the second server, click the “Add Folder” button again.
Add the locally created shared folder.
This time, instead of clicking the “Generate” button, we will paste the secret from the other instance into the “Secret” box:
Click the “Add” button to create the share.
After a moment, in both web interfaces, you should see some new information in the “Connected devices and status” section:
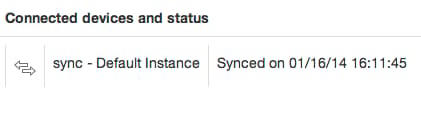
This means that our two instances of BitTorrent Sync have found each other! The icon in front means that we have given full access and files will be synced in both directions.
Test Syncing
Now that we have configured syncing, let’s test to see if it works.
On one of your servers (it doesn’t matter which one if you configured full access), we will add some files to our shared folder.
As a user that has been given access to the btsync group, create some files in the shared directory:
cd /shared
touch file {1..10}
This will create 10 files in the shared directory. We can check that these have been given the appropriate permissions by typing:
ls -l
-rw-rw-r-- 1 your_user btsync 0 Jan 16 16:16 file1
-rw-rw-r-- 1 your_user btsync 0 Jan 16 16:16 file10
-rw-rw-r-- 1 your_user btsync 0 Jan 16 16:16 file2
-rw-rw-r-- 1 your_user btsync 0 Jan 16 16:16 file3
-rw-rw-r-- 1 your_user btsync 0 Jan 16 16:16 file4
. . .
As you can see, the files are owned by your user, but the group owner is btsync. This is exactly what we want.
If we check our other server after a few seconds, we should see our files in our shared directory!
cd /shared
ls -l
-rw-r--r-- 1 btsync btsync 0 Jan 16 16:16 file1
-rw-r--r-- 1 btsync btsync 0 Jan 16 16:16 file10
-rw-r--r-- 1 btsync btsync 0 Jan 16 16:16 file2
-rw-r--r-- 1 btsync btsync 0 Jan 16 16:16 file3
-rw-r--r-- 1 btsync btsync 0 Jan 16 16:16 file4
As you can see, the files are given to the btuser and group. This is because the service can’t be sure that the original username exists on the second system.
The last step is to get the btsync daemon to automatically set the file permissions of the files that it syncs to be writeable by the btsync group. This is necessary if you are providing full access in order for your user to edit the files that it has synced.
We can do this in by reconfiguring the btsync daemon. This will open up a lot more options than we were given when we originally went through the configuration. Begin to reconfigure on both of your syncing machines by typing:
<pre> sudo dpkg-reconfigure btsync </pre>
You will run through the configuration menu, this time with many more questions. For the most part, it should automatically select either your previous selection, or the default choice for any previously unset parameters. One question that you’ll have to remember not to skip is the password prompt.
The option that you are looking is the default umask for files synced by the daemon.
We can set the appropriate umask to create files that are writeable by both the owner and the group (which our user is a part of), by typing this:
<pre> 002 </pre>
Finish up the configuration and the daemon should restart automatically with the new settings. Once you have completed this task on both servers, you should be able to create a new file on one server, and it will be given correct writeable permissions on the second host:
<pre> touch /shared/write_test </pre>
On the second host once the file syncs, you’ll see somethings like this:
<pre> -rw-rw-r-- 1 btsync btsync 0 Jan 30 10:44 write_test </pre>
In the web interface, you will not see that your files have been synced, because the files don’t contain any actual data. If we add some content to our files, the interface will update to show how many files we have synced:
for item in /shared/file{1..10}; do echo "some content" > $item; done

Conclusion
Now that you have your servers configured, you can easily transfer files between them. You can also configure multiple folders to automatically sync. This can provide some interesting options for dealing with configuration files and such.
The application is fairly flexible in how to sync between multiple computers. You can create one-time secrets to ensure that no one shares access to your directories, you can share only with specific hosts, and sync between your mobile device. BitTorrent Sync provides an archive version control system through the .SyncArchive file in directories and can rate limit to ensure that you have bandwidth available for other applications.
<div class=“author”>By Justin Ellingwood</div>
Thanks for learning with the DigitalOcean Community. Check out our offerings for compute, storage, networking, and managed databases.
About the author
Former Senior Technical Writer at DigitalOcean, specializing in DevOps topics across multiple Linux distributions, including Ubuntu 18.04, 20.04, 22.04, as well as Debian 10 and 11.
Still looking for an answer?
This textbox defaults to using Markdown to format your answer.
You can type !ref in this text area to quickly search our full set of tutorials, documentation & marketplace offerings and insert the link!
Very nice. I would recommend using putty to forward a local port to the server’s web control port so you can securely access the web without anyone between you and the server getting your login credentials.
@Morthawt: Great idea! We have an article on doing that here: <a href=“https://www.digitalocean.com/community/articles/how-to-set-up-ssh-tunneling-on-a-vps”>https://www.digitalocean.com/community/articles/how-to-set-up-ssh-tunneling-on-a-vps</a>.
Awesome post! We’d love to feature this on BitTorrent’s company blog. If you’re interested, please shoot me an email at kathie at bittorrent.com
Great post.
I do have a question about configuration though. I’m running Ubuntu 13.10, and I’ve installed btsync (not desktop) on two machines for testing purposes. File sync does occur, and as you indicate, btsync becomes owner/group for sync’d files on the server (default instance) and clients (and vice-versa). However, sync’d files are now read-only. Your graphic and text note this when you say “As you can see, the files are given to the btuser and group. This is because the service can’t be sure that the original username exists on the second system. This is not a problem and we can edit these files easily.” What exactly do you mean by this? My interpretation is that I SHOULD be able to edit (write) these files, but I’m seeing R-- for permissions (as your graphic points out), which would make editing impossible.
What am I missing?
Thanks much.
@richbl: See the <strong>Add Your User to the btsync Group and Give the Root User Ownership</strong>section.
richbl: Thanks for the heads up! I definitely forgot the step to configure the default umask of the daemon.
I’ve added the information to reconfigure the daemon with the correct umask settings which will allow the daemon to give the “btsync” group write permissions to any file that is synced.
@Kamal: Yeah, did that initially (I followed the full procedure), still having the issue described. In the tutorial, the permission flags clearly show read-only for group. So I’m confused as to how it’s possible to edit such a file unless you’re either owner or root. Maybe the procedure implies that you’re root.
@jellingwood: Just crossed posts with Kamal. I’ll take a look at the umask configuration. That might explain what I’m seeing. Thanks.
@jellingwood: The additional section on making a change to the btsync daemon did the trick. I didn’t realize that the dconf reconfiguration had additional settings lurking about.
Thanks again.
 This work is licensed under a Creative Commons Attribution-NonCommercial- ShareAlike 4.0 International License.
Become a contributor for community
Get paid to write technical tutorials and select a tech-focused charity to receive a matching donation.

DigitalOcean Documentation
Full documentation for every DigitalOcean product.

Resources for startups and AI-native businesses
The Wave has everything you need to know about building a business, from raising funding to marketing your product.
The developer cloud
Scale up as you grow — whether you're running one virtual machine or ten thousand.

Start building today
From GPU-powered inference and Kubernetes to managed databases and storage, get everything you need to build, scale, and deploy intelligent applications.
