
Introduction
In this tutorial, we will cover how to use Varnish Cache 4.0 to improve the performance of your existing web server. We will also show you a way to add HTTPS support to Varnish, with Nginx performing the SSL termination. We will assume that you already have a web application server set up, and we will use a generic LAMP (Linux, Apache, MySQL, PHP) server as our starting point.
Varnish Cache is a caching HTTP reverse proxy, or HTTP accelerator, which reduces the time it takes to serve content to a user. The main technique it uses is caching responses from a web or application server in memory, so future requests for the same content can be served without having to retrieve it from the web server. Performance can be improved greatly in a variety of environments, and it is especially useful when you have content-heavy dynamic web applications. Varnish was built with caching as its primary feature but it also has other uses, such as reverse proxy load balancing.
In many cases, Varnish works well with its defaults but keep in mind that it must be tuned to improve performance with certain applications, especially ones that use cookies. In depth tuning of Varnish is outside of the scope of this tutorial.
Prerequisites
In this tutorial, we assume that you already have a web application server that is listening on HTTP (port 80) on its private IP address. If you do not already have a web server set up, use the following link to set up your own LAMP stack: How To Install Linux, Apache, MySQL, PHP (LAMP) stack on Ubuntu 14.04. We will refer to this server as LAMP_VPS.

You will need to create a new Ubuntu 14.04 VPS which will be used for your Varnish installation. Create a non-root user with sudo permissions by completing steps 1-4 in the initial server setup for Ubuntu 14.04 guide. We will refer to this server as Varnish_VPS.
Keep in mind that the Varnish server will be receiving user requests and should be adequately sized for the amount of traffic you expect to receive.
Our Goal

Our goal is to set up Varnish Cache in front of our web application server, so requests can be served quickly and efficiently. After the caching is set up, we will show you how to add HTTPS support to Varnish, by utlizing Nginx to handle incoming SSL requests. After your setup is complete, both your HTTP and HTTPS traffic will see the performance benefits of caching.
Now that you have the prerequisites set up, and you know what you are trying to build, let’s get started!
Install Varnish
The recommended way to get the latest release of Varnish 4.0 is to install the package avaiable through the official repository.
Ubuntu 14.04 comes with apt-transport-https, but just run the following command on Varnish_VPS to be sure:
sudo apt-get install apt-transport-https
Now add the Varnish GPG key to apt:
curl https://repo.varnish-cache.org/ubuntu/GPG-key.txt | sudo apt-key add -
Then add the Varnish 4.0 repository to your list of apt sources:
sudo sh -c 'echo "deb https://repo.varnish-cache.org/ubuntu/ trusty varnish-4.0" >> /etc/apt/sources.list.d/varnish-cache.list'
Finally, update apt-get and install Varnish with the following commands:
sudo apt-get update
sudo apt-get install varnish
By default, Varnish is configured to listen on port 6081 and expects your web server to be on the same server and listening on port 8080. Open a browser and go to port 6081 of your server (replace the highlighted part with your public IP address or domain):
http://varnish_VPS_public_IP:6081
Because we installed Varnish on a new VPS, visiting port 6081 on your server’s public IP address or domain name will return the following error page:

This indicates that Varnish is installed and running, but it can’t find the web server that it is supposed to be caching. Let’s configure it to use our web server as a backend now.
Configure Varnish
First, we will configure Varnish to use our LAMP_VPS as a backend.
The Varnish configuration file is located at /etc/varnish/default.vcl. Let’s edit it now:
sudo vi /etc/varnish/default.vcl
Find the following lines:
backend default {
    .host = "127.0.0.1";
    .port = "8080";
}
And change the values of host and port match your LAMP server private IP address and listening port, respectively. Note that we are assuming that your web application is listening on its private IP address and port 80. If this is not the case, modify the configuration to match your needs:
backend default {
    .host = "LAMP_VPS_private_IP";
    .port = "80";
}
Varnish has a feature called “grace mode” that, when enabled, instructs Varnish to serve a cached copy of requested pages if your web server backend goes down and becomes unavailable. Let’s enable that now. Find the following sub vcl_backend_response block, and add the following highlighted lines to it:
sub vcl_backend_response {
    set beresp.ttl = 10s;
    set beresp.grace = 1h;
}
This sets the grace period of cached pages to one hour, meaning Varnish will continue to serve cached pages for up to an hour if it can’t reach your web server to look for a fresh copy. This can be handy if your application server goes down and you prefer that stale content is served to users instead of an error page (like the 503 error that we’ve seen previously), while you bring your web server back up.
Save and exit the default.vcl file.
We will want to set Varnish to listen on the default HTTP port (80), so your users will be able to access your site without adding an unusual port number to your URL. This can be set in the /etc/default/varnish file. Let’s edit it now:
sudo vi /etc/default/varnish
You will see a lot of lines, but most of them are commented out. Find the following DAEMON_OPTS line (it should be uncommented already):
DAEMON_OPTS="-a :6081 \
The -a option is used to assign the address and port that Varnish will listen for requests on. Let’s change it to listen to the default HTTP port, port 80. After your modification, it should look like this:
DAEMON_OPTS="-a :80 \
Save and exit.
Now restart Varnish to put the changes into effect:
sudo service varnish restart
Now test it out with a web browser, by visiting your Varnish server by its public IP address, on port 80 (HTTP) this time:
http://varnish_VPS_public_IP
You should see the same thing that is served from your LAMP_VPS. In our case, it’s just a plain Apache2 Ubuntu page:

At this point, Varnish is caching our application server–hopefully will you see performance benefits in decreased response time. If you had a domain name pointing to your existing application server, you may change its DNS entry to point to your Varnish_VPS_public_IP.
Now that we have the basic caching set up, let’s add SSL support with Nginx!
SSL Support with Nginx (Optional)
Varnish does not support SSL termination natively, so we will install Nginx for the sole purpose of handling HTTPS traffic. We will cover the steps to install and configure Nginx with a self-signed SSL certificate, and reverse proxy traffic from an HTTPS connection to Varnish over HTTP.
If you would like a more detailed explanation of setting up a self-signed SSL certificate with Nginx, refer to this link: SSL with Nginx for Ubuntu. If you want to try out a certificate from StartSSL, here is a tutorial that covers that.
Let’s install Nginx.
Install Nginx
On Varnish_VPS, let’s install Nginx with the following apt command:
sudo apt-get install nginx
After the installation is complete, you will notice that Nginx is not running. This is because it is configured to listen on port 80 by default, but Varnish is already using that port. This is fine because we want to listen on the default HTTPS port, port 443.
Let’s generate the SSL certificate that we will use.
Generate Self-signed SSL Certificate
On Varnish_VPS, create a directory where SSL certificate can be placed:
sudo mkdir /etc/nginx/ssl
Generate a self-signed, 2048-bit SSL key and certicate pair:
sudo openssl req -x509 -nodes -days 365 -newkey rsa:2048 -keyout /etc/nginx/ssl/nginx.key -out /etc/nginx/ssl/nginx.crt
Make sure that you set common name to match your domain name. This particular certificate will expire in a year.
Now that we have our certificate in place, let’s configure Nginx to use it.
Configure Nginx
Open the default Nginx server block configuration for editing:
sudo vi /etc/nginx/sites-enabled/default
Delete everything in the file and replace it with the following (and change the server_name to match your domain name):
server {
        listen 443 ssl;

        server_name example.com;
        ssl_certificate /etc/nginx/ssl/nginx.crt;
        ssl_certificate_key /etc/nginx/ssl/nginx.key;

        location / {
            proxy_pass http://127.0.0.1:80;
            proxy_set_header X-Real-IP  $remote_addr;
            proxy_set_header X-Forwarded-For $proxy_add_x_forwarded_for;
            proxy_set_header X-Forwarded-Proto https;
            proxy_set_header X-Forwarded-Port 443;
            proxy_set_header Host $host;
        }
}
Save and exit. The above configuration has a few important lines that we will explain in more detail:
- ssl_certificate: specifies SSL certificate location
- ssl_certificate_key: specifies SSL key location
- listen 443 ssl: configures Nginx to listen on port 443
- server_name: specifies your server name, and should match the common name of your SSL certificate
- proxy_pass http://127.0.0.1:80;: redirects traffic to Varnish (which is running on port 80 of 127.0.0.1 (i.e.
localhost)
The other proxy_set_header lines tell Nginx to forward information, such as the original user’s IP address, along with any user requests.
Now let’s start Nginx so our server can handle HTTPS requests.
sudo service nginx start
Now test it out with a web browser, by visiting your Varnish server by its public IP address, on port 443 (HTTPS) this time:
https://varnish_VPS_public_IP
Note: If you used a self-signed certificate, you will see a warning saying something like “The site’s security certificate is not trusted”. Since you know you just created the certificate, it is safe to proceed.
Again, you should see the same application page as before. The difference is that you are actually visiting the Nginx server, which handles the SSL encryption and forwards the unencrypted request to Varnish, which treats the request like it normally does.
Configure Backend Web Server
If your backend web server is binding to all of its network interfaces (i.e. public and private network interfaces), you will want to modify your web server configuration so it is only listening on its private interface. This is to prevent users from accessing your backend web server directly via its public IP address, which would bypass your Varnish Cache.
In Apache or Nginx, this would involve assigning the value of the listen directives to bind to the private IP address of your backend server.
Troubleshooting Varnish
If you are having trouble getting Varnish to serve your pages properly, here are a few commands that will help you see what Varnish is doing behind the scenes.
Stats
If you want to get an idea of how well your cache is performing, you will want to take a look at the varnishstat command. Run it like this:
varnishstat
You will a screen that looks like the following:
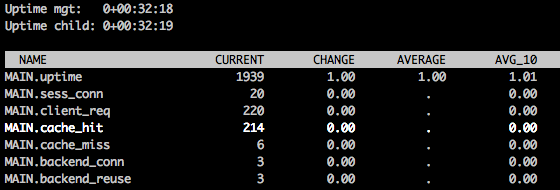
There is a large variety of stats that come up, and using the up/down arrows to scroll will show you a short description of each item. The cache_hit stat shows you how many requests were served with a cached result–you want this number to be as close to the total number of client requests (client_req) as possible.
Press q to quit.
Logs
If you want to get a detailed view of how Varnish is handling each individual request, in the form of a streaming log, you will want to use the varnishlog command. Run it like this:
varnishlog
Once it is running, try and access your Varnish server via a web browser. For each request you send to Varnish, you will see a detailed output that can be used to help troubleshoot and tune your Varnish configuration.
Press CTRL + C to quit.
Conclusion
Now that your web server has a Varnish Cache server in front of it, you will see improved performance in most cases. Remember that Varnish is very powerful and tuneable, and it may require additional tweaks to get the full benefit from it.
Thanks for learning with the DigitalOcean Community. Check out our offerings for compute, storage, networking, and managed databases.
About the author
Software Engineer @ DigitalOcean. Former Señor Technical Writer (I no longer update articles or respond to comments). Expertise in areas including Ubuntu, PostgreSQL, MySQL, and more.
Still looking for an answer?
This textbox defaults to using Markdown to format your answer.
You can type !ref in this text area to quickly search our full set of tutorials, documentation & marketplace offerings and insert the link!
Why do we need both Nginx and Varnish? Why no Nginx alone? (btw, does it have the grace mode?)
Just a note – if you’re upgrading from Varnish 3x. to Varnish 4.x be prepared for problems. I ran into a variety of VCL issues and didn’t have time to troubleshoot further – just had to roll back for now.
Not related to the article, but just FYI.
@pedrogomesyoo easily could just using caching in Nginx also, no one is saying that’s not an option. :)
I am getting below exception after installing and making changes
 sudo service varnish restart
 * Stopping HTTP accelerator varnishd                                    [fail]
 * Starting HTTP accelerator varnishd                                    [fail]
Message from VCC-compiler:
Expected ';' got '}'
(program line 187), at
('input' Line 35 Pos 1)
}
#

Running VCC-compiler failed, exit 1

VCL compilation failed
Take a look at the varnish config file: default.vcl and try this suggestion http://serverfault.com/a/305259
Above issue resolved …issue in this line of post
sub vcl_backend_response {
    set beresp.ttl = 10s;
    set beresp.grace = 1h
}
it should be like this
sub vcl_backend_response {
    set beresp.ttl = 10s;
    set beresp.grace = 1h;
}
But after making this change i am getting
sudo service varnish restart
 * Stopping HTTP accelerator varnishd                                    [fail]
 * Starting HTTP accelerator varnishd                                    [fail]
bind(): Address already in use
bind(): Address already in use
Error: Failed to open (any) accept sockets.
@subodhcjoshi82 – sounds like you have something else listening on the port Varnish is trying to use.
Check the output of netstat -tplanet | grep :80 – ideally you’ll want to see something like this:
tcp IPV4:80 0.0.0.0:* LISTEN 0 1585/varnishd tcp6 IPV6:80 :::* LISTEN 0 1585/varnishd
I suspect you’ll see your web server is still listening on port 80 though – therefore Varnish can’t bind. So instead you’ll see something like:
tcp IPV4:80 0.0.0.0:* LISTEN 0 15878/nginx: worker
This might be Apache if you’re using that instead of Nginx.
@xxdesmus Yes Port 80 Listen by my web server Apache Tomcat so i do not need to add port number in url …By default it listen by Apache but i made changes and now Apache working on port 8079 and now i made changes in
/etc/varnish/default.vcl
Like below
backend default {
   .host = "My Server Ip Address";
   .port = "8079";
}
But still same issue coming when i am firing this command
sudo service varnish restart
Getting same message
sudo service varnish restart
 * Stopping HTTP accelerator varnishd                                    [fail]
 * Starting HTTP accelerator varnishd                                    [fail]
bind(): Address already in use
bind(): Address already in use
Error: Failed to open (any) accept sockets.
Right, but what port are you expecting Varnish to listen on? 80? If so you’ll need to move Apache Tomcat to a different port. Otherwise you’ll need to specify a different port for Varnish to listen on via -> DAEMON_OPTS="-a :80 \ … should be some other port if you don’t expect it to be listening on 80, by default Varnish would be listening on port 6081 as the guide indicates.
It’d help if you could provide more background about where you expect Varnish to be listening vs. how you have your config setup for Varnish right now.
Tomcat is running on pot 80 because it will be quite easy for me setup domain with my application now when someone with enter domain name my application by default open previously it was not working as expected so i made changes in Tomcat config files and Tomcat started using port 80 …and Apache is listing on 8079. Now i saw your post we can boost our web application by this cache i installed Vanish in my droplet and as u mentioned these lines
We will want to set Varnish to listen on the default HTTP port (80), so your users will be able to access your site without adding an unusual port number to your URL. This can be set in the /etc/default/varnish
Look like i confused because of these lines “so your users will be able to access your site without adding an unusual port number to your URL”
So now as i already mentioned port 80 Listen by Tomcat and i will want to use Varnish as well …What changes i have to do its cache will work and when Tomcat down Varnish will work?
 This work is licensed under a Creative Commons Attribution-NonCommercial- ShareAlike 4.0 International License.
Become a contributor for community
Get paid to write technical tutorials and select a tech-focused charity to receive a matching donation.

DigitalOcean Documentation
Full documentation for every DigitalOcean product.

Resources for startups and AI-native businesses
The Wave has everything you need to know about building a business, from raising funding to marketing your product.
The developer cloud
Scale up as you grow — whether you're running one virtual machine or ten thousand.

Get started for free
Sign up and get $200 in credit for your first 60 days with DigitalOcean.*

*This promotional offer applies to new accounts only.