Tutorial

How To Install and Configure DKIM with Postfix on Debian Wheezy

Published on February 28, 2014
author

Popute Sebastian Armin

How To Install and Configure DKIM with Postfix on Debian Wheezy

Introduction

The frustration of getting falsely flagged as a spammer is not strange to most of the mail server admins. By excluding the possibility of a compromised server, a false flag is usually caused by one of the following:

  • the server is an open mail relay
  • the sender’s or server’s IP address is blacklisted
  • the server does not have a Fully Qualified Domain Name (FQDN) and a PTR record
  • the Sender Policy Framework (SPF) DNS record is missing or it is misconfigured
  • the DomainKeys Identified Mail (DKIM) implementation is missing or it’s not properly set up

These are some of the basic properties that are being checked by the majority of proprietary and open source spam filters (including SpamAssassin). Passing these tests is extremely important for a well configured mail server.

This tutorial will focus on installing and configuring OpenDKIM]: an open source implementation of the DKIM sender authentication system.

It is assumed that the reader knows how to access the server over SSH, Postfix and Dovecot is already installed and configured (tutorial), the host name and the FQDN are set up (tutorial, tutorial) and the SPF record is in place (tutorial).

About DKIM

DKIM is an Internet Standard that enables a person or organisation to associate a domain name with an email message. This, in effect, serves as a method of claiming responsibility for a message. At its core, DKIM is powered by asymmetric cryptography. The sender’s Mail Transfer Agent (MTA) signs every outgoing message with a private key. The recipient retrieves the public key from the sender’s DNS records and verifies if the message body and some of the header fields were not altered since the message signing took place.

Install OpenDKIM

Before starting the installation, a system update is recommended:

sudo apt-get update
sudo apt-get dist-upgrade

Install OpenDKIM and it’s dependencies:

sudo apt-get install opendkim opendkim-tools

Additional packages will be listed as dependencies, type yes and press Enter to continue.

Configure OpenDKIM

A couple of files must be created and edited in order to configure OpenDKIM.

Nano will be used as an editor because it’s installed by default on DigitalOcean droplets and it’s simple to operate:

  • navigate with the arrow keys
  • exit without saving changes: press CTRL + X and then N
  • exit and save changes: press CTRL + X and then Y, and finally press Enter

Important: replace every instance of example.com with your own domain in all commands and configuration files. Don’t forget to save your files after editing.

Let’s start with the main configuration file:

sudo nano /etc/opendkim.conf

Append the following lines to the end of the conf file (each parameter is explained below). Optionally, you can choose a custom port number for the Socket. Make sure that it’s not used by a different application.

AutoRestart             Yes
AutoRestartRate         10/1h
UMask                   002
Syslog                  yes
SyslogSuccess           Yes
LogWhy                  Yes

Canonicalization        relaxed/simple

ExternalIgnoreList      refile:/etc/opendkim/TrustedHosts
InternalHosts           refile:/etc/opendkim/TrustedHosts
KeyTable                refile:/etc/opendkim/KeyTable
SigningTable            refile:/etc/opendkim/SigningTable

Mode                    sv
PidFile                 /var/run/opendkim/opendkim.pid
SignatureAlgorithm      rsa-sha256

UserID                  opendkim:opendkim

Socket                  inet:12301@localhost
  • AutoRestart: auto restart the filter on failures

  • AutoRestartRate: specifies the filter’s maximum restart rate, if restarts begin to happen faster than this rate, the filter will terminate; 10/1h - 10 restarts/hour are allowed at most

  • UMask: gives all access permissions to the user group defined by UserID and allows other users to read and execute files, in this case it will allow the creation and modification of a Pid file.

  • Syslog, SyslogSuccess, *LogWhy: these parameters enable detailed logging via calls to syslog

  • Canonicalization: defines the canonicalization methods used at message signing, the simple method allows almost no modification while the relaxed one tolerates minor changes such as whitespace replacement; relaxed/simple - the message header will be processed with the relaxed algorithm and the body with the simple one

  • ExternalIgnoreList: specifies the external hosts that can send mail through the server as one of the signing domains without credentials

  • InternalHosts: defines a list of internal hosts whose mail should not be verified but signed instead

  • KeyTable: maps key names to signing keys

  • SigningTable: lists the signatures to apply to a message based on the address found in the From: header field

  • Mode: declares operating modes; in this case the milter acts as a signer (s) and a verifier (v)

  • PidFile: the path to the Pid file which contains the process identification number

  • SignatureAlgorithm: selects the signing algorithm to use when creating signatures

  • UserID: the opendkim process runs under this user and group

  • Socket: the milter will listen on the socket specified here, Posfix will send messages to opendkim for signing and verification through this socket; 12301@localhost defines a TCP socket that listens on localhost, port 12301

This simple configuration is meant to allow message signing for one or more domains, to learn about other options please go here.

Connect the milter to Postfix:

sudo nano /etc/default/opendkim

Add the following line, edit the port number only if a custom one is used:

SOCKET="inet:12301@localhost"

Configure postfix to use this milter:

sudo nano /etc/postfix/main.cf

Make sure that these two lines are present in the Postfix config file and are not commented out:

milter_protocol = 2
milter_default_action = accept

It is likely that a filter (SpamAssasin, Clamav etc.) is already used by Postfix; if the following parameters are present, just append the opendkim milter to them (milters are separated by a comma), the port number should be the same as in opendkim.conf:

smtpd_milters = unix:/spamass/spamass.sock, inet:localhost:12301
non_smtpd_milters = unix:/spamass/spamass.sock, inet:localhost:12301

If the parameters are missing, define them as follows:

smtpd_milters = inet:localhost:12301
non_smtpd_milters = inet:localhost:12301

Create a directory structure that will hold the trusted hosts, key tables, signing tables and crypto keys:

sudo mkdir /etc/opendkim
sudo mkdir /etc/opendkim/keys

Specify trusted hosts:

sudo nano /etc/opendkim/TrustedHosts

We will use this file to define both ExternalIgnoreList and InternalHosts, messages originating from these hosts, domains and IP addresses will be trusted and signed.

Because our main configuration file declares TrustedHosts as a regular expression file (refile), we can use wildcard patters, *.example.com means that messages coming from example.com’s subdomains will be trusted too, not just the ones sent from the root domain.

Customize and add the following lines to the newly created file. Multiple domains can be specified, do not edit the first three lines:

127.0.0.1
localhost
192.168.0.1/24

*.example.com

#*.example.net
#*.example.org

Create a key table:

sudo nano /etc/opendkim/KeyTable

A key table contains each selector/domain pair and the path to their private key. Any alphanumeric string can be used as a selector, in this example mail is used and it’s not necessary to change it.

mail._domainkey.example.com example.com:mail:/etc/opendkim/keys/example.com/mail.private

#mail._domainkey.example.net example.net:mail:/etc/opendkim/keys/example.net/mail.private
#mail._domainkey.example.org example.org:mail:/etc/opendkim/keys/example.org/mail.private

Create a signing table:

sudo nano /etc/opendkim/SigningTable

This file is used for declaring the domains/email addresses and their selectors.

*@example.com mail._domainkey.example.com

#*@example.net mail._domainkey.example.net
#*@example.org mail._domainkey.example.org

Generate the public and private keys

Change to the keys directory:

cd /etc/opendkim/keys

Create a separate folder for the domain to hold the keys:

sudo mkdir example.com
cd example.com

Generate the keys:

sudo opendkim-genkey -s mail -d example.com

-s specifies the selector and -d the domain, this command will create two files, mail.private is our private key and mail.txt contains the public key.

Change the owner of the private key to opendkim:

sudo chown opendkim:opendkim mail.private

Add the public key to the domain’s DNS records

Open mail.txt:

sudo nano -$ mail.txt

The public key is defined under the p parameter. Do not use the example key below, it’s only an illustration and will not work on your server.

mail._domainkey IN TXT "v=DKIM1; k=rsa; p=MIGfMA0GCSqGSIb3DQEBAQUAA4GNADCBiQKBgQC5N3lnvvrYgPCRSoqn+awTpE+iGYcKBPpo8HHbcFfCIIV10Hwo4PhCoGZSaKVHOjDm4yefKXhQjM7iKzEPuBatE7O47hAx1CJpNuIdLxhILSbEmbMxJrJAG0HZVn8z6EAoOHZNaPHmK2h4UUrjOG8zA5BHfzJf7tGwI+K619fFUwIDAQAB" ; ----- DKIM key mail for example.com

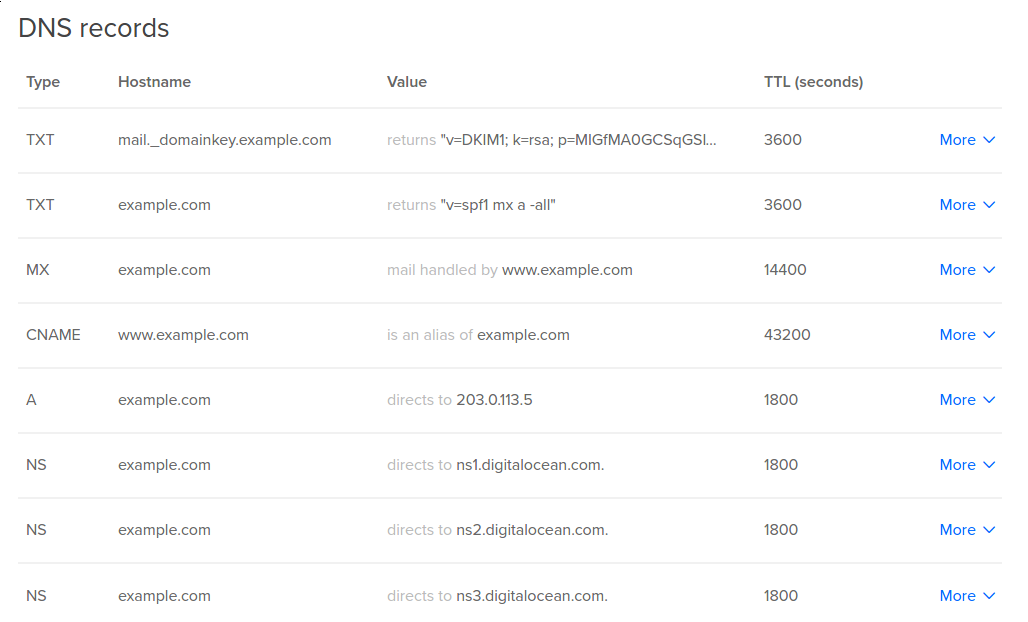
Copy that key and add a TXT record to your domain’s DNS entries:

Name: mail._domainkey.example.com.

Text: "v=DKIM1; k=rsa; p=MIGfMA0GCSqGSIb3DQEBAQUAA4GNADCBiQKBgQC5N3lnvvrYgPCRSoqn+awTpE+iGYcKBPpo8HHbcFfCIIV10Hwo4PhCoGZSaKVHOjDm4yefKXhQjM7iKzEPuBatE7O47hAx1CJpNuIdLxhILSbEmbMxJrJAG0HZVn8z6EAoOHZNaPHmK2h4UUrjOG8zA5BHfzJf7tGwI+K619fFUwIDAQAB"

Please note that the DNS changes may take a couple of hours to propagate.

Restart Postfix and OpenDKIM:

sudo service postfix restart
sudo service opendkim restart

Congratulations! You have successfully configured DKIM for your mail server!

The configuration can be tested by sending an empty email to check-auth@verifier.port25.com and a reply will be received. If everything works correctly you should see DKIM check: pass under Summary of Results.

==========================================================
Summary of Results
==========================================================
SPF check:          pass
DomainKeys check:   neutral
DKIM check:         pass
Sender-ID check:    pass
SpamAssassin check: ham

Alternatively, you can send a message to a Gmail address that you control, view the received email’s headers in your Gmail inbox, dkim=pass should be present in the Authentication-Results header field.

Authentication-Results: mx.google.com;
       spf=pass (google.com: domain of contact@example.com designates --- as permitted sender) smtp.mail=contact@example.com;
       dkim=pass header.i=@example.com;

<div class=“author”>Submitted by: P. Sebastian</a></div>

Thanks for learning with the DigitalOcean Community. Check out our offerings for compute, storage, networking, and managed databases.

Learn more about our products

About the author(s)

Category:
Tutorial

Still looking for an answer?

Ask a questionSearch for more help

Was this helpful?
 
50 Comments
Leave a comment...

This textbox defaults to using Markdown to format your answer.

You can type !ref in this text area to quickly search our full set of tutorials, documentation & marketplace offerings and insert the link!

I went over this again and again and still get: DKIM check: neutral Can you update the pictures with new links? This might help. Thank you.

alexdo
Site Moderator
Site Moderator badge
January 8, 2025

Heya, @sianios

Keep in mind that DNS changes might take up to 48 hours in order to update. This is mainly due to DNS cache and general propagation DNS time.

Regards

Hi. how to pass “DomainKeys check” ?

Please refer to my recent response to “Jon” (in this same thread), regarding DomainKeys authentication deprecation.

-xxar

alexdo
Site Moderator
Site Moderator badge
January 30, 2025

DomainKeys (DK) is an old and obsolete email authentication method that was replaced by DKIM (DomainKeys Identified Mail).

If your DKIM check passes, you can ignore the “DomainKeys check” result in tools like check-auth@verifier.port25.com or mail-tester.com.

Regards

Hey, I followed your article to a tee, but am still having some problems. Also, I am performing these steps on Ubuntu 14.04.

Everything seems perfect, but I got the two following errors from opendkim that I can’t figure out the fix for:

opendkim[8078]: AC355401B9: SSL error:0D07207B:asn1 encoding routines:ASN1_get_object:header too long opendkim[8078]: AC355401B9: dkim_eom(): resource unavailable: d2i_PrivateKey_bio() failed

My searches suggest that the problem may be with the cert itself so I re-did that step slowly (including the updated TXT record), but I still get the errors. I also thought maybe it was a simple permissions issue with opendkim reading the cert itself, but after chown -R opendkim:opendkim /etc/opendkim it still didn’t work.

Thank you for getting me this far, if you have further insight, please help.

alexdo
Site Moderator
Site Moderator badge
January 8, 2025

SSL error:0D07207B:asn1 encoding routines:ASN1_get_object:header too long

This error suggests that OpenDKIM is trying to read a file that is either corrupted, not in the correct format, or not what it expects (e.g., a private key instead of a certificate or vice versa).

resource unavailable: d2i_PrivateKey_bio() failed

This error indicates that OpenDKIM is unable to load the private key, likely because the file is invalid or unreadable.

The private key must be in PEM format. You can verify this by checking the file:

cat /etc/opendkim/keys/yourdomain.private

It should start with:

-----BEGIN PRIVATE KEY-----

or:

-----BEGIN RSA PRIVATE KEY-----

If the file doesn’t look right, regenerate the key using:

opendkim-genkey -s selector -d yourdomain.com

Replace selector with your DKIM selector and yourdomain.com with your domain.

Regards

I solved the problem that I was having. The formatting of the tutorial was the problem. In the section where you create the KeyTable the formatting makes it appear that this stanza is on two lines instead of one:

mail._domainkey.example.com example.com:mail:/etc/opendkim/keys/example.com/mail.private

By joining those lines together with a space between them, everything finally worked as expected.

It was quite satisfying to see the dkim=pass!

Thanks for the howto!

alexdo
Site Moderator
Site Moderator badge
January 11, 2025

Heya,

I’m glad that you’ve sorted this! Adding the public DKIM record can sometimes be tricky and different providers might have an alternative way of joing long CNAME and TXT records.

Regards

Hi, I receive error:

sudo apt-get install opendkim opendkim-tools Reading package lists… Done Building dependency tree Reading state information… Done E: Unable to locate package opendkim E: Unable to locate package opendkim-tools

can you consult? thank you.

alexdo
Site Moderator
Site Moderator badge
January 8, 2025

You can ensure that the universe repository is enabled, as opendkim resides there. To check and enable:

sudo add-apt-repository universe sudo apt update

After updating and verifying your repositories, install the packages:

sudo apt install opendkim opendkim-tools

Hope that this helps!

ournet.biz, I remember that error of “Unable to locate package opendkim” happens because you have not ran the “apt-get update” before starting with the install option. Try and see…

alexdo
Site Moderator
Site Moderator badge
January 8, 2025

You can ensure that the universe repository is enabled, as opendkim resides there. To check and enable:

sudo add-apt-repository universe sudo apt update

After updating and verifying your repositories, install the packages:

sudo apt install opendkim opendkim-tools

Hope that this helps!

Hello, im getting this:

========================================================== Summary of Results

SPF check: pass DomainKeys check: neutral DKIM check: pass DKIM check: pass Sender-ID check: pass SpamAssassin check: ham

But my email is still being flagged as spam on gmail, what is wrong?

how did you solve this? got the same now

I have the same too!

alexdo
Site Moderator
Site Moderator badge
January 8, 2025

Even if your email passes SPF, DKIM, and SpamAssassin checks, Gmail has a sophisticated spam detection system that evaluates multiple factors beyond these checks.

You can use sites like https://www.mail-tester.com/ to check the overall score of your outgoing emails. The site will return result with recommended actions which you can implement to increase the score of your emails.

Also you can set up a Gmail Postmaster account (https://postmaster.google.com/) to monitor your domain’s reputation and receive feedback on deliverability issues.

Hope that this helps!

Some webhosters don’t allow to add capital letters in the IN TEXT field, they automatically change every letter to lowercase, so it will be difficult to enter the base64-encoded Key, it will look like:

mail._domainkey in txt "v=dkim1; k=rsa; p=migfma0gcsqgsib3dqebaquaa4gnadcbiqkbgqc5n3lnvvrygpcrsoqn+awtpe+igyckbppo8hhbcffciiv10hwo4phcogzsakvhojdm4yefkxhqjm7ikzepubate7o47hax1cjpnuidlxhilsbembmxjrjag0hzvn8z6eaoohznaphmk2h4uurjog8za5bhfzjf7tgwi+k619ffuwidaqab" ; ----- dkim key mail for example.com

Which will not be the correct key. You have to contact your webhoster then to change the interface.

You can check if you Key is valid with: http://dkimcore.org/tools/keycheck.html

alexdo
Site Moderator
Site Moderator badge
January 11, 2025

Heya,

Use the DKIM Core Key Checker to test your key before submission:

  • Enter your domain and selector (e.g., mail._domainkey.example.com).
  • Paste the DKIM record.
  • Confirm it’s valid before proceeding.

Also If your hosting platform supports splitting TXT records, divide the DKIM key into smaller chunks (less common but worth trying). For example:

mail._domainkey IN TXT "v=DKIM1; k=rsa; p=migfma0gcsqgsib3dqebaquaa4gnadcbiqkbgqc5n3lnvvrygpcrsoqn+" 
"awtpe+igyckbppo8hhbcffciiv10hwo4phcogzsakvhojdm4yefkxhqjm7ikzepu"
"bate7o47hax1cjpnuidlxhilsbembmxjrjag0hzvn8z6eaoohznaphmk2h4uurjog"
"8za5bhfzjf7tgwi+k619ffuwidaqab"

This method preserves the case while adhering to the host’s limitations. Ensure the platform supports this.

Regards

If my mail server is sub.domain.com, is it still safe to replace all example.com with sub.domain.com in the tutorial?

My DKIM is still showing neutral.

same here! i have a domain.com hosted on bluehost and subdomain.domain.com poting A to the serveer. how should i installl in this case?

alexdo
Site Moderator
Site Moderator badge
January 30, 2025

Yes, if your mail server is sub.domain.com, you should replace example.com with sub.domain.com in most cases. However, there are some important exceptions where you still need to use domain.com instead of sub.domain.com.

  • DO NOT use sub.domain.com here.
  • The DKIM record should be at the root domain (domain.com), not your mail server subdomain.
mail._domainkey.domain.com  TXT  "v=DKIM1; k=rsa; p=MIGfMA0G..."
  • Your SPF and DMARC policies should be for domain.com, not sub.domain.com.
  • SPF Record (✅ Correct)
domain.com  TXT  "v=spf1 mx ~all"
  • DMARC Record
_dmarc.domain.com  TXT  "v=DMARC1; p=reject; rua=mailto:postma

Regards

Do you have more info on config to pass **DomainKeys **test?

DomainKeys != DKIM.

DomainKeys authentication is deprecated: DKIM is the successor to DomainKeys.

Trying to “pass” the DomainKeys component of the check recommended in this guide (provided by check-auth@verifier.port25.com), is absolutely unnecessary.

If you see “DKIM check: pass” in the authentication report, then you’re good.

-xxar

alexdo
Site Moderator
Site Moderator badge
January 30, 2025

You’re absolutely right! DomainKeys (DK) is an old, deprecated authentication method, and DKIM has fully replaced it.

There’s no need to worry about passing the DomainKeys check when verifying email authentication.

Regards

alexdo
Site Moderator
Site Moderator badge
January 30, 2025

While DKIM has largely replaced DomainKeys, some older systems (or specific mail servers) may still check for it.

  1. Create a directory for the key:
sudo mkdir -p /etc/opendkim/keys/example.com cd /etc/opendkim/keys/example.com
  1. Generate a private and public key for DomainKeys (not DKIM!):
opendkim-genkey -b 1024 -s domainkeys -d example.com -D /etc/opendkim/keys/example.com
  • This will create:
  • domainkeys.privatePrivate key (kept on the mail server)
  • domainkeys.txtPublic key (added to DNS)
  1. Open the domainkeys.txt file:
cat /etc/opendkim/keys/example.com/domainkeys.txt

You’ll see something like:

domainkeys._domainkey.example.com. IN TXT "k=rsa; p=MIGfMA0G...QAB"
  1. Go to your DNS provider (DigitalOcean, Cloudflare, etc.) and create a TXT record:
  • Name: domainkeys._domainkey
  • Type: TXT
  • Value: k=rsa; p=MIGfMA0G...QAB (from the file)

Regards

Sep 10 19:34:04 sd-65686 postfix/cleanup[38857]: warning: connect to Milter service inet:localhost:12301: Connection refused

in /var/log/mail.warn

To anyone else having this issue, there is an open bug with the service file not reading the config file correctly. The fix is here: https://bugs.debian.org/cgi-bin/bugreport.cgi?bug=864162#32

To summarize (on Ubuntu for me): sudo nano /lib/systemd/system/opendkim.service

(change the line: ExecStart=/usr/sbin/opendkim -P … to ExecStart=/usr/sbin/opendkim -x /etc/opendkim.conf)

sudo systemctl daemon-reload service opendkim restart

Cheers!

This appears to be fixed in the version I just installed last week (mid-October 2018).

alexdo
Site Moderator
Site Moderator badge
January 30, 2025

Thanks for sharing this fix!

Regards

alexdo
Site Moderator
Site Moderator badge
January 30, 2025

The “connect to Milter service inet:localhost:12301: Connection refused” error in Postfix means that Postfix cannot communicate with OpenDKIM via the configured Milter socket (inet:localhost:12301).

If using an INET socket, check if OpenDKIM is listening:

sudo netstat -tulnp | grep 12301
  • If OpenDKIM isn’t listening, the service isn’t binding properly.
  • To fix this, explicitly bind it to 127.0.0.1:
Socket inet:12301@127.0.0.1

Restart OpenDKIM:

sudo systemctl restart opendkim

Regards

Works like a charm! The only thing that’s really annoying is those example.com URLs… it would be so easy to add a simple JS (based on jQuery or whatever) that would give us the option of auto-replacing ALL occurrences of “example.com” on this page with whatever domain name we need to set and gone is the tedious step of “copy into text editor - edit - copy again”. I could volunteer to write such a thing if you want.

alexdo
Site Moderator
Site Moderator badge
January 30, 2025

That’s a fantastic idea! A simple JavaScript snippet could allow users to enter their domain once and dynamically replace all instances of example.com on the page. It would make following tutorials much easier.

Regards

Theres also a nice website to test the email: http://www.mail-tester.com/

alexdo
Site Moderator
Site Moderator badge
January 20, 2025

Mail tester is a great tool indeed! I’ve used it numerous times and have recommended it a lot in past. It is really useful when it comes to improving your outgoing mail score!

Regards

I’m a getting a public key not available message my TXT entry looks like:

mail._domainkey.mail                  "v=DKIM1; h=rsa-sha256; k=rsa; s=email; " 	  "p=MIGfMA0GCSqGSIb3DQEBAQUAA4GNADCBiQKBgQCzj7CP7Evao78fUrJVf4Z7/8uQj9sMR4uL1/L38lvkWgahfJN9xqX3WxAywK09S79HWdhdOl1j+cyffU7MOlN09n9MyBp5/IX5xmJuh2DWx/dr+w8MXoqWlccsGPM7EUC9koa0Ue7u6/COL0M4xjZxcyvMzHtMRzj2aC2zBE45mwIDAQAB"

my MX entry looks like:

10             mail.example.com

any help is appreciated.

i feel like there’s weird formatting with the opendkim keygen but i have no idea how to change that other than manually remove whitespace which seems like it would mess things up.

but i don’t know anything.

u can check ur dns record in here:

http://www.protodave.com/tools/dkim-key-checker/

alexdo
Site Moderator
Site Moderator badge
January 30, 2025

Your issue is likely caused by incorrect DNS formatting or wrong DKIM selector configuration. Let’s troubleshoot and fix this step by step.

  • mail._domainkey.mail should likely be mail._domainkey.example.com, where example.com is your actual domain.
  • The correct host (in DigitalOcean DNS) should just be:
mail._domainkey
  • In DigitalOcean, use quotes (“”) and split every 255 characters.
  • Correct formatting:
"v=DKIM1; k=rsa; p=MIGfMA0GCSqGSIb3DQEBAQUAA4GNADCBiQKBgQCzj7CP7Evao78fUrJVf4Z7/" "8uQj9sMR4uL1/L38lvkWgahfJN9xqX3WxAywK09S79HWdhdOl1j+cyffU7MOlN09n9MyBp5/" "IX5xmJuh2DWx/dr+w8MXoqWlccsGPM7EUC9koa0Ue7u6/COL0M4xjZxcyvMzHtMRzj2aC2zBE45mwIDAQAB"

Once the changes are made and DNS has propagated, you can send an email to mail-tester.com or DKIM Validator to verify.

Hope that this helps!

in the digital ocean DNS records its wrong its not mail._domainkey.example.com.

it’s mail._domainkey.

I was gettin this error:

Result: permerror (key "mail._domainkey.mydomain.com" doesn't exist)

thank you for the tutorial, worked like a charm! :) anyway the check-auth@verifier.port25.com is still failing, but on gmail I got

Authentication-Results: mydomain.com; dkim=pass
	reason="1024-bit key; insecure key"
	header.d=eempo.net header.i=@mydomain.com header.b=J3sMKpms;
	dkim-adsp=pass; dkim-atps=neutral

When I added the TXT record on digitalocean DNS I was missing the “.” at the end of the domain and getting “permerror” ej. mail._domainkey.example.com. <- that last dot makes a difference ;) 2 hours later I check on http://www.protodave.com/tools/dkim-key-checker/ and all good. I <3 this article.

It doesn’t accept the dot (.) at the end. Every time I try to enter the domain with the dot (.) at the end, it just disappears and leaves just the mail._domainkey in the field. How did you force it to allow the dot at the end?

Oh, I saw in the Zone File below the entries, that DO is adding the domain with the dot (.) at the end, automagically. So no need to enter in the TXT record mail._domainkey**.yourdomain.tld.** If you just enter mail._domainkey and check the Zone File below, you’ll see that the domain will get attached at the end.

I had the same doubt but on gandi.net adding the final ‘.’ throws a syntax error, so you don’t even have an option. I suppose it adds “automagically” as @petsoukos reported too.

alexdo
Site Moderator
Site Moderator badge
January 30, 2025

Yes! That final dot (.) at the end of the domain name is critical in many DNS setups.

In fully qualified domain names (FQDNs), the dot at the end indicates that the domain is absolute and should not be appended with any additional suffixes. Without it, some DNS providers may automatically append the domain name again, causing issues.

Regards

alexdo
Site Moderator
Site Moderator badge
January 30, 2025

Yes! That’s a very important clarification.

Gmail warns that your DKIM key is 1024-bit, which is now considered weak. You should upgrade to a 2048-bit DKIM key.

opendkim-genkey -b 2048 -s mail -d mydomain.com
  • Update your DNS TXT record with the new public key.
  • Restart OpenDKIM:
sudo systemctl restart opendkim
  • Wait for DNS propagation (can take up to 24 hours).
  • Verify the new key with:
opendkim-testkey -d mydomain.com -s mail -vvv

Once updated, Gmail will stop flagging your DKIM as insecure.

For some reason I get DKIM check details:

Result: neutral (message not signed)

This comment has been deleted

    Solved

    how u solved it? please help me :)

    alexdo
    Site Moderator
    Site Moderator badge
    January 30, 2025

    The “Result: neutral (message not signed)” error indicates that OpenDKIM is not signing outgoing emails. This means either:

    1. OpenDKIM is not running or properly configured.
    2. Postfix (or your mail server) is not passing emails through OpenDKIM.
    3. The signing table is misconfigured.

    Regards

    Restarting OpenDKIM: No /usr/sbin/opendkim found running; none killed. opendkim: /etc/opendkim.conf: refile:/etc/opendkim/SigningTable: dkimf_db_open(): No such file or directory opendkim.

    I am getting above error on sudo service opendkim restart. Please help!!!

    Some file is corrupt. Try to recreate /etc/opendkim.conf with the same content. And restart opendkim.

    alexdo
    Site Moderator
    Site Moderator badge
    January 30, 2025

    No such file or directory" in OpenDKIM usually means that the referenced SigningTable file in /etc/opendkim.conf is either missing, misconfigured, or OpenDKIM doesn’t have permission to read it.

    You can check if the SigningTable file exists at the specified location:

    ls -l /etc/opendkim/SigningTable
    

    If the file doesn’t exist, you need to create it.

    Regards

    Whtas this? OpenDKIM Filter: Unable to create listening socket

    alexdo
    Site Moderator
    Site Moderator badge
    January 28, 2025

    The error “OpenDKIM Filter: Unable to create listening socket” occurs when OpenDKIM cannot bind to the specified socket for communication, often due to configuration or permission issues.

    You can verify the Socket Path: Check if the directory exists:

    ls -ld /var/run/opendkim
    

    If it doesn’t exist, create it:

    sudo mkdir -p /var/run/opendkim 
    sudo chown opendkim:opendkim /var/run/opendkim 
    sudo chmod 750 /var/run/opendkim
    

    Ensure the opendkim user has permission to create and access the socket:

    sudo chown -R opendkim:opendkim /var/run/opendkim
    

    Restart OpenDKIM:

    sudo systemctl restart opendkim
    

    Hope that this helps!

    If Domainkey is neutural… Check your postfix version with command below

    sudo postconf mail_version
    

    If Postfix version higher than 2.6, set “milter_protocol” value 6 instead of 2.

    milter_protocol = 6
    

    And it is more easier to spam test from http://www.mail-tester.com/

    Hope this helps anyone who has same issue with me.

    alexdo
    Site Moderator
    Site Moderator badge
    January 20, 2025

    Thanks for sharing this!

    Also ail tester is a great tool indeed! I’ve used it numerous times and have recommended it a lot in past. It is really useful when it comes to improving your outgoing mail score!

    Regards

    If you have multiple domains and you are using 1 mailserver: mailserver is for example: mail.fap.com other domains: fup.com fop.com Use the same mailserver in the signingTable: nano /etc/opendkim/SigningTable

    should contain: *@fap.com mail._domainkey.fap.com *@fup.com mail._domainkey**.fap.com** *@fop.com mail._domainkey.fap.com

    OTHERWISE it gives an error on the email addresses of the other domains: “requested action aborted: error in processing”

    Hope this will save some people some time. It took me some debugging :p

    By the way: this tutorial also works for ubuntu

    alexdo
    Site Moderator
    Site Moderator badge
    January 28, 2025

    Great tip! This approach is spot on for a shared mail server setup with multiple domains, and it will definitely save time for anyone dealing with multi-domain configurations.

    If you’re using a single mail server (e.g., mail.fap.com) to handle emails for multiple domains (e.g., fup.com, fop.com), OpenDKIM requires proper configuration to ensure emails are signed correctly for all domains.

    The SigningTable must map all domains to the DKIM key associated with the mail server’s domain (fap.com in this case).

    Regards

    I am getting a Your DKIM signature is not valid error when testing my email with mail-tester Any ideas why?

    alexdo
    Site Moderator
    Site Moderator badge
    January 28, 2025

    The “Your DKIM signature is not valid” error in mail-tester typically indicates a mismatch or issue in the DKIM setup.

    You can use a tool like dig or an online checker to verify the DKIM TXT record for your domain and ensure the record is correctly published and matches the public key you generated:

    dig TXT mail._domainkey.yourdomain.com
    

    If you recently updated the DNS record, wait for full propagation (up to 24-48 hours).

    Regards

    Hm, I have done everything and still my messages get into spam folder each time (gmail inbox and other private mail account).

    • I pass all tests and mail-tester.com gives me a 10/10
    • mxtoolbox states I’m also not blacklisted or any other problems what else could it be?

    I had the same issue! The actual most important thing is to send your ip to (for example) hotmail and get them to whitelist it like you can here

    alexdo
    Site Moderator
    Site Moderator badge
    January 28, 2025

    This is a really good idea. You can also consider the following:

    • Gradually increase the volume of emails sent from your server.
    • Start with low-volume, high-quality emails (e.g., transactional emails) before sending bulk or marketing emails.
    • Microsoft and Gmail Whitelisting:
    • Request whitelisting with providers like:
    • Microsoft SNDS (Smart Network Data Services)
    • Google Postmaster Tools
    • Sign up and verify your domain and IP to improve reputation monitoring.

    Hope that this helps!

    @maxmitch thanks for the link, will try this There could be another possibility why “perfectly setup” mail ends up as spam. I was running a mail server on the same IP but under a different domain name for about 2 month. Maybe it takes some time to get the same IP associated with a new domain name. Since people at digitalocean link new domains to the same IPs all the time this problem should be widespread. I wonder if DO staff could elaborate on this issue.

    @sugarhill I think the idea behind hotmail (I only have tested mine through hotmail) is that it is not actually perfect because it is not a ‘known’ IP and nothing will be perfect up until then. I even removed the DKIM records from the domain and it still worked with hotmail once I had registered the IP. It is just another one of those ‘there is no guaranteed way to do it’ things (like google and geting your website to the top (but a good place to start is to add meta tags and register the domain on google… OFF TOPIC)) Let me know if you need any help with anything else! What you said about “Maybe it takes some time to get the same IP associated with a new domain name.” seems pretty irrelevant to me, I can’t really imagine that being the issue as at the end of the day a domain is just a reference to the IP.

    alexdo
    Site Moderator
    Site Moderator badge
    January 20, 2025

    Gmail have a more strict policy than most of the mail providers. I’ll double check if the mail server IP is not blacklisted and also add the sender email as trusted to by-pass the Gmail filter just temporary so it will be more permisive and allow future emails originating from the same domain name.

    Regards

    alexdo
    Site Moderator
    Site Moderator badge
    January 28, 2025

    If you’re scoring 10/10 on mail-tester.com, passing DKIM, SPF, and DMARC checks, and not being blacklisted, the problem often lies with sender reputation, content, or email engagement history.

    Even though you’re not blacklisted, new or low-volume IPs often start with a neutral or low reputation, causing emails to land in spam.

    • Gradually increase the volume of emails sent from your server.
    • Start with low-volume, high-quality emails (e.g., transactional emails) before sending bulk or marketing emails.
    • Microsoft and Gmail Whitelisting:
    • Request whitelisting with providers like:
    • Microsoft SNDS (Smart Network Data Services)
    • Google Postmaster Tools
    • Sign up and verify your domain and IP to improve reputation monitoring.

    Hope that this helps!

    Hi; I did this how to with success +change into /etc/opendkim.conf Canonicalization relaxed/simple for Canonicalization relaxed/relaxed like G**gle is

    now my next question/challenge is to have an 2048bit key because with this how to you finish with an 1024bit key

    Anybody know where you interact with this parameter ?

    Cheers to all!

    alexdo
    Site Moderator
    Site Moderator badge
    January 28, 2025

    Great to hear that your setup is working! Switching to relaxed/relaxed canonicalization is a good move for compatibility with email providers like Gmail.

    The default opendkim-genkey command generates a 1024-bit key. To create a 2048-bit key, you need to use the -b flag to specify the key size.

    1. Navigate to your OpenDKIM keys directory:
    cd /etc/opendkim/keys/yourdomain.com
    
    1. Generate a 2048-bit DKIM key:
    opendkim-genkey -b 2048 -s mail -d yourdomain.com
    

    Once the private and public keys are updated ypu can send a test email and analyze it with mail-tester.com or dkimvalidator.com.

    Regards

    Hello! First of all it was a very helpful tutorial! However I get the following error: Starting OpenDKIM: opendkim: /etc/opendkim.conf: configuration error at line 3: illegal value opendkim.

    I attache the file code…

    AutoRestartRate         10/1h
    UMask                   002
    Syslog                  yes
    SyslogSuccess           Yes
    LogWhy                  Yes
    
    Canonicalization        relaxed/simple
    
    ExternalIgnoreList      refile:/etc/opendkim/TrustedHosts
    InternalHosts           refile:/etc/opendkim/TrustedHosts
    KeyTable                refile:/etc/opendkim/KeyTable
    SigningTable            refile:/etc/opendkim/SigningTable
    
    Mode                    sv
    PidFile                 /var/run/opendkim/opendkim.pid
    SignatureAlgorithm      rsa-sha256
    
    UserID                  opendkim:opendkim
    
    Socket                  inet:12301@localhost```
    
    Thanks in advance!
    alexdo
    Site Moderator
    Site Moderator badge
    January 28, 2025

    The error “illegal value opendkim” suggests there’s an issue with the Mode directive or another configuration value.

    depending on your OpenDKIM version, sv might not be a valid value. Instead, omit the Mode directive entirely to enable both signing and verification, as it’s the default behavior.

    You can comment out or remove the Mode line:

    # Mode sv
    

    Here’s a cleaned-up version of your opendkim.conf:

    AutoRestartRate         10/1h
    UMask                   002
    Syslog                  yes
    SyslogSuccess           Yes
    LogWhy                  Yes
    
    Canonicalization        relaxed/simple
    
    ExternalIgnoreList      refile:/etc/opendkim/TrustedHosts
    InternalHosts           refile:/etc/opendkim/TrustedHosts
    KeyTable                refile:/etc/opendkim/KeyTable
    SigningTable            refile:/etc/opendkim/SigningTable
    
    PidFile                 /var/run/opendkim/opendkim.pid
    SignatureAlgorithm      rsa-sha256
    
    UserID                  opendkim:opendkim
    Socket                  inet:12301@localhost
    

    Then send a test email to a tool like mail-tester.com to confirm DKIM signing works.

    Regards

    Thanks for this useful guide. After I done everything, testing with www.mail-tester.com, I am in this situation:

    DKIM key record in message : v=1; a=rsa-sha256; c=relaxed/simple; d=mydomain.com; s=mail; t=1442826194; bh=g3zLYH4xKxcPrHOD18z9YfpQcnk/GaJedfustWU5uGs=; h=Subject:From:To:Date:From; b=kx1bsgRUKZ01I90IEokp/BK9cArsRMaALGFOt7g4oBqUfSeINq9f2EfLejE/fZAxpW3mNfpePu4Y3yGxYMH1ZR0QKBpfV+J2dSUv//akyqShgtjAxRMjr4ipgXDrmXDUHgP765RK0IAVJvKsk6cqJ1wuLRIvw60PP0k/SU3RTmo=

    Public DKIM key in dns record: “v=DKIM1; k=rsa; p=MIGfMA0GCSqGSIb3DQEBAQUAA4GNADCBiQKBgQC5N3lnvvrYgPCRSoqn+awTpE+iGYcKBPpo8HHbcFfCIIV10Hwo4PhCoGZSaKVHOjDm4yefKXhQjM7iKzEPuBatE7O47hAx1CJpNuIdLxhILSbEmbMxJrJAG0HZVn8z6EAoOHZNaPHmK2h4UUrjOG8zA5BHfzJf7tGwI+K619fFUwIDAQAB”

    (key length: 1024bit)

    The response is that my DKIM key is invalid

    What is my error?

    Can help me?

    alexdo
    Site Moderator
    Site Moderator badge
    January 28, 2025

    Your DKIM setup looks almost correct, but the issue lies in the mismatch between your DKIM signature (the value in the email header) and the public key in your DNS TXT record.

    Use dig to retrieve your DNS TXT record and ensure it matches your public key:

    dig TXT mail._domainkey.mydomain.com
    
    • Check if the p= value in the DNS record matches the public key in your default.txt file (or equivalent key file generated with opendkim-genkey).
    • Ensure there are no missing or extra characters.

    Correct Format:

    v=DKIM1; k=rsa; p=MIGfMA0GCSqGSIb3DQEBAQUAA4GNADCBiQKBgQC5N3lnvvrYgPCRSoqn+awTpE+iGYcKBPpo8HHbcFfCIIV10Hwo4PhCoGZSaKVHOjDm4yefKXhQjM7iKzEPuBatE7O47hAx1CJpNuIdLxhILSbEmbMxJrJAG0HZVn8z6EAoOHZNaPHmK2h4UUrjOG8zA5BHfzJf7tGwI+K619fFUwIDAQAB
    

    Changes to DNS records can take up to 24-48 hours to propagate fully. If you’ve made recent updates, wait and test again after propagation.

    Regards

    Thanks, works perfectly. Debian 8.

    I followed this exact same step but keep on getting dkim=fail on port25 and gmail checks. DKIM check details:

    Result: fail (signature doesn’t verify) ID(s) verified: Canonicalized Headers: subject:GetBlu’0D’‘0A’ to:check-auth-jeet=getblu.in@verifier.port25.com’0D’‘0A’ date:Sun,‘20’13’20’Dec’20’2015’20’01:28:18’20’-0500’20’(EST)‘0D’‘0A’ from:promotion@getblu.in’20’(GetBlu)‘0D’‘0A’ dkim-signature:v=1;'20’a=rsa-sha256;'20’c=relaxed/simple;'20’d=getblu.in;'20’s=mail;'20’t=1449988098;'20’bh=TsD52s2OJWaKdEZxTmVeh4bTpuEBIDAX7t1cN+s4ag0=;'20’h=Subject:To:Date:From:From;'20’b=

    0.0 T_DKIM_INVALID DKIM-Signature header exists but is not valid

    I have tried uninstalling and reinstalling, redoing the whole process again ,remove extra quotes and brackets in my mail.txt file. Still the same issue. Any help?

    alexdo
    Site Moderator
    Site Moderator badge
    January 28, 2025

    The error “DKIM-Signature header exists but is not valid” suggests that while the DKIM signature is present, there’s a problem with either how it was generated or how it’s being verified.

    The mail._domainkey TXT record might have formatting errors or an incomplete key. Also some email providers like Gmail require a key length of at least 1024 or 2048 bits.

    You can also use the following tools to validate your DKIM setup:

    Regards

    Wow, this was incredibly helpful! Great guide. Thank you!

    Nice guide, thanks.

    Just a little question: It seems the InternalHosts and ExternalIgnoreHosts mechanisms don’t accept FQDNs, even with the refile: prefix. It works fine with IP Addresses, but I can’t get it to work with subdomains nor wildcards… I keep getting “not authenticated” and “no signatude data” with FQDNs in the TrustedHosts file, but it works if I replace them with their corresponding IPs.

    Is that an error in the howto, or am I somehow missing something?

    alexdo
    Site Moderator
    Site Moderator badge
    January 28, 2025

    Thank you for your kind words! Regarding your question, you’re absolutely correct: the InternalHosts and ExternalIgnoreHosts mechanisms in OpenDKIM typically do not work as expected with Fully Qualified Domain Names (FQDNs) or wildcards, even when using the refile: prefix.

    The simplest and most reliable solution is to replace FQDNs with their corresponding IP addresses in the InternalHosts and ExternalIgnoreHosts files. Example:

    192.168.1.1 
    10.0.0.0/24
    

    If your FQDN resolves to multiple IPs, list all of them explicitly.

    Regards

    Hi, thanks for the tutorial. When i run

    sudo service postfix restart


    I get the following warnings (sorry, the output is quite long).

     * Stopping Postfix Mail Transport Agent postfix                                                                                                                                             postmulti: warning: /etc/postfix/main.cf, line 48: overriding earlier entry: smtpd_milters=unix:/spamass/spamass.sock, inet:localhost:12301
    postmulti: warning: /etc/postfix/main.cf, line 49: overriding earlier entry: non_smtpd_milters=unix:/spamass/spamass.sock, inet:localhost:12301
    postmulti: warning: /etc/postfix/main.cf, line 48: overriding earlier entry: smtpd_milters=unix:/spamass/spamass.sock, inet:localhost:12301
    postmulti: warning: /etc/postfix/main.cf, line 49: overriding earlier entry: non_smtpd_milters=unix:/spamass/spamass.sock, inet:localhost:12301
    postfix: warning: /etc/postfix/main.cf, line 48: overriding earlier entry: smtpd_milters=unix:/spamass/spamass.sock, inet:localhost:12301
    postfix: warning: /etc/postfix/main.cf, line 49: overriding earlier entry: non_smtpd_milters=unix:/spamass/spamass.sock, inet:localhost:12301
    /usr/sbin/postconf: warning: /etc/postfix/main.cf, line 48: overriding earlier entry: smtpd_milters=unix:/spamass/spamass.sock, inet:localhost:12301
    /usr/sbin/postconf: warning: /etc/postfix/main.cf, line 49: overriding earlier entry: non_smtpd_milters=unix:/spamass/spamass.sock, inet:localhost:12301
                                                                                                                                                                                          [ OK ]
     * Starting Postfix Mail Transport Agent postfix                                                                                                                                             postmulti: warning: /etc/postfix/main.cf, line 48: overriding earlier entry: smtpd_milters=unix:/spamass/spamass.sock, inet:localhost:12301
    postmulti: warning: /etc/postfix/main.cf, line 49: overriding earlier entry: non_smtpd_milters=unix:/spamass/spamass.sock, inet:localhost:12301
    postmulti: warning: /etc/postfix/main.cf, line 48: overriding earlier entry: smtpd_milters=unix:/spamass/spamass.sock, inet:localhost:12301
    postmulti: warning: /etc/postfix/main.cf, line 49: overriding earlier entry: non_smtpd_milters=unix:/spamass/spamass.sock, inet:localhost:12301
    postconf: warning: /etc/postfix/main.cf, line 48: overriding earlier entry: smtpd_milters=unix:/spamass/spamass.sock, inet:localhost:12301
    postconf: warning: /etc/postfix/main.cf, line 49: overriding earlier entry: non_smtpd_milters=unix:/spamass/spamass.sock, inet:localhost:12301
    postmulti: warning: /etc/postfix/main.cf, line 48: overriding earlier entry: smtpd_milters=unix:/spamass/spamass.sock, inet:localhost:12301
    postmulti: warning: /etc/postfix/main.cf, line 49: overriding earlier entry: non_smtpd_milters=unix:/spamass/spamass.sock, inet:localhost:12301
    postfix: warning: /etc/postfix/main.cf, line 48: overriding earlier entry: smtpd_milters=unix:/spamass/spamass.sock, inet:localhost:12301
    postfix: warning: /etc/postfix/main.cf, line 49: overriding earlier entry: non_smtpd_milters=unix:/spamass/spamass.sock, inet:localhost:12301
    /usr/sbin/postconf: warning: /etc/postfix/main.cf, line 48: overriding earlier entry: smtpd_milters=unix:/spamass/spamass.sock, inet:localhost:12301
    /usr/sbin/postconf: warning: /etc/postfix/main.cf, line 49: overriding earlier entry: non_smtpd_milters=unix:/spamass/spamass.sock, inet:localhost:12301


    Line 48 and 49 have the following:

    smtpd_milters = inet:localhost:12301
    non_smtpd_milters = inet:localhost:12301


    If the two lines of code above are being overridden, should i therefore remove them?

    Restarting OpenDkim runs fine with no errors or warnings.

    Thanks in advance :)

    Problem solved! I commented out line 48 and 49. Postfix restarted with no error or warning messages and the DKIM check came back as a pass.

    alexdo
    Site Moderator
    Site Moderator badge
    January 27, 2025

    I’m glad you’ve sorted this!

    The warning indicates that the smtpd_milters and non_smtpd_milters directives are being overridden, likely because they were already defined earlier in the main.cf file.

    Regards

    on mx tools i get the error DKIM Selector is required

    I think it has something todo with the entry <selector>._domainkey.<domain.com>

    so lets say i have the domain xxxx.info

    is this then the entry i have to make mail._domainkey.xxxx.info

    and the: v=DKIM1; k=rsa; p=MIGfMA0GCSqGSIb3DQEBAQUAA4GNADCBiQKBgQC5N3lnvvrYgPCRSoqn+awTpE+iGYcKBPpo8HHbcFfCIIV10Hwo4PhCoGZSaKVHOjDm4yefKXhQjM7iKzEPuBatE7O47hAx1CJpNuIdLxhILSbEmbMxJrJAG0HZVn8z6EAoOHZNaPHmK2h4UUrjOG8zA5BHfzJf7tGwI+K619fFUwIDAQAB

    with or without the " " at the beginning and the end ?

    alexdo
    Site Moderator
    Site Moderator badge
    January 27, 2025

    Your DNS TXT record should follow this format:

    Record Name (Host): mail._domainkey

    Record Value: The public key string generated by opendkim-genkey.

    For your example:

    Record Name (Host): mail._domainkey (Note: Do not append the domain manually; most DNS providers, including DigitalOcean, will automatically append the domain name.)

    Record Value:

    v=DKIM1; k=rsa; p=MIGfMA0GCSqGSIb3DQEBAQUAA4GNADCBiQKBgQC5N3lnvvrYgPCRSoqn+awTpE+iGYcKBPpo8HHbcFfCIIV10Hwo4PhCoGZSaKVHOjDm4yefKXhQjM7iKzEPuBatE7O47hAx1CJpNuIdLxhILSbEmbMxJrJAG0HZVn8z6EAoOHZNaPHmK2h4UUrjOG8zA5BHfzJf7tGwI+K619fFUwIDAQAB
    

    You can then wait for the DNS to propagate and re-test using MXtoolbox or similar DMS check tool

    Regards

    Thank you, works well on my server ubuntu 14.04. I used the -b 2048 additional option in the key generation command since Google recommends that length and all went well.

    (Just a side note that with floating IP, the droplet IP must be included in the SPF to get spf=pass from Google. This defeats the purpose of floating IP. Also, a PTR record still points to droplet IP and not floating IP and this may be an issue. These facts rule out a floating IP for me unfortunately.)

    alexdo
    Site Moderator
    Site Moderator badge
    January 27, 2025

    If you’re running an email server, it’s often best to use the droplet’s static IP instead of a floating IP to ensure alignment of SPF, DKIM, and rDNS configurations.

    PTR records are linked to the droplet’s actual IP address because DigitalOcean ties reverse DNS (rDNS) to the droplet, not the floating IP. This is why the PTR points to the droplet’s hostname, not the floating IP.

    Since the actual sending server’s IP (the droplet’s IP) must be included in the SPF record, it does undermine the purpose of a floating IP, which is supposed to abstract away the underlying infrastructure.

    Unfortunately, SPF requires specifying the exact IPs that can send mail on behalf of your domain. Google checks this against the droplet’s IP, even if you’re using a floating IP for external connections.

    To sidestep these issues, you can offload email delivery to services like SendGrid, Mailgun, or Postmark. These services handle rDNS, SPF, DKIM, and DMARC alignment for you.

    Regards

    Looks like it works as the result on DKIM key checker:

    DNS QUERY: mail._domainkey.lolla.net.br QUERY STATUS: Success

    BUT… my e-mails still does not get to the destiny. I send, Roundcube says the message was sent, but never no one can receive it. I can receive e-mails from gmail normally.

    What it could be wrong? I’ve rebuilt my droplet so many times, tryied everything, please help me guys.

    alexdo
    Site Moderator
    Site Moderator badge
    January 27, 2025

    Your emails might be stuck in the Postfix (or other MTA) queue due to delivery issues. Run the following command to inspect the mail queue:

    sudo mailq
    

    If there are emails in the queue, they will show up with error messages (e.g., “connection timed out” or “relay denied”).

    To clear the queue:

    sudo postsuper -d ALL
    

    You can also check your mail server’s logs for detailed information about why the emails aren’t being delivered. For Postfix, the log is typically located at:

    sudo tail -f /var/log/mail.log
    

    Hope that this helps!

    I spent quite freaking several hours trying to make this thing work, DKIM test services all kept saying no such key, key not found bla bla bla.

    Solution is: DO NOT add mail._domainkey.example.com TXT record, instead DO it this way - mail._domainkey

    Yes, just mail._domainkey as record name.

    That was it.

    alexdo
    Site Moderator
    Site Moderator badge
    January 27, 2025

    Yes, that is correct the record name should be mail._domainkey, in general DKIM public records can be confusing to configure in first place.

    Regards

    OMG, Gmail no longer puts my mails in spam!

    Works for me exactly like described for Ubuntu 16.04 LTS. Cool, thanks a lot!!

    Whenever I try to verify the settings by sending mail, I get the following in the logs

    no signing table match for 'root@sub.example.com'
    

    When I run hostname I get “sub.example.com”, and when I run hostname -f I get “sub”

    What am I not doing right?

    alexdo
    Site Moderator
    Site Moderator badge
    January 27, 2025

    The error message “no signing table match for ‘root@sub.example.com’” indicates that OpenDKIM is unable to find a matching entry in your SigningTable for the email address root@sub.example.com. This issue typically arises due to a mismatch between the domain configuration and your hostname.

    The hostname on your server may not be configured correctly.

    Run the following to verify your current hostname:

    hostname hostname -f
    
    • hostname should return sub.example.com (fully qualified domain name).
    • hostname -f should also return sub.example.com.
    • If hostname -f returns sub, fix it by updating your hostname configuration:
    sudo hostnamectl set-hostname sub.example.com
    

    Update your /etc/hosts file:

    sudo nano /etc/hosts
    

    Ensure there’s a line that looks like this:

    127.0.0.1   sub.example.com sub
    

    Restart services to apply changes:

    sudo systemctl restart opendkim 
    sudo systemctl restart postfix
    

    Hope that this helps!

    This is great tutorial! I was having strange errors ad issues with DKIM pass on my domain, and I decided to try your solution from start and it worked for me! Thank you for this!

    alexdo
    Site Moderator
    Site Moderator badge
    January 27, 2025

    I’m glad the tutorial helped you resolve your DKIM issues and get everything working properly. Email authentication can sometimes feel tricky to set up, so hearing that you successfully implemented it is fantastic feedback. :)

    Regards

    i configured my spf and dkim accordingly but when I test by sending empty email I cannot see “Sender-ID check: pass” this line in the test result. What may be the problem.

    My test result The Port25 Solutions, Inc. team

    ========================================================== Summary of Results

    SPF check: pass DomainKeys check: neutral DKIM check: pass DKIM check: pass SpamAssassin check: ham

    alexdo
    Site Moderator
    Site Moderator badge
    January 27, 2025

    Heya,

    The absence of a “Sender-ID check: pass” line in your test result typically means that the receiving email service did not perform a Sender ID check. This is not necessarily a problem, as Sender ID is an older email authentication method that has been largely deprecated in favor of SPF, DKIM, and DMARC.

    You can use tool like MxToolbox SPF Lookup to verify the record. If SPF passes (as it does in your test result), Sender ID should also theoretically pass since they use the same data.

    Regards

    I checked my key for DKIM and it says my key must be base64 encoded. I don’t know how to fix that, as my key has caps and lowercase in it. Anyone? I replaced my IP, email and domain for security reasons: SPF: PASS with IP IP_ADDRESS DKIM: UNKNOWN with domain null

    Received-SPF: pass (google.com: domain of me@myemail.com designates IP_ADDRESS as permitted sender) client-ip=IP_ADDRESS; Authentication-Results: mx.google.com; dkim=temperror (no key for signature) header.i=@myemail.com; spf=pass (google.com: domain of me@myemail.com designates IP_ADDRESS as permitted sender) smtp.mailfrom=me@myemail.com Received: by myemail.com (Postfix, from userid 1000) id 37970FD580; Wed, 8 Mar 2017 21:42:58 +0000 (UTC) DKIM-Signature: v=1; a=rsa-sha256; c=relaxed/simple; d=myemail.com; s=mail; t=1489009378; bh=WBggpZrfs7F0OzQkyE7LiZPHyfFFhl7N4CNav2f5YVw=; h=Date:To:From:From; b=hKo9/Pr3g+SzLFCGplEnxtmDdGZGPXailDssMTiJj5dXeC6QDAccLrktr55K+Pzzc R3uM7E2W1eqfSUZOW9uZqjKFmfML64ki6Fyz2JaVrquASeiQtDURiXwbOaESamewc3 4iyU7eL0ciJrXfWllCqrD/E1mGdT5CEIu9wlaUIE= Date: Wed, 08 Mar 2017 21:42:58 +0000

    alexdo
    Site Moderator
    Site Moderator badge
    January 27, 2025

    The error stating that your DKIM key must be base64-encoded typically indicates an issue with how the public key is formatted in your DNS TXT record.

    When you generate a DKIM key pair using opendkim-genkey or another tool, the public key is provided in the default.txt file.

    Open the default.txt file:

    cat default.txt
    

    Example:

    default._domainkey IN TXT (     "v=DKIM1; k=rsa; p=MIGfMA0GCSqGSIb3DQEBAQUAA4GNADCBiQKBgQC5N3LNvVRyGpCRsoQN+awTPe+iGYckb..." )
    

    Copy everything after p= (the key itself). Ensure it contains no whitespace, newlines, or invalid characters.

    After updating your keys, test your DKIM configuration with mail-tester.com to verify that your emails are being signed with the correct key and length.

    Regards

    Configure postfix to use this milter:

    sudo nano /etc/postfix/main.cf

    After following all the steps, the directory postfix doesn’t exist on my server and hence nano /etc/postfix/main.cf command gives an error. Am I supposed to have done something prior to this?

    I have followed this and been through the instructions a few times to make sure I hadn’t missed a step but connections to the OpenDKIM milter are refused and looking at the log it isn’t loading properly:

    opendkim.service: PID file /var/run/opendkim/opendkim.pid not readable (yet?) after start: No such file or directory
    

    However checking as SU I can see the contents of this file so I am guessing it is some type of permissions problem but I am not sure what permissions I need to give to /var/run/opendkim/.

    This article was written for a much older version of Ubuntu so maybe this is the issue. I am running on 17.04.

    Please can anyone give me some tips as to how to resolve this? Thanks Robin

    It appears my last comment was deleted?

    I have gone over these instructions over and over again but when trying to start the OpenDKIM service it always fails with this error:

    opendkim.service: PID file /var/run/opendkim/opendkim.pid not readable (yet?) after start: No such file or directory
    

    This looks to be some sort of permission issue but doing a stat on the file it shows this:

    sudo stat /var/run/opendkim/opendkim.pid
      File: /var/run/opendkim/opendkim.pid
      Size: 5               Blocks: 8          IO Block: 4096   regular file
    Device: 15h/21d Inode: 2224613     Links: 1
    Access: (0660/-rw-rw----)  Uid: (  139/opendkim)   Gid: (  148/opendkim)
    Access: 2017-10-14 13:27:52.578832592 +0100
    Modify: 2017-10-14 13:27:52.574832593 +0100
    Change: 2017-10-14 13:27:52.574832593 +0100
     Birth: -
    

    Please can someone advise me how to resolve this. I have already searched online and cannot find a solution.

    There is a slight error to these instructions where it says to append text to opendkim.conf as you must also comment out the lines above otherwise you get options specified more than once (as some are already specified with other values above where you append).

    Thanks Robin

    This tutorial is out of date as the provided configs do not work for Ubuntu 18.04 LTS. Working configurations can be found here:

    https://www.skelleton.net/2015/03/21/how-to-eliminate-spam-and-protect-your-name-with-dmarc/

    This tutorial got me most of the way to getting DKIM going. Thank you so much. As others have commented, there was an important omission which was commented below. However, the commenter made a typo.

    The contents of the SigningTable were missing. They should read (consistent with the example.com):

    *@example.com mail._domainkey.example.com
    

    Also, when adding your TXT record, you don’t need to append your domain to the key value, you just need to enter:

    mail._domainkey
    

    Since DigitalOcean appends your domain on your behalf.

    Please make sure your mail.txt file format is correct!

    When I output my newly created DKIM record, the public key had multiple speech marks and spaces, remove all of them and your DKIM record should be fine.

    Hi,

    I really can’t suggest enough to use ‘-b 2048’ parameter when generating keys. Microsoft’s Outlook servers and gmail are not accepting mails with 256bit signed DKIM keys. They expect at least 1048bit signed keys. I thought, to be on the safe side 2048bit would be better… Some of my mails were been rejected and most of the rest were ending in spam folders (even the transactional ones, not bulk sendings) Now it’s much better, quite satisfactory inbox delivery.

    Maybe the tutorial could be updated as well…

    btw. I found this how-to linked from an Ubuntu 16.04 tutorial and used for Ubuntu 18.04 recently, and it works.

    From the official OpenDKIM manpage:

    ExternalIgnoreList (dataset)

    Identifies a set of “external” hosts that may send mail through the server as one of the signing domains without credentials as such. This has the effect of suppressing the “external host (hostname) tried to send mail as (domain)” log messages. Entries in the data set should be of the same form as those of the PeerList option below. The set is empty by default.

    InternalHosts (dataset)

    Identifies a set internal hosts whose mail should be signed rather than verified. Entries in this data set follow the same form as those of the PeerList option below. If not specified, the default of “127.0.0.1” is applied. Naturally, providing a value here overrides the default, so if mail from 127.0.0.1 should be signed, the list provided here should include that address explicitly.

    PeerList (dataset)

    Identifies a set of “peers” that identifies clients whose connections should be accepted without processing by this filter. The set should contain on each line a hostname, domain name (e.g. “.example.com”), IP address, an IPv6 address (including an IPv4 mapped address), or a CIDR-style IP specification (e.g. “192.168.1.0/24”). An entry beginning with a bang (“!”) character means “not”, allowing exclusions of specific hosts that are otherwise members of larger sets. Host and domain names are matched first, then the IP or IPv6 address depending on the connection type. More precise entries are preferred over less precise ones, i.e. “192.168.1.1” will match before “!192.168.1.0/24”. The text form of IPv6 addresses will be forced to lowercase when queried (RFC5952), so the contents of this data set should also use lowercase. The IP address portion of an entry may optionally contain square brackets; both forms (with and without) will be checked.

    The official manpage indicates that the directions found in this and many other tutorials on OpenDKIM are flawed. The contents of the InternalHosts file should be more akin to postfix mynetworks. That is, IP addresses or IP ranges (CIDRs), not hostnames. The list should consist of hosts that may relay email through this host and, as it passes through, the relayed email is what gets digitally signed by this host. The contents of the ExternalIgnoreList file indicates hosts that may send on behalf of any of the domains in SigningTable without being logged in the log file. That is, ExternalIgnoreList just suppresses warnings in the log.

    This perspective also makes more sense once you see that ExternalIgnoreList and InternalHosts causes OpenDKIM to fail to start when used with MySQL strings while KeyTable and SigningTable works just fine with MySQL strings. The ‘refile’ prefix seen in the tutorial probably doesn’t do anything.

    TL;DR, your TrustedHosts file should, generally, only contain IP addresses:

    127.0.0.0/8
    [::ffff:127.0.0.0]/104
    [::1]/128
    localhost
    
    YOUR.DROPLET.PUBLIC.IP
    DROPLET.PRIVATE.NETWORK.IP
    

    The last lines are optional and obviously get replaced with real IP addresses associated with the droplet running OpenDKIM. Using ‘localhost’ in the 4th line lets the system resolver decide to use IPv4 or IPv6 for an exact IP match. OpenDKIM prioritizes exact IPs over inexact IPs for performance reasons.

    The way the tutorial here is written makes it seem like your domain names should go into the TrustedHosts file. However, based on the manpage, that is most certainly not what is supposed to happen. Tutorials like these should be checked thoroughly for correctness, preferably by the developers of the software in question, before publishing them because they end up ranking highly on Google and spread misinformation. There are probably a bunch of poorly configured droplets and other servers out there where the person who set it up put domains into their TrustedHosts file because of this tutorial.

    I always try to find a second, in-depth tutorial when doing stuff like this. That way I can spot the differences and pick the best options instead of just following along verbatim. I use MySQL with postfix + dovecot, so I have to adapt tutorials like these anyway.

    The best DKIM tester is, IMO, mail-tester.com. They only let 3 emails through per 24 hour period for free but their service provides far more depth of reporting and analysis than the port25.com address does. Since the report is web-based, is also avoids mail routing issues with the return path + DKIM (e.g. an improperly configured DKIM setup might block the return message).

    Try DigitalOcean for free

    Click below to sign up and get $200 of credit to try our products over 60 days!

    Sign up

    Join the Tech Talk
    Success! Thank you! Please check your email for further details.

    Please complete your information!

    Become a contributor for community

    Get paid to write technical tutorials and select a tech-focused charity to receive a matching donation.

    DigitalOcean Documentation

    Full documentation for every DigitalOcean product.

    Resources for startups and SMBs

    The Wave has everything you need to know about building a business, from raising funding to marketing your product.

    Get our newsletter

    Stay up to date by signing up for DigitalOcean’s Infrastructure as a Newsletter.

    New accounts only. By submitting your email you agree to our Privacy Policy

    The developer cloud

    Scale up as you grow — whether you're running one virtual machine or ten thousand.

    Get started for free

    Sign up and get $200 in credit for your first 60 days with DigitalOcean.*

    *This promotional offer applies to new accounts only.