By Mark Drake and Tony Tran
Not using Ubuntu 18.04?
Choose a different version or distribution.
Introduction
pgAdmin is an open-source administration and development platform for PostgreSQL and its related database management systems. Written in Python and jQuery, it supports all the features found in PostgreSQL. You can use pgAdmin to do everything from writing basic SQL queries to monitoring your databases and configuring advanced database architectures.
In this tutorial, we’ll walk through the process of installing and configuring the latest version of pgAdmin onto an Ubuntu 18.04 server, accessing pgAdmin through a web browser, and connecting it to a PostgreSQL database on your server.
Prerequisites
To complete this tutorial, you will need:
- A server running Ubuntu 18.04. This server should have a non-root user with sudo privileges, as well as a firewall configured with
ufw. For help with setting this up, follow our Initial Server Setup Guide for Ubuntu 18.04. - Nginx installed and configured as a reverse proxy for
http://unix:/tmp/pgadmin4.sock, following Step 1 and 2 of How To Configure Nginx as a Reverse Proxy on Ubuntu 22.04. - PostgreSQL installed on your server. You can set this up by following our guide on How To Install and Use PostgreSQL on Ubuntu 18.04. As you follow this guide, be sure to create a new role and database, as you will need both to connect pgAdmin to your PostgreSQL instance.
- Python 3 and
venvinstalled on your server. Follow How To Install Python 3 and Set Up a Programming Environment on an Ubuntu 18.04 server to install these tools and set up a virtual environment.
Step 1 — Installing pgAdmin and its Dependencies
As of this writing, the most recent version of pgAdmin is pgAdmin 4, while the most recent version available through the official Ubuntu repositories is pgAdmin 3. pgAdmin 3 is no longer supported though, and the project maintainers recommend installing pgAdmin 4. In this step, we will go over the process of installing the latest version of pgAdmin 4 within a virtual environment (as recommended by the project’s development team) and installing its dependencies using apt.
To begin, update your server’s package index if you haven’t done so recently:
- sudo apt update
Next, install the following dependencies. These include libgmp3-dev, a multiprecision arithmetic library; libpq-dev, which includes header files and a static library that helps communication with a PostgreSQL backend:
- sudo apt install libgmp3-dev libpq-dev
Following this, create a few directories where pgAdmin will store its sessions data, storage data, and logs:
- sudo mkdir -p /var/lib/pgadmin4/sessions
- sudo mkdir /var/lib/pgadmin4/storage
- sudo mkdir /var/log/pgadmin4
Then, change ownership of these directories to your non-root user and group. This is necessary because they are currently owned by your root user, but we will install pgAdmin from a virtual environment owned by your non-root user, and the installation process involves creating some files within these directories. After the installation, however, we will change the ownership over to the www-data user and group so it can be served to the web:
- sudo chown -R sammy:sammy /var/lib/pgadmin4
- sudo chown -R sammy:sammy /var/log/pgadmin4
Next, open up your virtual environment. Navigate to the directory your programming environment is in and activate it. Following the naming conventions of the prerequisite Python 3 tutorial, we’ll go to the environments directory and activate the my_env environment:
- cd environments/
- source my_env/bin/activate
After activating the virtual environment, it would be prudent to ensure that you have the latest version of pip installed on your system. The version of pip that’s available from the default Ubuntu 18.04 repositories is version 9.0.1, while the latest version is 21.0.1. If you installed the python3-pip package as outlined in the prerequisite Python installation tutorial but you haven’t upgraded it to the latest version, you will run into problems when configuring pgAdmin in the next step.
To upgrade pip to the latest version, run the following command:
- python -m pip install -U pip
Following this, download the pgAdmin 4 source code onto your machine. To find the latest version of the source code, navigate to the pgAdmin 4 (Python Wheel) Download page. Click the link for the latest version ( v6.10, as of this writing), then on the next page click the link reading pip. From this File Browser page, copy the file link that ends with .whl — the standard built-package format used for Python distributions. Then go back to your terminal and run the following wget command, making sure to replace the link with the one you copied from the PostgreSQL site, which will download the .whl file to your server:
- wget https://ftp.postgresql.org/pub/pgadmin/pgadmin4/v6.10/pip/pgadmin4-6.10-py3-none-any.whl
Next install the wheel package, the reference implementation of the wheel packaging standard. A Python library, this package serves as an extension for building wheels and includes a command line tool for working with .whl files:
- python -m pip install wheel
Then install pgAdmin 4 package with the following command:
- python -m pip install pgadmin4-6.10-py3-none-any.whl
Next, install Gunicorn, a Python WSGI server that will be used with Nginx to serve the pgadmin web interface later in the tutorial:
- python -m pip install gunicorn
That takes care of installing pgAdmin and its dependencies. Before connecting it to your database, though, there are a few changes you’ll need to make to the program’s configuration.
Step 2 — Configuring pgAdmin 4
Although pgAdmin has been installed on your server, there are still a few steps you must go through to ensure it has the permissions and configurations needed to allow it to correctly serve the web interface.
pgAdmin’s main configuration file, config.py, is read before any other configuration file. Its contents can be used as a reference point for further configuration settings that can be specified in pgAdmin’s other config files, but to avoid unforeseen errors, you should not edit the config.py file itself. We will add some configuration changes to a new file, named config_local.py, which will be read after the primary one.
Create this file now using your preferred text editor. Here, we will use nano:
- nano my_env/lib/python3.10/site-packages/pgadmin4/config_local.py
In your editor, add the following content:
LOG_FILE = '/var/log/pgadmin4/pgadmin4.log'
SQLITE_PATH = '/var/lib/pgadmin4/pgadmin4.db'
SESSION_DB_PATH = '/var/lib/pgadmin4/sessions'
STORAGE_DIR = '/var/lib/pgadmin4/storage'
SERVER_MODE = True
Here are what these five directives do:
LOG_FILE: this defines the file in which pgAdmin’s logs will be stored.SQLITE_PATH: pgAdmin stores user-related data in an SQLite database, and this directive points the pgAdmin software to this configuration database. Because this file is located under the persistent directory/var/lib/pgadmin4/, your user data will not be lost after you upgrade.SESSION_DB_PATH: specifies which directory will be used to store session data.STORAGE_DIR: defines where pgAdmin will store other data, like backups and security certificates.SERVER_MODE: setting this directive toTruetells pgAdmin to run in Server mode, as opposed to Desktop mode.
Notice that each of these file paths point to the directories you created in Step 1.
After adding these lines, save and close the file. If you used nano, do so by press CTRL + X followed by Y and then ENTER.
With those configurations in place, run the pgAdmin setup script to set your login credentials:
- python my_env/lib/python3.10/site-packages/pgadmin4/setup.py
After running this command, you will see a prompt asking for your email address and a password. These will serve as your login credentials when you access pgAdmin later on, so be sure to remember or take note of what you enter here:
Output. . .
Enter the email address and password to use for the initial pgAdmin user account:

Email address: sammy@example.com
Password:
Retype password:
With that, pgAdmin is fully configured. However, the program isn’t yet being served from your server, so it remains inaccessible. To resolve this, we will configure Gunicorn and Nginx to serve pgAdmin so you can access its user interface through a web browser.
Step 3 — Starting Gunicorn and Configuring Nginx
You will be using Gunicorn to serve pgAdmin as a web application. However, as an application server Gunicorn will only be available locally, and not accessible through the internet. To make it available remotely, you will need to use Nginx as a reverse proxy.
Having completed the prerequisite to set up Nginx as a reverse proxy, your Nginx configuration file will contain this:
server {
    listen 80;
    listen [::]:80;

    server_name your_domain www.your_domain;

    location / {
        proxy_pass http://unix:/tmp/pgadmin4.sock;
        include proxy_params;
    }
}
This reverse proxy configuration enables your Gunicorn server to be accessible in your local browser. Start your Gunicorn server with the pgAdmin application:
- gunicorn --bind unix:/tmp/pgadmin4.sock --workers=1 --threads=25 --chdir ~/environments/my_env/lib/python3.10/site-packages/pgadmin4 pgAdmin4:app
Output[2022-08-29 00:19:11 +0000] [7134] [INFO] Starting gunicorn 20.1.0
[2022-08-29 00:19:11 +0000] [7134] [INFO] Listening at: unix:/tmp/pgadmin4.sock (7134)
[2022-08-29 00:19:11 +0000] [7134] [INFO] Using worker: gthread
[2022-08-29 00:19:11 +0000] [7135] [INFO] Booting worker with pid: 7135
Note: Invoking Gunicorn in this manner ties the process to your terminal. For a more long-term solution, invoke Gunicorn with a program like Supervisor. You can follow this tutorial on how to install and manage Supervisor on Ubuntu and Debian VPS.
With Gunicorn acting as an application server made accessible by your Nginx reverse proxy, you are ready to access pgAdmin in your web browser.
Step 4 — Accessing pgAdmin
On your local machine, open up your preferred web browser and navigate to your server’s IP address:
http://your_server_ip
Once there, you’ll be presented with a login screen similar to the following:
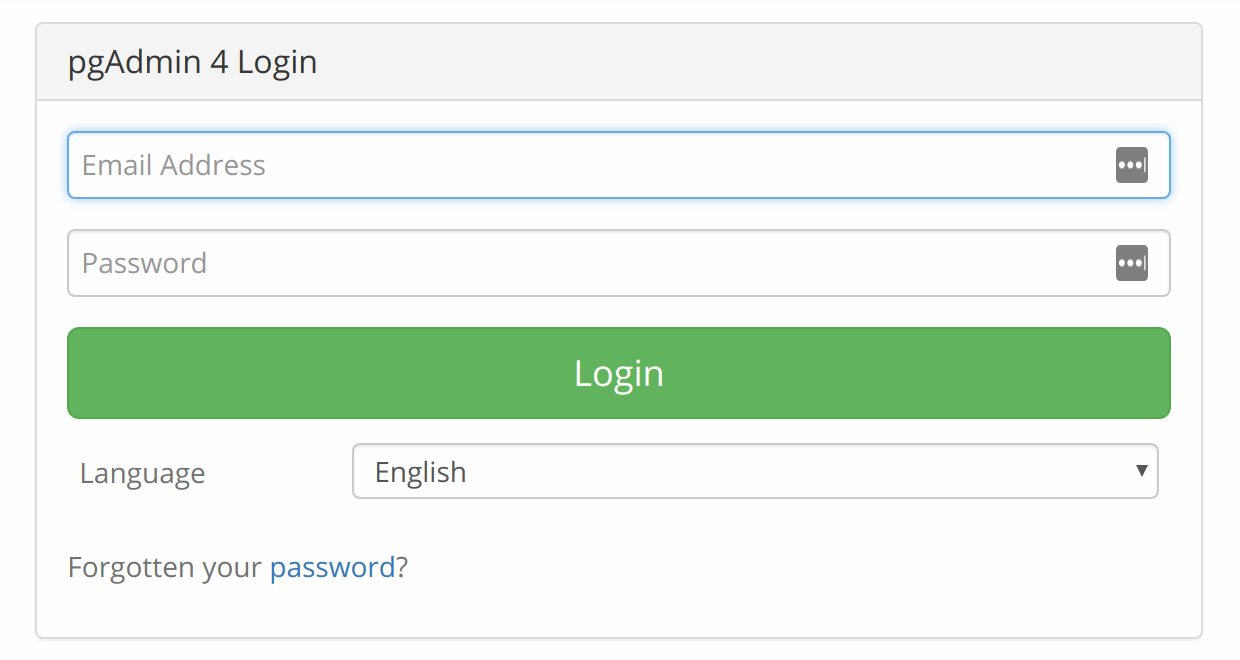
Enter the login credentials you defined in Step 2, and you’ll be taken to the pgAdmin Welcome Screen:
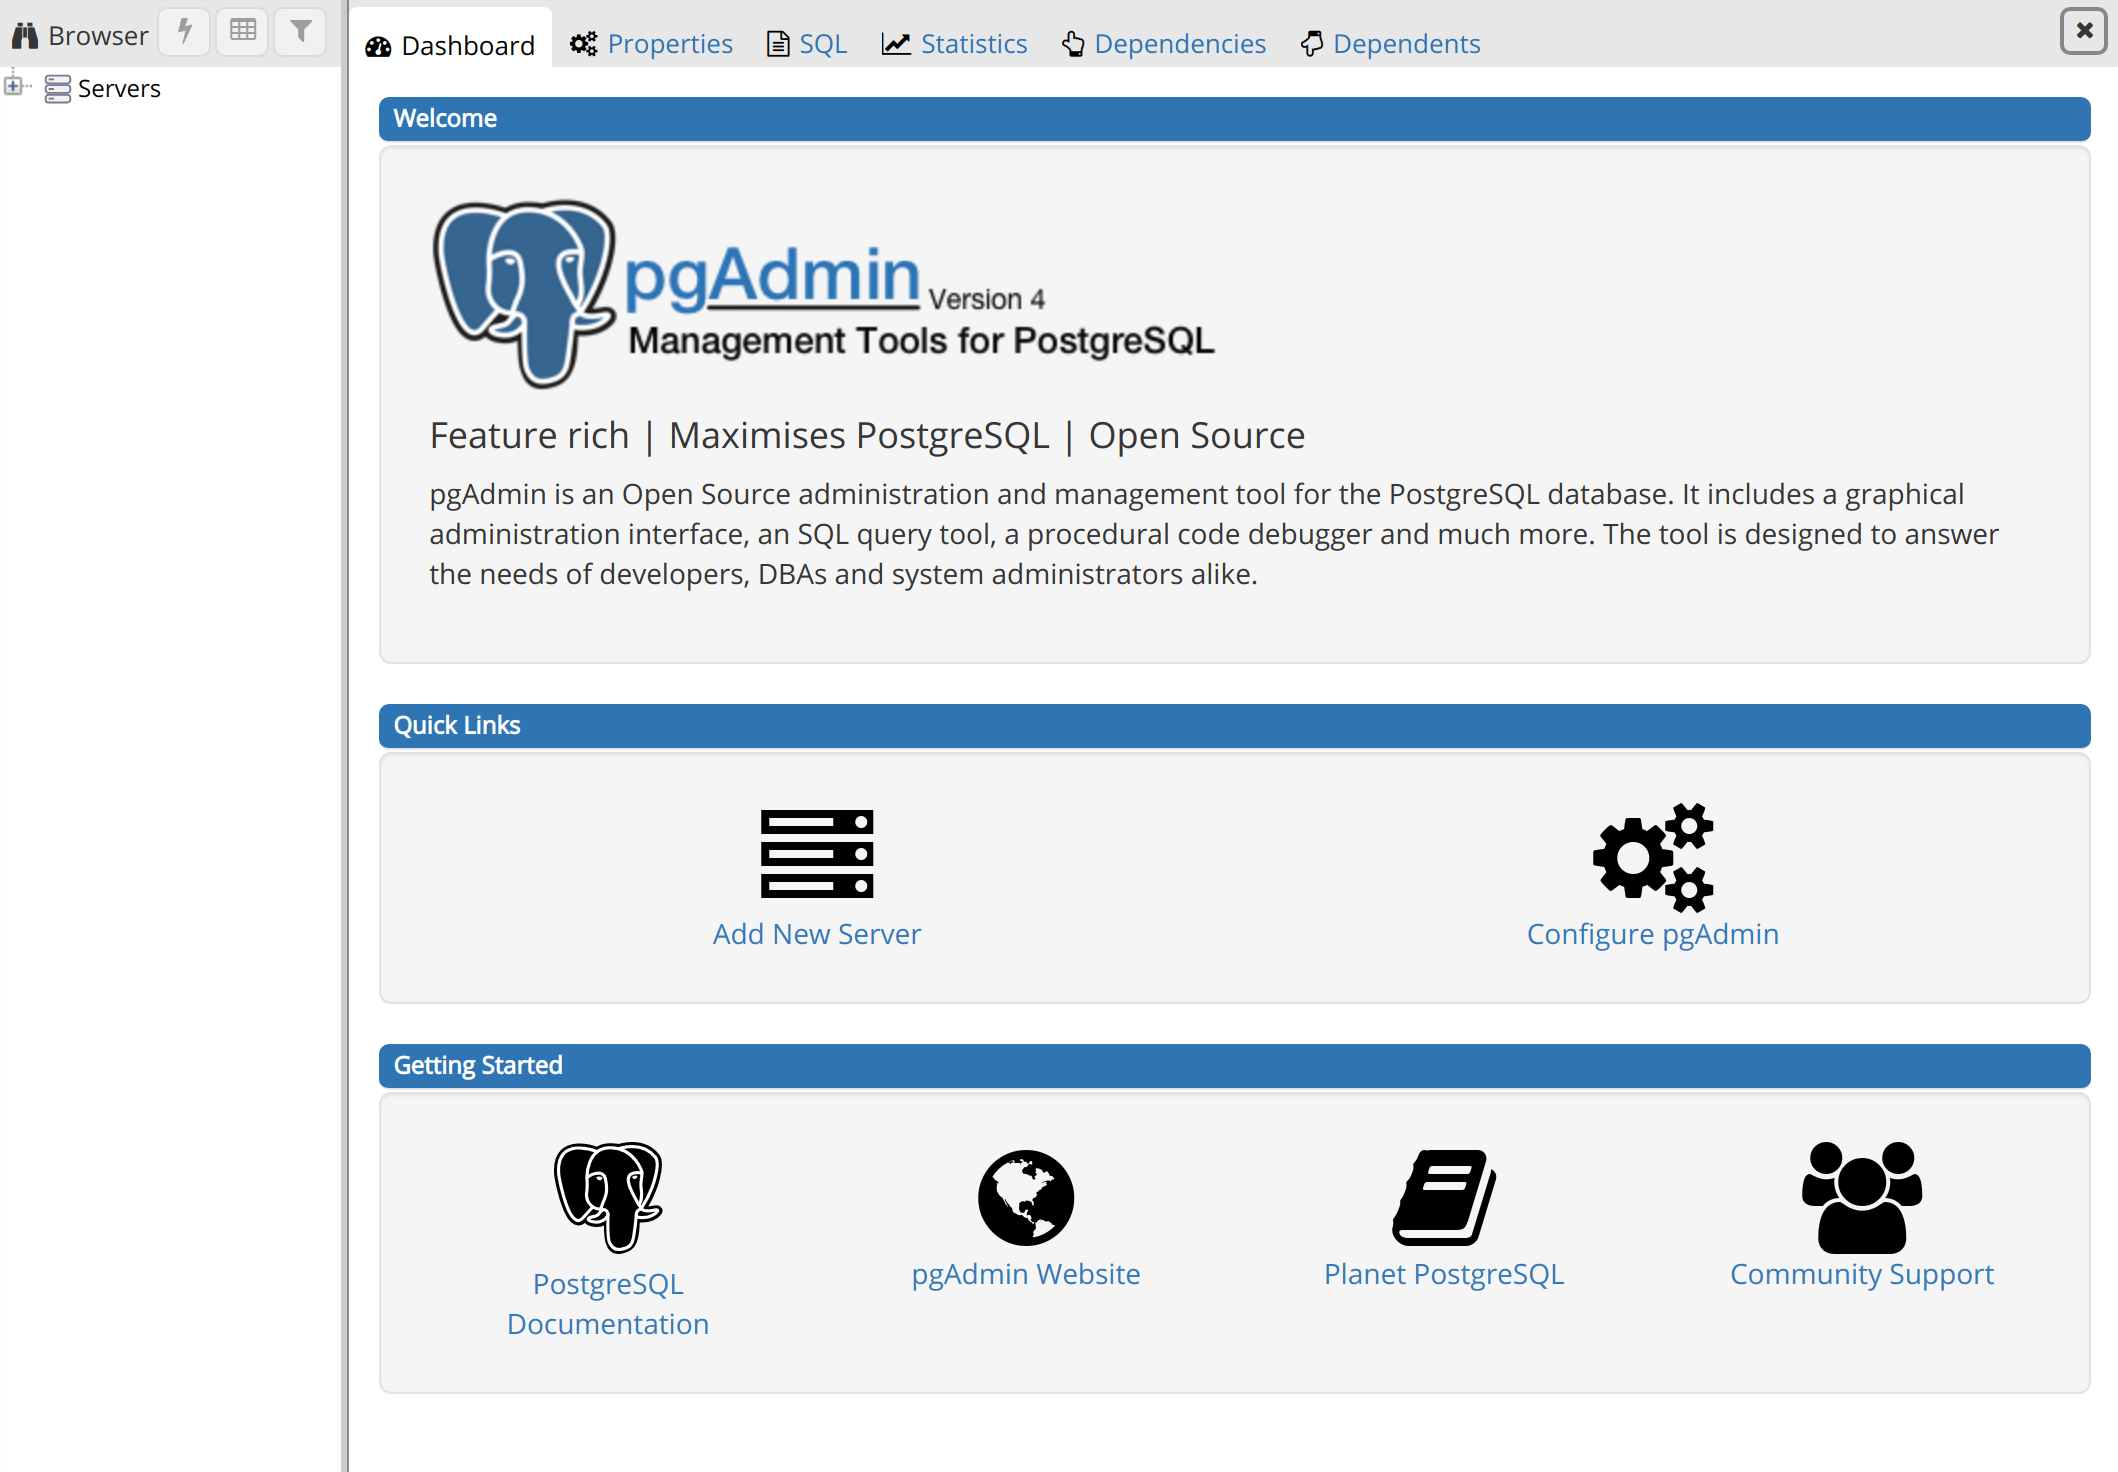
Now that you’ve confirmed you can access the pgAdmin interface, all that’s left to do is to connect pgAdmin to your PostgreSQL database. Before doing so, though, you’ll need to make one minor change to your PostgreSQL superuser’s configuration.
Step 5 — Configuring your PostgreSQL User
If you followed the prerequisite PostgreSQL tutorial, you should already have PostgreSQL installed on your server with a new superuser role and database set up.
By default in PostgreSQL, you authenticate as database users using the “Identification Protocol,” or “ident,” authentication method. This involves PostgreSQL taking the client’s Ubuntu username and using it as the allowed database username. This can allow for greater security in many cases, but it can also cause issues in instances where you’d like an outside program, such as pgAdmin, to connect to one of your databases. To resolve this, we will set a password for this PostgreSQL role which will allow pgAdmin to connect to your database.
From your terminal, open the PostgreSQL prompt under your superuser role:
- sudo -u sammy psql
From the PostgreSQL prompt, update the user profile to have a strong password of your choosing:
- ALTER USER sammy PASSWORD 'password';
Then exit the PostgreSQL prompt:
- \q
Next, go back to the pgAdmin 4 interface in your browser, and locate the Browser menu on the left hand side. Right-click on Servers to open a context menu, hover your mouse over Create, and click Server….
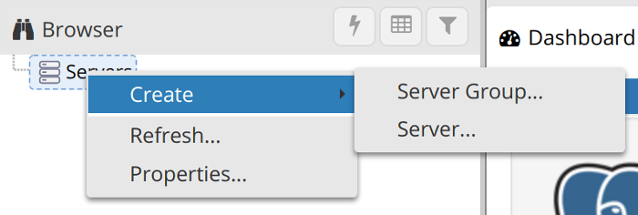
This will cause a window to pop up in your browser in which you’ll enter info about your server, role, and database.
In the General tab, enter the name for this server. This can be anything you’d like, but you may find it helpful to make it something descriptive. In our example, the server is named Sammy-server-1.
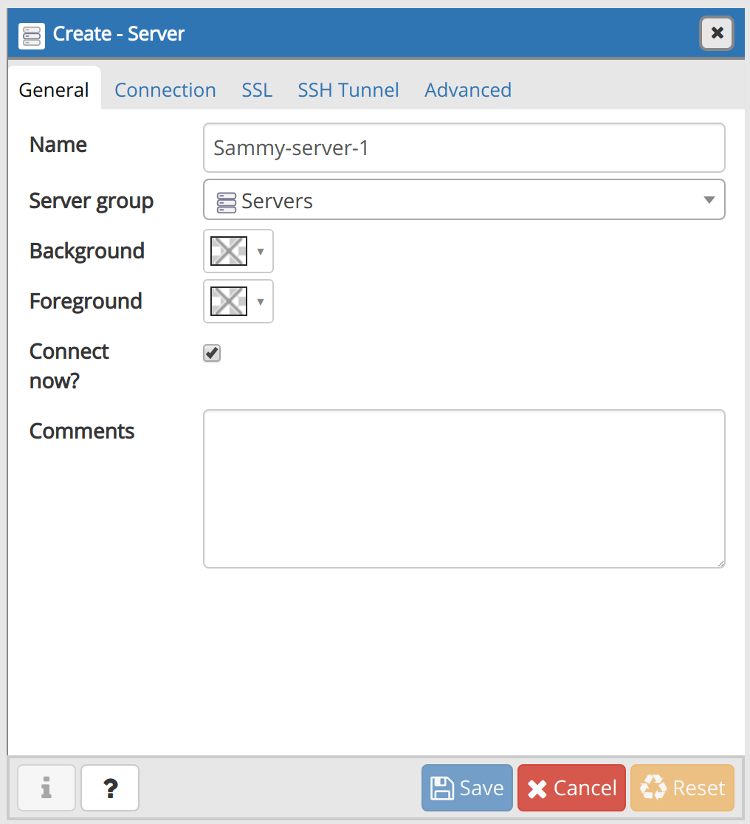
Next, click on the Connection tab. In the Host name/address field, enter localhost. The Port should be set to 5432 by default, which will work for this setup, as that’s the default port used by PostgreSQL.
In the Maintenance database field, enter the name of the database you’d like to connect to. Note that this database must already be created on your server. Then, enter the PostgreSQL username and password you configured previously in the Username and Password fields, respectively.
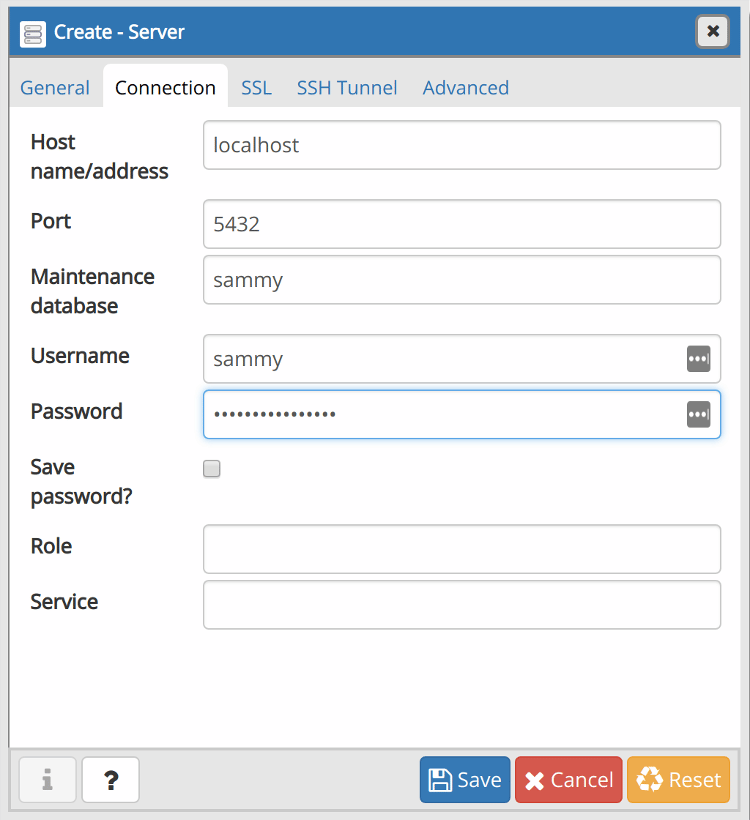
The empty fields in the other tabs are optional, and it’s only necessary that you fill them in if you have a specific setup in mind in which they’re required. Click the Save button, and the database will appear under the Servers in the Browser menu.
You’ve successfully connected pgAdmin4 to your PostgreSQL database. You can do just about anything from the pgAdmin dashboard that you would from the PostgreSQL prompt. To illustrate this, we will create an example table and populate it with some sample data through the web interface.
Step 6 — Creating a Table in the pgAdmin Dashboard
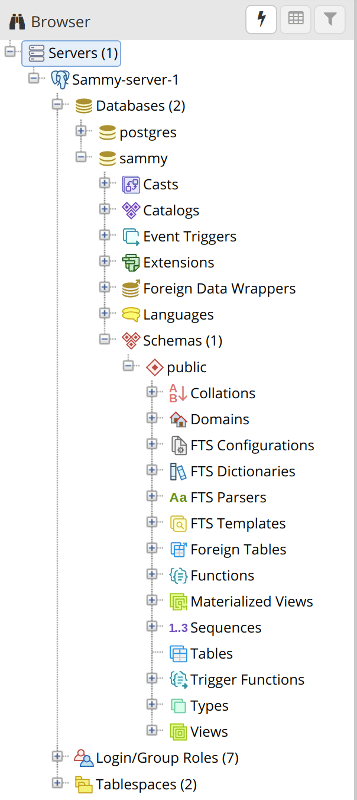
From the pgAdmin dashboard, locate the Browser menu on the left-hand side of the window. Click on the plus sign (+) next to Servers (1) to expand the tree menu within it. Next, click the plus sign to the left of the server you added in the previous step (Sammy-server-1 in our example), then expand Databases, the name of the database you added (sammy, in our example), and then Schemas (1). You should see a tree menu like the following:
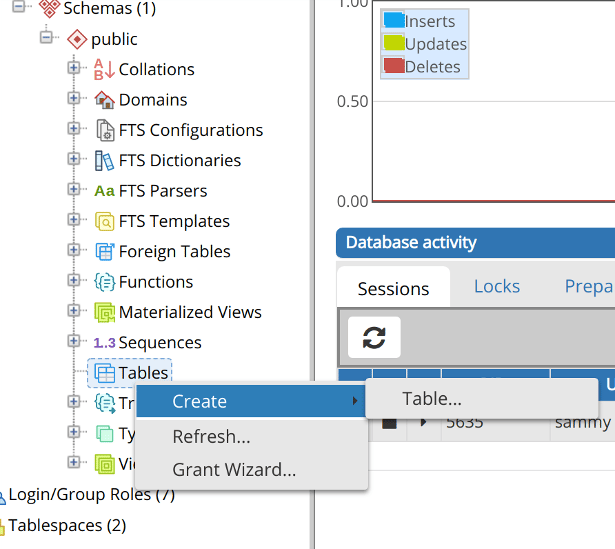
Right-click the Tables list item, then hover your cursor over Create and click Table….
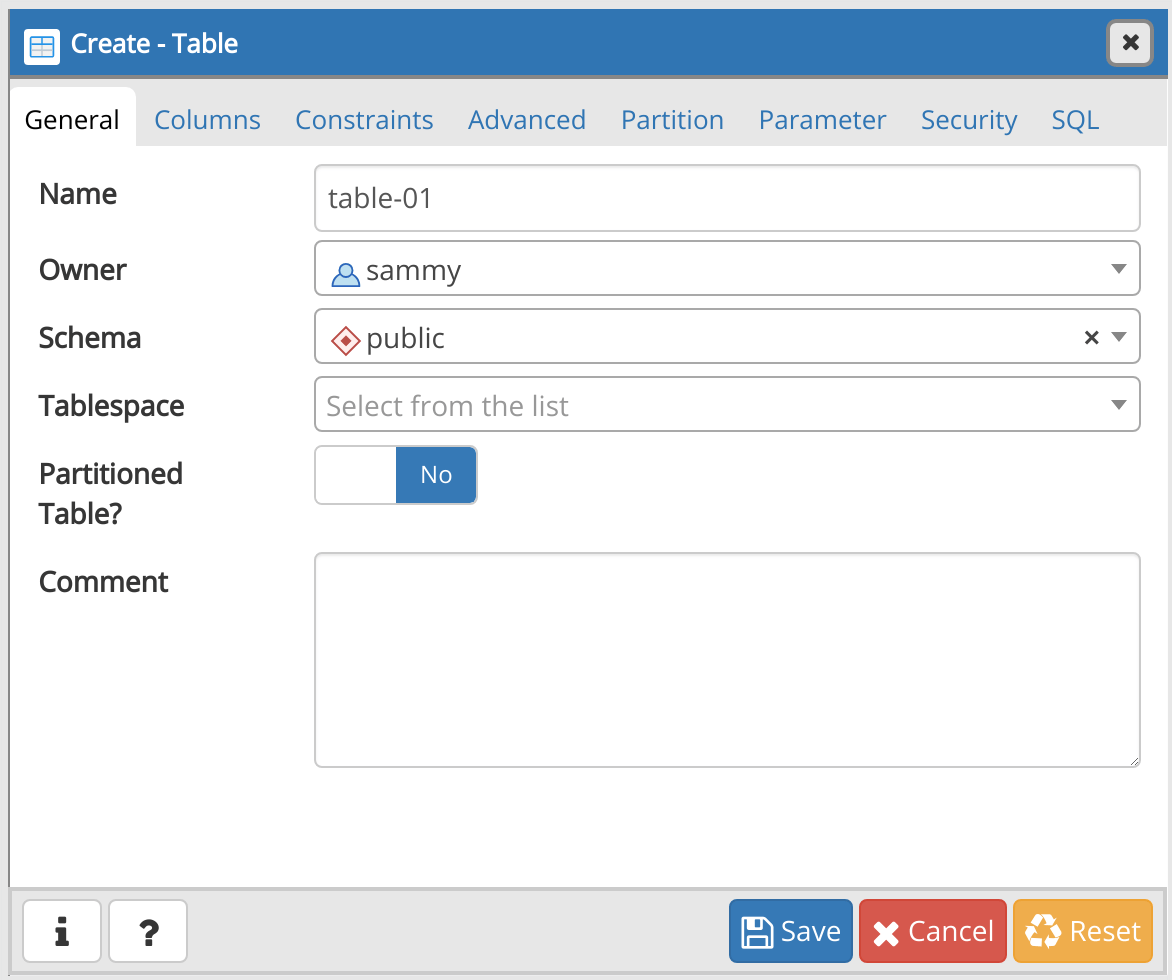
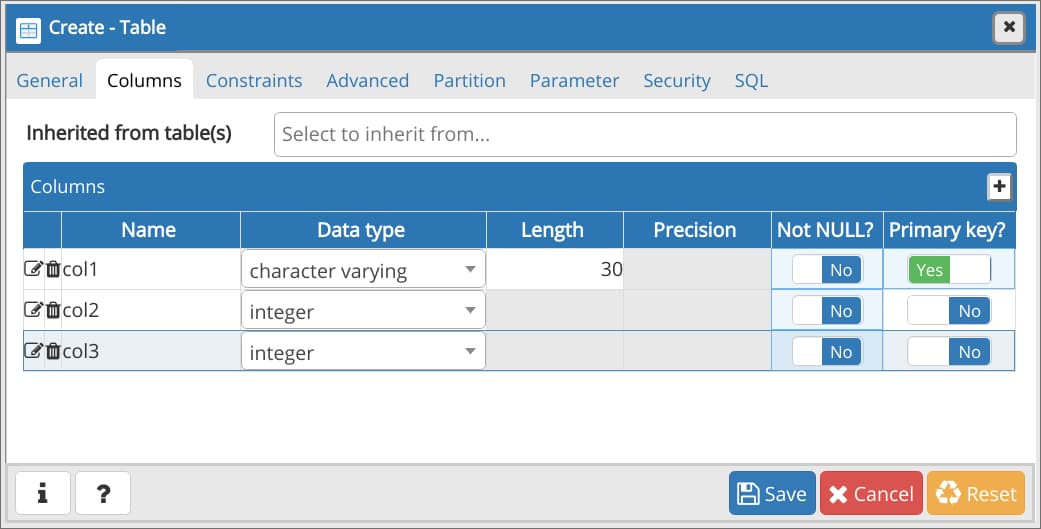
This will open up a Create-Table window. Under the General tab of this window, enter a name for the table. This can be anything you’d like, but to keep things simple we’ll refer to it as table-01.
Then navigate to the Columns tab and click the + sign in the upper right corner of the window to add some columns. When adding a column, you’re required to give it a Name and a Data type, and you may need to choose a Length if it’s required by the data type you’ve selected.
Additionally, the official PostgreSQL documentation states that adding a primary key to a table is usually best practice. A primary key is a constraint that indicates a specific column or set of columns that can be used as a special identifier for rows in the table. This isn’t a requirement, but if you’d like to set one or more of your columns as the primary key, toggle the switch at the far right from No to Yes.
Click the Save button to create the table.
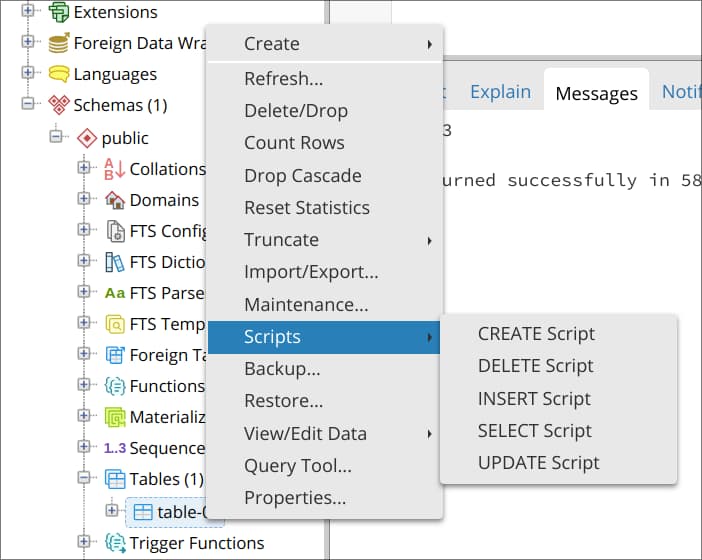
By this point, you’ve created a table and added a couple columns to it. However, the columns don’t yet contain any data. To add data to your new table, right-click the name of the table in the Browser menu, hover your cursor over Scripts and click on INSERT Script.
This will open a new panel on the dashboard. At the top you’ll see a partially-completed INSERT statement, with the appropriate table and column names. Go ahead and replace the question marks (?) with some dummy data, being sure that the data you add aligns with the data types you selected for each column. Note that you can also add multiple rows of data by adding each row in a new set of parentheses, with each set of parentheses separated by a comma as shown in the following example.
If you’d like, feel free to replace the partially-completed INSERT script with this example INSERT statement:
INSERT INTO public."table-01"(
    col1, col2, col3)
    VALUES ('Juneau', 14, 337), ('Bismark', 90, 2334), ('Lansing', 51, 556);
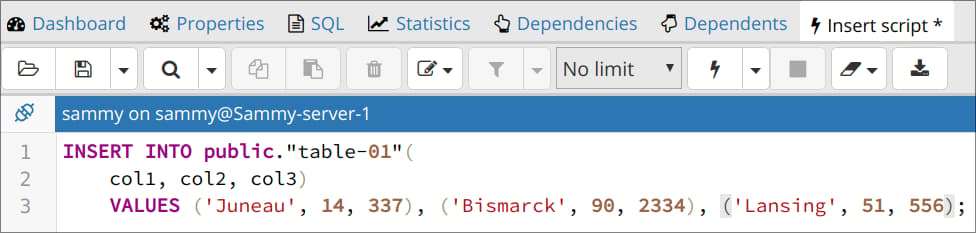
Click on the sideways triangle icon (▶) to execute the INSERT statement. Note that in older versions of pgAdmin, the execute icon is instead a lightning bolt (⚡).
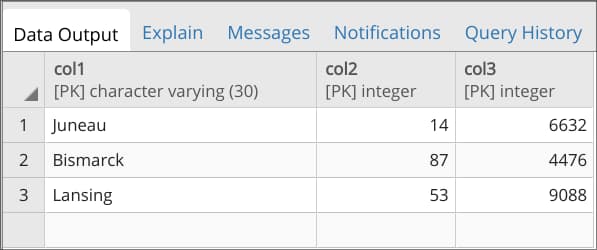
To view the table and all the data within it, right-click the name of your table in the Browser menu once again, hover your cursor over View/Edit Data, and select All Rows.
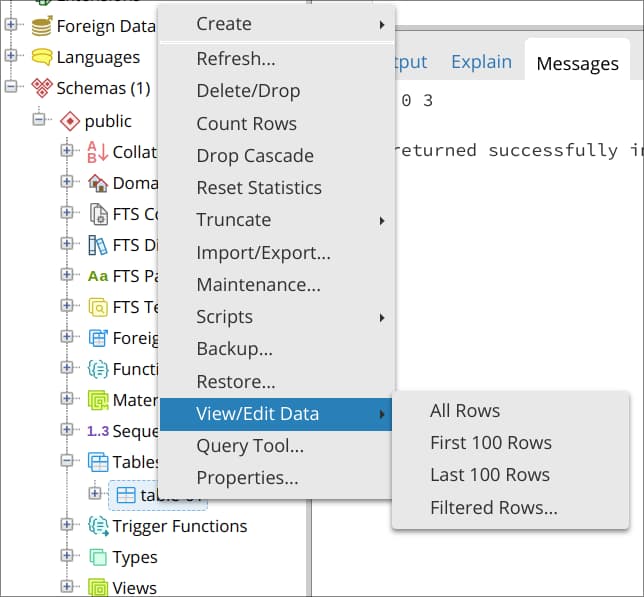
This will open another new panel, below which, in the lower panel’s Data Output tab, you can view all the data held within that table.
With that, you’ve successfully created a table and populated it with some data through the pgAdmin web interface. Of course, this is just one method you can use to create a table through pgAdmin. For example, it’s possible to create and populate a table using SQL instead of the GUI-based method described in this step.
Conclusion
In this guide, you learned how to install pgAdmin 4 from a Python virtual environment, configure it, serve it to the web with Gunicorn and Nginx, and how to connect it to a PostgreSQL database. Additionally, this guide went over one method that can be used to create and populate a table, but pgAdmin can be used for much more than just creating and editing tables.
For more information on how to get the most out of all of pgAdmin’s features, we encourage you to review the project’s documentation. You can also learn more about PostgreSQL through our Community tutorials on the subject.
Thanks for learning with the DigitalOcean Community. Check out our offerings for compute, storage, networking, and managed databases.
About the author(s)
Former Technical Writer at DigitalOcean. Focused on SysAdmin topics including Debian 11, Ubuntu 22.04, Ubuntu 20.04, Databases, SQL and PostgreSQL.
Still looking for an answer?
This textbox defaults to using Markdown to format your answer.
You can type !ref in this text area to quickly search our full set of tutorials, documentation & marketplace offerings and insert the link!
Thanks for the tutorial! I have a problem, for some reason I cannot access the postgresql server :/ Not sure what is wrong… My server is running on a DO droplet. The port 5432 seems to be open: ~$ lsof -i :5432 COMMAND PID USER FD TYPE DEVICE SIZE/OFF NODE NAME postgres 23170 postgres 6u IPv4 9234028 0t0 TCP localhost:postgresql (LISTEN)
I have created a user/password and a database, but when I try to connect from my computer with HeidiSQL or pgAdmin, I get error messages like: “Is the server running on host “138.x.x.x” and accepting TCP/IP connections on port 5432?”
What am I missing?
when deactivated the virtual environment the output was permission denied. Can i get the solution?
Hey, currently the login page is: http://my_server_ip/login How can I change it, e. g. to http://my_server_ip/some_other_path/login ?
Thanks for an answer.
This was the first tutorial I followed from this site. Thank you very much for this post, it was 100% all the way through!
I’m getting a syntax error when trying to doing the vonfigtest. I check pgadmin4.conf several times and the path names are all correct. IP is correct. it says "syntax error on line on : invalid command ‘<virtualHost’, perhaps misspelled or defined by a module not included in the server configuration.“
I’m absolutely positive I inputted exactly as instructed
I fallow step by step and in step 4 I got an error from apache:
“Forbidden You don’t have permission to access / on this server.”
How can I slove this?
Is there a reason why we can’t just do:
sudo apt-get install pgadmin4 pgadmin4-apache2
Wouldn’t that essentially take care of things? What am I missing?
Thank for this great tutorial. I just meet the DO website and I’m loving it. I got an error message in Step3, after testing configuration file’s syntax:
cgobel@ZL-WORKSTATION:/$ apachectl configtest
AH00526: Syntax error on line 1 of /etc/apache2/sites-enabled/pgadmin4.conf:
Name duplicates previous WSGI daemon definition.
Action 'configtest' failed.
The Apache error log may have more information.
Could you help me to understand this error? Thanks
Hi,
I did a mistake when I created the user, and made the installation under /root.
But when I finished, I got the error 4.3 Forbidden.
Then I moved the folder environments/ to the user created, /home/USER_NAME.
But now the server isn’t answering, and after some time it gives Gateway Timeout.
Thanks, Carlos
Running python my_env/lib/python3.6/site-packages/pgadmin4/setup.py results in error:
Traceback (most recent call last):
  File "my_env/lib/python3.6/site-packages/pgadmin4/setup.py", line 413, in <module>
    setup_db()
  File "my_env/lib/python3.6/site-packages/pgadmin4/setup.py", line 345, in setup_db
    create_app_data_directory(config)
  File "/home/scottj/environments/my_env/lib/python3.6/site-packages/pgadmin4/pgadmin/setup/data_directory.py", line 24, in create_app_data_directory
    _create_directory_if_not_exists(os.path.dirname(config.SQLITE_PATH))
  File "/home/scottj/environments/my_env/lib/python3.6/site-packages/pgadmin4/pgadmin/setup/data_directory.py", line 16, in _create_directory_if_not_exists
    os.mkdir(_path)
PermissionError: [Errno 13] Permission denied: '/var/lib/pgadmin'
I believe that’s correct as there is no /var/lib/pgadmin directory as per these instructions. Even if I do this;
sudo chmod 777 -R /var/log/pgadmin4/
sudo chmod 777 -R /var/lib/pgadmin4/
It still results in the same error so it doesn’t appear to be a permission issue? So where did this go wrong?
 This work is licensed under a Creative Commons Attribution-NonCommercial- ShareAlike 4.0 International License.
Become a contributor for community
Get paid to write technical tutorials and select a tech-focused charity to receive a matching donation.

DigitalOcean Documentation
Full documentation for every DigitalOcean product.

Resources for startups and AI-native businesses
The Wave has everything you need to know about building a business, from raising funding to marketing your product.
The developer cloud
Scale up as you grow — whether you're running one virtual machine or ten thousand.

Start building today
From GPU-powered inference and Kubernetes to managed databases and storage, get everything you need to build, scale, and deploy intelligent applications.
