Tutorial

How To Install Elasticsearch, Logstash, and Kibana (ELK Stack) on CentOS 7

How To Install Elasticsearch, Logstash, and Kibana (ELK Stack) on CentOS 7

Introduction

In this tutorial, we will go over the installation of the Elasticsearch ELK Stack on CentOS 7—that is, Elasticsearch 2.2.x, Logstash 2.2.x, and Kibana 4.4.x. We will also show you how to configure it to gather and visualize the syslogs of your systems in a centralized location, using Filebeat 1.1.x. Logstash is an open source tool for collecting, parsing, and storing logs for future use. Kibana is a web interface that can be used to search and view the logs that Logstash has indexed. Both of these tools are based on Elasticsearch, which is used for storing logs.

Centralized logging can be very useful when attempting to identify problems with your servers or applications, as it allows you to search through all of your logs in a single place. It is also useful because it allows you to identify issues that span multiple servers by correlating their logs during a specific time frame.

It is possible to use Logstash to gather logs of all types, but we will limit the scope of this tutorial to syslog gathering.

Our Goal

The goal of the tutorial is to set up Logstash to gather syslogs of multiple servers, and set up Kibana to visualize the gathered logs.

Our ELK stack setup has four main components:

  • Logstash: The server component of Logstash that processes incoming logs
  • Elasticsearch: Stores all of the logs
  • Kibana: Web interface for searching and visualizing logs, which will be proxied through Nginx
  • Filebeat: Installed on client servers that will send their logs to Logstash, Filebeat serves as a log shipping agent that utilizes the lumberjack networking protocol to communicate with Logstash

ELK Infrastructure

We will install the first three components on a single server, which we will refer to as our ELK Server. Filebeat will be installed on all of the client servers that we want to gather logs for, which we will refer to collectively as our Client Servers.

Prerequisites

To complete this tutorial, you will require root access to an CentOS 7 VPS. Instructions to set that up can be found here (steps 3 and 4): Initial Server Setup with CentOS 7.

If you would prefer to use Ubuntu instead, check out this tutorial: How To Install ELK on Ubuntu 14.04.

The amount of CPU, RAM, and storage that your ELK Server will require depends on the volume of logs that you intend to gather. For this tutorial, we will be using a VPS with the following specs for our ELK Server:

  • OS: CentOS 7
  • RAM: 4GB
  • CPU: 2

In addition to your ELK Server, you will want to have a few other servers that you will gather logs from.

Let’s get started on setting up our ELK Server!

Install Java 8

Elasticsearch and Logstash require Java, so we will install that now. We will install a recent version of Oracle Java 8 because that is what Elasticsearch recommends. It should, however, work fine with OpenJDK, if you decide to go that route. Following the steps in this section means that you accept the Oracle Binary License Agreement for Java SE.

Change to your home directory and download the Oracle Java 8 (Update 73, the latest at the time of this writing) JDK RPM with these commands:

  1. cd ~
  2. wget --no-cookies --no-check-certificate --header "Cookie: gpw_e24=http%3A%2F%2Fwww.oracle.com%2F; oraclelicense=accept-securebackup-cookie" "http://download.oracle.com/otn-pub/java/jdk/8u73-b02/jdk-8u73-linux-x64.rpm"

Then install the RPM with this yum command (if you downloaded a different release, substitute the filename here):

  1. sudo yum -y localinstall jdk-8u73-linux-x64.rpm

Now Java should be installed at /usr/java/jdk1.8.0_73/jre/bin/java, and linked from /usr/bin/java.

You may delete the archive file that you downloaded earlier:

  1. rm ~/jdk-8u*-linux-x64.rpm

Now that Java 8 is installed, let’s install ElasticSearch.

Install Elasticsearch

Elasticsearch can be installed with a package manager by adding Elastic’s package repository.

Run the following command to import the Elasticsearch public GPG key into rpm:

  1. sudo rpm --import http://packages.elastic.co/GPG-KEY-elasticsearch

Create a new yum repository file for Elasticsearch. Note that this is a single command:

  1. echo '[elasticsearch-2.x]
  2. name=Elasticsearch repository for 2.x packages
  3. baseurl=http://packages.elastic.co/elasticsearch/2.x/centos
  4. gpgcheck=1
  5. gpgkey=http://packages.elastic.co/GPG-KEY-elasticsearch
  6. enabled=1
  7. ' | sudo tee /etc/yum.repos.d/elasticsearch.repo

Install Elasticsearch with this command:

  1. sudo yum -y install elasticsearch

Elasticsearch is now installed. Let’s edit the configuration:

  1. sudo vi /etc/elasticsearch/elasticsearch.yml

You will want to restrict outside access to your Elasticsearch instance (port 9200), so outsiders can’t read your data or shutdown your Elasticsearch cluster through the HTTP API. Find the line that specifies network.host, uncomment it, and replace its value with “localhost” so it looks like this:

elasticsearch.yml excerpt (updated)
network.host: localhost

Save and exit elasticsearch.yml.

Now start Elasticsearch:

  1. sudo systemctl start elasticsearch

Then run the following command to start Elasticsearch automatically on boot up:

  1. sudo systemctl enable elasticsearch

Now that Elasticsearch is up and running, let’s install Kibana.

Install Kibana

The Kibana package shares the same GPG Key as Elasticsearch, and we already installed that public key.

Create and edit a new yum repository file for Kibana:

  1. sudo vi /etc/yum.repos.d/kibana.repo

Add the following repository configuration:

/etc/yum.repos.d/kibana.repo
  1. [kibana-4.4]
  2. name=Kibana repository for 4.4.x packages
  3. baseurl=http://packages.elastic.co/kibana/4.4/centos
  4. gpgcheck=1
  5. gpgkey=http://packages.elastic.co/GPG-KEY-elasticsearch
  6. enabled=1

Save and exit.

Install Kibana with this command:

  1. sudo yum -y install kibana

Open the Kibana configuration file for editing:

  1. sudo vi /opt/kibana/config/kibana.yml

In the Kibana configuration file, find the line that specifies server.host, and replace the IP address (“0.0.0.0” by default) with “localhost”:

kibana.yml excerpt (updated)
server.host: "localhost"

Save and exit. This setting makes it so Kibana will only be accessible to the localhost. This is fine because we will install an Nginx reverse proxy, on the same server, to allow external access.

Now start the Kibana service, and enable it:

  1. sudo systemctl start kibana
  2. sudo chkconfig kibana on

Before we can use the Kibana web interface, we have to set up a reverse proxy. Let’s do that now, with Nginx.

Install Nginx

Because we configured Kibana to listen on localhost, we must set up a reverse proxy to allow external access to it. We will use Nginx for this purpose.

Note: If you already have an Nginx instance that you want to use, feel free to use that instead. Just make sure to configure Kibana so it is reachable by your Nginx server (you probably want to change the host value, in /opt/kibana/config/kibana.yml, to your Kibana server’s private IP address). Also, it is recommended that you enable SSL/TLS.

Add the EPEL repository to yum:

  1. sudo yum -y install epel-release

Now use yum to install Nginx and httpd-tools:

  1. sudo yum -y install nginx httpd-tools

Use htpasswd to create an admin user, called “kibanaadmin” (you should use another name), that can access the Kibana web interface:

  1. sudo htpasswd -c /etc/nginx/htpasswd.users kibanaadmin

Enter a password at the prompt. Remember this login, as you will need it to access the Kibana web interface.

Now open the Nginx configuration file in your favorite editor. We will use vi:

  1. sudo vi /etc/nginx/nginx.conf

Find the default server block (starts with server {), the last configuration block in the file, and delete it. When you are done, the last two lines in the file should look like this:

nginx.conf excerpt
    include /etc/nginx/conf.d/*.conf;
}

Save and exit.

Now we will create an Nginx server block in a new file:

  1. sudo vi /etc/nginx/conf.d/kibana.conf

Paste the following code block into the file. Be sure to update the server_name to match your server’s name:

/etc/nginx/conf.d/kibana.conf
  1. server {
  2. listen 80;
  3. server_name example.com;
  4. auth_basic "Restricted Access";
  5. auth_basic_user_file /etc/nginx/htpasswd.users;
  6. location / {
  7. proxy_pass http://localhost:5601;
  8. proxy_http_version 1.1;
  9. proxy_set_header Upgrade $http_upgrade;
  10. proxy_set_header Connection 'upgrade';
  11. proxy_set_header Host $host;
  12. proxy_cache_bypass $http_upgrade;
  13. }
  14. }

Save and exit. This configures Nginx to direct your server’s HTTP traffic to the Kibana application, which is listening on localhost:5601. Also, Nginx will use the htpasswd.users file, that we created earlier, and require basic authentication.

Now start and enable Nginx to put our changes into effect:

  1. sudo systemctl start nginx
  2. sudo systemctl enable nginx

Note: This tutorial assumes that SELinux is disabled. If this is not the case, you may need to run the following command for Kibana to work properly: sudo setsebool -P httpd_can_network_connect 1

Kibana is now accessible via your FQDN or the public IP address of your ELK Server i.e. http://elk_server_public_ip/. If you go there in a web browser, after entering the “kibanaadmin” credentials, you should see a Kibana welcome page which will ask you to configure an index pattern. Let’s get back to that later, after we install all of the other components.

Install Logstash

The Logstash package shares the same GPG Key as Elasticsearch, and we already installed that public key, so let’s create and edit a new Yum repository file for Logstash:

  1. sudo vi /etc/yum.repos.d/logstash.repo

Add the following repository configuration:

/etc/yum.repos.d/logstash.repo
  1. [logstash-2.2]
  2. name=logstash repository for 2.2 packages
  3. baseurl=http://packages.elasticsearch.org/logstash/2.2/centos
  4. gpgcheck=1
  5. gpgkey=http://packages.elasticsearch.org/GPG-KEY-elasticsearch
  6. enabled=1

Save and exit.

Install Logstash with this command:

  1. sudo yum -y install logstash

Logstash is installed but it is not configured yet.

Generate SSL Certificates

Since we are going to use Filebeat to ship logs from our Client Servers to our ELK Server, we need to create an SSL certificate and key pair. The certificate is used by Filebeat to verify the identity of ELK Server. Create the directories that will store the certificate and private key with the following commands:

Now you have two options for generating your SSL certificates. If you have a DNS setup that will allow your client servers to resolve the IP address of the ELK Server, use Option 2. Otherwise, Option 1 will allow you to use IP addresses.

Option 1: IP Address

If you don’t have a DNS setup—that would allow your servers, that you will gather logs from, to resolve the IP address of your ELK Server—you will have to add your ELK Server’s private IP address to the subjectAltName (SAN) field of the SSL certificate that we are about to generate. To do so, open the OpenSSL configuration file:

  1. sudo vi /etc/pki/tls/openssl.cnf

Find the [ v3_ca ] section in the file, and add this line under it (substituting in the ELK Server’s private IP address):

openssl.cnf excerpt
  1. subjectAltName = IP: ELK_server_private_ip

Save and exit.

Now generate the SSL certificate and private key in the appropriate locations (/etc/pki/tls/), with the following commands:

  1. cd /etc/pki/tls
  2. sudo openssl req -config /etc/pki/tls/openssl.cnf -x509 -days 3650 -batch -nodes -newkey rsa:2048 -keyout private/logstash-forwarder.key -out certs/logstash-forwarder.crt

The logstash-forwarder.crt file will be copied to all of the servers that will send logs to Logstash but we will do that a little later. Let’s complete our Logstash configuration. If you went with this option, skip option 2 and move on to Configure Logstash.

Option 2: FQDN (DNS)

If you have a DNS setup with your private networking, you should create an A record that contains the ELK Server’s private IP address—this domain name will be used in the next command, to generate the SSL certificate. Alternatively, you can use a record that points to the server’s public IP address. Just be sure that your servers (the ones that you will be gathering logs from) will be able to resolve the domain name to your ELK Server.

Now generate the SSL certificate and private key, in the appropriate locations (/etc/pki/tls/…), with the following command (substitute in the FQDN of the ELK Server):

  1. cd /etc/pki/tls
  2. sudo openssl req -subj '/CN=ELK_server_fqdn/' -x509 -days 3650 -batch -nodes -newkey rsa:2048 -keyout private/logstash-forwarder.key -out certs/logstash-forwarder.crt

The logstash-forwarder.crt file will be copied to all of the servers that will send logs to Logstash but we will do that a little later. Let’s complete our Logstash configuration.

Configure Logstash

Logstash configuration files are in the JSON-format, and reside in /etc/logstash/conf.d. The configuration consists of three sections: inputs, filters, and outputs.

Let’s create a configuration file called 02-beats-input.conf and set up our “filebeat” input:

  1. sudo vi /etc/logstash/conf.d/02-beats-input.conf

Insert the following input configuration:

02-beats-input.conf
  1. input {
  2. beats {
  3. port => 5044
  4. ssl => true
  5. ssl_certificate => "/etc/pki/tls/certs/logstash-forwarder.crt"
  6. ssl_key => "/etc/pki/tls/private/logstash-forwarder.key"
  7. }
  8. }

Save and quit. This specifies a beats input that will listen on tcp port 5044, and it will use the SSL certificate and private key that we created earlier.

Now let’s create a configuration file called 10-syslog-filter.conf, where we will add a filter for syslog messages:

  1. sudo vi /etc/logstash/conf.d/10-syslog-filter.conf

Insert the following syslog filter configuration:

10-syslog-filter.conf
  1. filter {
  2. if [type] == "syslog" {
  3. grok {
  4. match => { "message" => "%{SYSLOGTIMESTAMP:syslog_timestamp} %{SYSLOGHOST:syslog_hostname} %{DATA:syslog_program}(?:\[%{POSINT:syslog_pid}\])?: %{GREEDYDATA:syslog_message}" }
  5. add_field => [ "received_at", "%{@timestamp}" ]
  6. add_field => [ "received_from", "%{host}" ]
  7. }
  8. syslog_pri { }
  9. date {
  10. match => [ "syslog_timestamp", "MMM d HH:mm:ss", "MMM dd HH:mm:ss" ]
  11. }
  12. }
  13. }

Save and quit. This filter looks for logs that are labeled as “syslog” type (by Filebeat), and it will try to use grok to parse incoming syslog logs to make it structured and query-able.

Lastly, we will create a configuration file called 30-elasticsearch-output.conf:

  1. sudo vi /etc/logstash/conf.d/30-elasticsearch-output.conf

Insert the following output configuration:

/etc/logstash/conf.d/30-elasticsearch-output.conf
  1. output {
  2. elasticsearch {
  3. hosts => ["localhost:9200"]
  4. sniffing => true
  5. manage_template => false
  6. index => "%{[@metadata][beat]}-%{+YYYY.MM.dd}"
  7. document_type => "%{[@metadata][type]}"
  8. }
  9. }

Save and exit. This output basically configures Logstash to store the beats data in Elasticsearch which is running at localhost:9200, in an index named after the beat used (filebeat, in our case).

If you want to add filters for other applications that use the Filebeat input, be sure to name the files so they sort between the input and the output configuration (i.e. between 02- and 30-).

Test your Logstash configuration with this command:

  1. sudo service logstash configtest

It should display Configuration OK if there are no syntax errors. Otherwise, try and read the error output to see what’s wrong with your Logstash configuration.

Restart and enable Logstash to put our configuration changes into effect:

  1. sudo systemctl restart logstash
  2. sudo chkconfig logstash on

Next, we’ll load the sample Kibana dashboards.

Load Kibana Dashboards

Elastic provides several sample Kibana dashboards and Beats index patterns that can help you get started with Kibana. Although we won’t use the dashboards in this tutorial, we’ll load them anyway so we can use the Filebeat index pattern that it includes.

First, download the sample dashboards archive to your home directory:

  1. cd ~
  2. curl -L -O https://download.elastic.co/beats/dashboards/beats-dashboards-1.1.0.zip

Install the unzip package with this command:

  1. sudo yum -y install unzip

Next, extract the contents of the archive:

  1. unzip beats-dashboards-*.zip

And load the sample dashboards, visualizations and Beats index patterns into Elasticsearch with these commands:

  1. cd beats-dashboards-*
  2. ./load.sh

These are the index patterns that we just loaded:

  • [packetbeat-]YYYY.MM.DD
  • [topbeat-]YYYY.MM.DD
  • [filebeat-]YYYY.MM.DD
  • [winlogbeat-]YYYY.MM.DD

When we start using Kibana, we will select the Filebeat index pattern as our default.

Load Filebeat Index Template in Elasticsearch

Because we are planning on using Filebeat to ship logs to Elasticsearch, we should load a Filebeat index template. The index template will configure Elasticsearch to analyze incoming Filebeat fields in an intelligent way.

First, download the Filebeat index template to your home directory:

  1. cd ~
  2. curl -O https://gist.githubusercontent.com/thisismitch/3429023e8438cc25b86c/raw/d8c479e2a1adcea8b1fe86570e42abab0f10f364/filebeat-index-template.json

Then load the template with this command:

  1. curl -XPUT 'http://localhost:9200/_template/filebeat?pretty' -d@filebeat-index-template.json

If the template loaded properly, you should see a message like this:

Output:
{ "acknowledged" : true }

Now that our ELK Server is ready to receive Filebeat data, let’s move onto setting up Filebeat on each client server.

Set Up Filebeat (Add Client Servers)

Do these steps for each CentOS or RHEL 7 server that you want to send logs to your ELK Server. For instructions on installing Filebeat on Debian-based Linux distributions (e.g. Ubuntu, Debian, etc.), refer to the Set Up Filebeat (Add Client Servers) section of the Ubuntu variation of this tutorial.

Copy SSL Certificate

On your ELK Server, copy the SSL certificate—created in the prerequisite tutorial—to your Client Server (substitute the client server’s address, and your own login):

  1. scp /etc/pki/tls/certs/logstash-forwarder.crt user@client_server_private_address:/tmp

After providing your login’s credentials, ensure that the certificate copy was successful. It is required for communication between the client servers and the ELK Server.

Now, on your Client Server, copy the ELK Server’s SSL certificate into the appropriate location (/etc/pki/tls/certs):

  1. sudo mkdir -p /etc/pki/tls/certs
  2. sudo cp /tmp/logstash-forwarder.crt /etc/pki/tls/certs/

Now we will install the Topbeat package.

Install Filebeat Package

On Client Server, create run the following command to import the Elasticsearch public GPG key into rpm:

  1. sudo rpm --import http://packages.elastic.co/GPG-KEY-elasticsearch

Create and edit a new yum repository file for Filebeat:

  1. sudo vi /etc/yum.repos.d/elastic-beats.repo

Add the following repository configuration:

/etc/yum.repos.d/elastic-beats.repo
  1. [beats]
  2. name=Elastic Beats Repository
  3. baseurl=https://packages.elastic.co/beats/yum/el/$basearch
  4. enabled=1
  5. gpgkey=https://packages.elastic.co/GPG-KEY-elasticsearch
  6. gpgcheck=1

Save and exit.

Install Filebeat with this command:

  1. sudo yum -y install filebeat

Filebeat is installed but it is not configured yet.

Configure Filebeat

Now we will configure Filebeat to connect to Logstash on our ELK Server. This section will step you through modifying the example configuration file that comes with Filebeat. When you complete the steps, you should have a file that looks something like this.

On Client Server, create and edit Filebeat configuration file:

  1. sudo vi /etc/filebeat/filebeat.yml

Note: Filebeat’s configuration file is in YAML format, which means that indentation is very important! Be sure to use the same number of spaces that are indicated in these instructions.

Near the top of the file, you will see the prospectors section, which is where you can define prospectors that specify which log files should be shipped and how they should be handled. Each prospector is indicated by the - character.

We’ll modify the existing prospector to send secure and messages logs to Logstash. Under paths, comment out the - /var/log/*.log file. This will prevent Filebeat from sending every .log in that directory to Logstash. Then add new entries for syslog and auth.log. It should look something like this when you’re done:

filebeat.yml excerpt 1 of 5
...
      paths:
        - /var/log/secure
        - /var/log/messages
#        - /var/log/*.log
...

Then find the line that specifies document_type:, uncomment it and change its value to “syslog”. It should look like this after the modification:

filebeat.yml excerpt 2 of 5
...
      document_type: syslog
...

This specifies that the logs in this prospector are of type syslog (which is the type that our Logstash filter is looking for).

If you want to send other files to your ELK server, or make any changes to how Filebeat handles your logs, feel free to modify or add prospector entries.

Next, under the output section, find the line that says elasticsearch:, which indicates the Elasticsearch output section (which we are not going to use). Delete or comment out the entire Elasticsearch output section (up to the line that says logstash:).

Find the commented out Logstash output section, indicated by the line that says #logstash:, and uncomment it by deleting the preceding #. In this section, uncomment the hosts: ["localhost:5044"] line. Change localhost to the private IP address (or hostname, if you went with that option) of your ELK server:

filebeat.yml excerpt 3 of 5
  ### Logstash as output
  logstash:
    # The Logstash hosts
    hosts: ["ELK_server_private_IP:5044"]

This configures Filebeat to connect to Logstash on your ELK Server at port 5044 (the port that we specified an input for earlier).

Directly under the hosts entry, and with the same indentation, add this line:

filebeat.yml excerpt 4 of 5
    bulk_max_size: 1024

Next, find the tls section, and uncomment it. Then uncomment the line that specifies certificate_authorities, and change its value to ["/etc/pki/tls/certs/logstash-forwarder.crt"]. It should look something like this:

filebeat.yml excerpt 5 of 5
...
    tls:
      # List of root certificates for HTTPS server verifications
      certificate_authorities: ["/etc/pki/tls/certs/logstash-forwarder.crt"]

This configures Filebeat to use the SSL certificate that we created on the ELK Server.

Save and quit.

Now start and enable Filebeat to put our changes into place:

  1. sudo systemctl start filebeat
  2. sudo systemctl enable filebeat

Again, if you’re not sure if your Filebeat configuration is correct, compare it against this example Filebeat configuration.

Now Filebeat is sending your syslog messages and secure files to your ELK Server! Repeat this section for all of the other servers that you wish to gather logs for.

Test Filebeat Installation

If your ELK stack is setup properly, Filebeat (on your client server) should be shipping your logs to Logstash on your ELK server. Logstash should be loading the Filebeat data into Elasticsearch in an date-stamped index, filebeat-YYYY.MM.DD.

On your ELK Server, verify that Elasticsearch is indeed receiving the data by querying for the Filebeat index with this command:

  1. curl -XGET 'http://localhost:9200/filebeat-*/_search?pretty'

You should see a bunch of output that looks like this:

Sample Output:
... { "_index" : "filebeat-2016.01.29", "_type" : "log", "_id" : "AVKO98yuaHvsHQLa53HE", "_score" : 1.0, "_source":{"message":"Feb 3 14:34:00 rails sshd[963]: Server listening on :: port 22.","@version":"1","@timestamp":"2016-01-29T19:59:09.145Z","beat":{"hostname":"topbeat-u-03","name":"topbeat-u-03"},"count":1,"fields":null,"input_type":"log","offset":70,"source":"/var/log/auth.log","type":"log","host":"topbeat-u-03"} } ...

If your output shows 0 total hits, Elasticsearch is not loading any logs under the index you searched for, and you should review your setup for errors. If you received the expected output, continue to the next step.

Connect to Kibana

When you are finished setting up Filebeat on all of the servers that you want to gather logs for, let’s look at Kibana, the web interface that we installed earlier.

In a web browser, go to the FQDN or public IP address of your ELK Server. After entering the “kibanaadmin” credentials, you should see a page prompting you to configure a default index pattern:

Create index

Go ahead and select [filebeat]-YYY.MM.DD from the Index Patterns menu (left side), then click the Star (Set as default index) button to set the Filebeat index as the default.

Now click the Discover link in the top navigation bar. By default, this will show you all of the log data over the last 15 minutes. You should see a histogram with log events, with log messages below:

Discover page

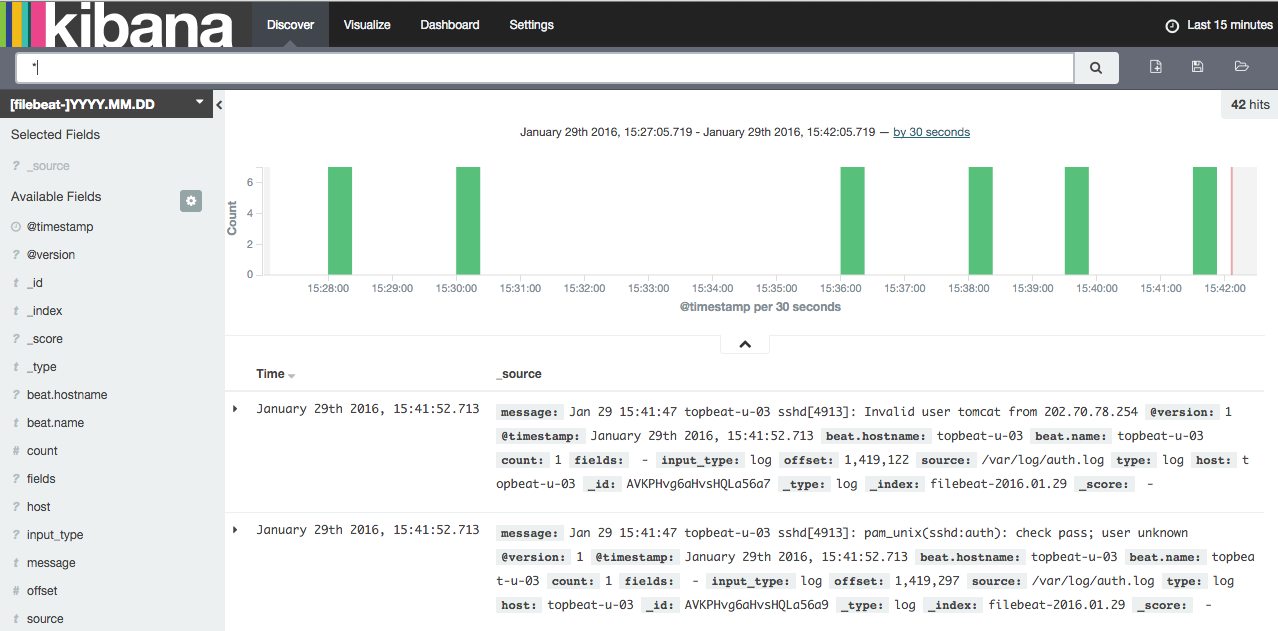
Right now, there won’t be much in there because you are only gathering syslogs from your client servers. Here, you can search and browse through your logs. You can also customize your dashboard.

Try the following things:

  • Search for “root” to see if anyone is trying to log into your servers as root
  • Search for a particular hostname (search for host: "hostname")
  • Change the time frame by selecting an area on the histogram or from the menu above
  • Click on messages below the histogram to see how the data is being filtered

Kibana has many other features, such as graphing and filtering, so feel free to poke around!

Conclusion

Now that your syslogs are centralized via Elasticsearch and Logstash, and you are able to visualize them with Kibana, you should be off to a good start with centralizing all of your important logs. Remember that you can send pretty much any type of log or indexed data to Logstash, but the data becomes even more useful if it is parsed and structured with grok.

To improve your new ELK stack, you should look into gathering and filtering your other logs with Logstash, and creating Kibana dashboards. You may also want to gather system metrics by using Topbeat with your ELK stack. All of these topics are covered in the other tutorials in this series.

Good luck!

Thanks for learning with the DigitalOcean Community. Check out our offerings for compute, storage, networking, and managed databases.

Learn more about our products


Tutorial Series: Centralized Logging with Logstash and Kibana On CentOS 7

Centralized logging can be very useful when attempting to identify problems with your servers or applications, as it allows you to search through all of your logs in a single place. It is also useful because it allows you to identify issues that span multiple servers by correlating their logs during a specific time frame. This series will teach you how to install Logstash and Kibana on Ubuntu, then how to add more filters to structure your log data. Then it will teach you how to use Kibana.

About the author(s)

Mitchell Anicas
Mitchell Anicas
See author profile

Still looking for an answer?

Ask a questionSearch for more help

Was this helpful?
 
110 Comments
Leave a comment...

This textbox defaults to using Markdown to format your answer.

You can type !ref in this text area to quickly search our full set of tutorials, documentation & marketplace offerings and insert the link!

1st - thank you for nice tutorial. Unfortunately, Nginx frontend doesn’t work for me:

Error: Bad Request at respond (http://x.x.x.x/index.js?_b=5930:81566:15) at checkRespForFailure (http://x.x.x.x/index.js?_b=5930:81534:7) at http://x.x.x.x/index.js?_b=5930:80203:7 at wrappedErrback (http://x.x.x.x/index.js?_b=5930:20882:78) at wrappedErrback (http://x.x.x.x/index.js?_b=5930:20882:78) at wrappedErrback (http://x.x.x.x/index.js?_b=5930:20882:78) at http://x.x.x.x/index.js?_b=5930:21015:76 at Scope.$eval (http://x.x.x.x/index.js?_b=5930:22002:28) at Scope.$digest (http://x.x.x.x/index.js?_b=5930:21814:31) at Scope.$apply (http://x.x.x.x/index.js?_b=5930:22106:24)

any idea? TIA, Vitaly

I found a solution to fix these config : i use a static adress IP for my ELK server : 10.82.136.52 In logstash agent pipeline, in output : /etc/logstash/conf.d/30-*.conf for elasticsearch, enter the IP in double quote : output { elasticsearch { host => “10.82.136.52” } } Thanks a lots. It do run now :-) I continue the next step of the tutorial.

Great tutorial, thank you. I get an error on the kibana page prompting “Configure an index pattern” and iget stuck there it says "Unable to fetch mapping. Do you have indices matching the pattern? Any ideas? TIA

I’m getting the exact same error. Does anyone know how to fix this error?

I had the same problem and it turned out that my logstash-forwarder install wasn’t actually forwarding log messages to logstash.

I’m running a centralized loghost and my logstash-forwarder is installed locally on the same VM that runs logstash. I told logstash-forwarder to send to 127.0.0.1:5000 but I noticed via “netstat -anp | grep <logstash pid>” that logstash is listening on my public interface (e.g. 192.168.1.10) as opposed to 127.0.0.1.

When I changed my logstash-forwarder config to use the public IP I also noticed (via tail -f /var/log/elasticsearch/elasticsearch.log) a bunch of log messages start rolling.

Then all of the sudden the “Configure and index pattern” web prompt worked.

On configuration of Logstash Forwarder, you have to give FQDN instead of logstash_server_private_IP.

I had the same problem. I started looking through the logstash-forwarder.conf file and noticed a section with an opening bracket that didn’t have a close bracket.

If you just edited the pre-existing logstash-forwarder.conf file, you probably ran into that as well. I didn’t notice it initially, but the close curly bracket encompasses the paths section also opens another paths section with an open curly bracket. Look for a “}, {” in the conf file.

Follo. worked for me: See “Filebeat Configuration”, filebeat.yml excerpt 1 of 4 *… paths: - /var/log/auth.log - /var/log/syslog

- /var/log/.log

… Check if auth.log or syslog are present in /var/log/ dir Else, write there follo. instead paths: - /var/log/secure - /var/log/messages It works. //There’s been a mistake in above tutorial: it says we’ll send messages and secure logs but gives auth.log and syslog

Mitchell Anicas
DigitalOcean Employee
DigitalOcean Employee badge
January 12, 2016

Thanks, I corrected the issue.

Thank you Mitchel for this tutorial! I have a question. I need to send httpd logs to kibana. Do you have any templates to filter that entries? I’m from Brazil, sorry for my bad english ;)

I used your previous tutorial and it worked nice. Thanks!!! Just one last little problem.

My Grok filter for LogStash:

filter {
    grok {
      match => { "message" => "%{SYSLOGTIMESTAMP:syslog_timestamp} %{SYSLOGHOST:syslog_hostname} %{DATA:syslog_program}(?:\[%{POSINT:syslog_pid}\])?: %{GREEDYDATA:syslog_message}" }
    }
}

It is perfect for my Linux logins logs:

Mar  9 14:18:20 ServerName sshd[14160]: pam_unix(sshd:session): session opened for user root by (uid=0)
{
             "message" => "Mar  9 14:18:20 ServerName sshd[14160]: pam_unix(sshd:session): session opened for user root by (uid=0)",
            "@version" => "1",
          "@timestamp" => "2015-03-09T15:08:39.189Z",
                "host" => "elasticsearchservername",
    "syslog_timestamp" => "Mar  9 14:18:20",
     "syslog_hostname" => "ServerName",
      "syslog_program" => "sshd",
          "syslog_pid" => "14160",
      "syslog_message" => "pam_unix(sshd:session): session opened for user root by (uid=0)"
}

The problem are the windows logs (little sintax differences), so I can’t get the syslog_pid:

Mar  3 08:58:57 ServerName2 Security-Auditing: 4624: AUDIT_SUCCESS Se inici.. sesi..n correctamente en una cuenta. Sujeto: Id. de seguridad: 
{
             "message" => "Mar  3 08:58:57 ServerName2 Security-Auditing: 4624: AUDIT_SUCCESS Se inici.. sesi..n correctamente en una cuenta. Sujeto: Id. de seguridad:",
            "@version" => "1",
          "@timestamp" => "2015-03-09T15:22:50.351Z",
                "host" => "elasticsearchservername",
    "syslog_timestamp" => "Mar  3 08:58:57",
     "syslog_hostname" => "ServerName2 ",
      "syslog_program" => "Security-Auditing",
      "syslog_message" => "4624: AUDIT_SUCCESS Se inici.. sesi..n correctamente en una cuenta. Sujeto: Id. de seguridad:"
}

How can I change the grok filter for both logs (windows and linux) and get the two syslog_pid?

Thanks in advance and sorry for my English 0:-)

Mitchell Anicas
DigitalOcean Employee
DigitalOcean Employee badge
March 12, 2015

The log patterns are different, so you probably should send the Windows logs as a different type and write a filter to match it.

https://grokdebug.herokuapp.com/ is pretty handy for writing grok patterns.

This comment has been deleted

    Thanks for your advise Mitchel!!!

    I feel closer to the end. Using your suggested web, I have the 2 grok filters, so my filter part in logstash.conf is:

    filter {
      if [type] == "linuxlog" {
        grok {
          match => { "message" => "%{SYSLOGTIMESTAMP:syslog_timestamp} %{SYSLOGHOST:syslog_hostname} %{DATA:syslog_program}(?:\[%{POSINT:syslog_pid}\])?: %{GREEDYDATA:syslog_message}" }
        }
      }
      if [type] == "windowslog" {
        grok {
          match => { "message" => "%{SYSLOGTIMESTAMP:syslog_timestamp} %{SYSLOGHOST:syslog_hostname} %{DATA:syslog_program}?: %{POSINT:syslog_pid}?: %{GREEDYDATA:syslog_message}" }
        }
      }
    }
    

    It works for Linux and Windows logs. The last problem is how can I decide which type of log the logstash is receiving. How can I stablish the type in the input part? Actually, it is:

    input {
      tcp {
        port => 5000
        type => syslog
      }
      udp {
        port => 5000
        type => syslog
      }
    }
    

    Thanks again! You are being so helpful.

    Thank you for these tutorials they are a life saver. Run into a bit of a snag with nginx. It states 502 Bad Gateway when trying to access Kibana. Direct access works fine so Kibana is okay. Nginx error log states the following:

    2015/03/12 14:46:17 [crit] 8741#0: *1 connect() to 127.0.0.1:5601 failed (13: Permission denied) while connecting to upstream, client: xxx.xxx.xxx.xxx, server: log.server.com, request: “GET / HTTP/1.1”, upstream: “http://127.0.0.1:5601/”, host: “log.server.com

    2015/03/12 14:46:17 [error] 8741#0: *1 no live upstreams while connecting to upstream, client: xxx.xxx.xxx.xxx, server: log.server.com, request: “GET /favicon.ico HTTP/1.1”, upstream: “http://localhost/favicon.ico”, host: “log.server.com

    What permission is denied?

    I managed to get it working and getting rid of the bad gateway error by running:

    sudo setsebool -P httpd_can_network_connect 1
    
    Mitchell Anicas
    DigitalOcean Employee
    DigitalOcean Employee badge
    March 12, 2015

    Sorry about that! Most of our CentOS tutorials assume that SELinux is disabled.

    Hi,

    Thanks for your tutorial. Is there a way to setup a default page on kibana dahsboard, for example one of the dashboard I created as default page?

    Mitchell Anicas
    DigitalOcean Employee
    DigitalOcean Employee badge
    March 13, 2015

    Not as far as I know. Maybe bookmarking the share link will work for you?

    OK, I have finished. I configured the Windows Servers to send the logs to 5000 port, and the Linux to the 5001 port. My succesfully finish logstash.conf is:

    input {
      tcp {
        port => 5000
        type => windowslog
      }
      udp {
        port => 5000
        type => windowslog
      }
      tcp {
        port => 5001
        type => linuxlog
      }
      udp {
        port => 5001
        type => linuxlog
      }
    }
    filter {
      if [type] == "linuxlog" {
        grok {
          match => { "message" => "%{SYSLOGTIMESTAMP:syslog_timestamp} %{SYSLOGHOST:syslog_hostname} %{DATA:syslog_program}(?:\[%{POSINT:syslog_pid}\])?: %{GREEDYDATA:syslog_message}" }
        }
      }
      if [type] == "windowslog" {
        grok {
          match => { "message" => "%{SYSLOGTIMESTAMP:syslog_timestamp} %{SYSLOGHOST:syslog_hostname} %{DATA:syslog_program}?: %{POSINT:syslog_pid}?: %{GREEDYDATA:syslog_message}" }
        }
      }
    }
    output {
      elasticsearch { host => localhost }
      stdout { codec => rubydebug }
    }
    

    It works!!! I can see in my Kibana the logins/logouts… I am happy!!! Thanks for the help, Mitchell, great blog.

    Mitchell Anicas
    DigitalOcean Employee
    DigitalOcean Employee badge
    March 13, 2015

    Nice work!

    Hey Mitchell,

    Thanks for another amazing post. Let me just say that your tutorials are of the best quality out there and are invaluable to those of us who read them.

    I have one final problem Mitchell.

    I don’t have the year in my incoming logs (so do you), so when I get the “syslog_timestamp” it is: Mar 17 15:09:17 (like in your Kibana logs)

    If I go to “Settings” in Kibana, it says that “syslog_timestamp” is a string field (not a date), so i can’t order by “syslog_timestamp”, only by @timestamp.

    How can I resolve this? Adding the year to the “syslog_timestamp”? Changing the field type in ElasticSearch?

    Thanks again in advance…

    If you want to run logstash and listen on :5514 for incoming syslog messages and have rsyslog forward messages to you then you will either need to disable SELinux (setenforce 0; systemctl restart rsyslog) or you’ll need to extend your SELinux policy and include :5514 as a port rsyslog can connect to.

    logstash can’t listen on :514 because it is a privileged port so it listens on :5514.

    However, the SELinux for syslog forbids rsyslog from connecting to any port other than :514.

    This bug/errata has more details: https://bugzilla.redhat.com/show_bug.cgi?id=728591

    You’ll need to run the following command (as root) in order to permit rsyslog to connect to :5514 (logstash): semanage port -a -t syslogdportt -p tcp 5514

    Thank you for the tutorial, I followed it up to installing nginx, I’m installing this on my webserver and want to use it to manage my logs including my apache logs, I don’t want to install nginx as well as the already present apache. Is there a way to continue the tutorial but using apache instead?

    Mitchell Anicas
    DigitalOcean Employee
    DigitalOcean Employee badge
    March 30, 2015

    In this setup, Nginx is being used as a reverse proxy to serve the Kibana application. If you want to use Apache, you can use the mod_rewrite module and include these configuration lines:

    ProxyPass / http://localhost:5601/
    ProxyPassReverse / http://localhost:5601/
    

    Also, the second tutorial in this series covers how to gather Apache logs.

    Hi Mitchell,

    Thank you for the tutorial. I would like to create a elasticsearch cluster on single host, could you guide me on how to do that? I installed elasticsearch 1.5.0 and it is running as a service right now.

    HI David,

     I'm getting certificate signed by unknown authority error !!. Any suggestions ?
    

    This comment has been deleted

      HI Manicas,

      I want to Index it by Source hostname. Can you suggest me how to do it ?

      regards,

      Hemanath

      First, a great thank for this tutotial that helped me to start with ELK. Now, I am well on my POC but I’ve problem of industrialization “data security”. Of course, Shield exists but we don’t want a paid tool. My question is : In real life, nginx would be enough to secure exchanges between final customer and Kibana? How can compartmentalize different customers (of course with different indices)?

      Thanks

      Hi Mitchel, these are great tutorials. I have tried installing on Centos and Ubuntu but I had not luck getting the indices to work. I only see the logstash-* , but I dont see a drop down box to select @timestamp, or the create button, the only message that it shows is “unable to fetch mapping, Do you have indices matching the pattern?” I been wanting to use Kibana as a syslog for cisco Switches, routers, nexus and other.

      Mitchell Anicas
      DigitalOcean Employee
      DigitalOcean Employee badge
      May 7, 2015

      That means that Logstash isn’t receiving and storing logs in Elasticsearch. It is likely that your Logstash or Logstash Forwarder are not configured properly.

      Hi Mitchell,

      I am newbie to ELK setup. :)

      I have followed same steps. Installed elasticsearch on one machine, logstash on other machine. All installations done by root only. These are new Linux boxes which I got for installations. Then I started logstash by following command: sudo service logstash start But after 2-3 minutes when I check status of logstash, it shows that it’s not running like:

      [root@rwc-host1 conf.d]# sudo service logstash status
      logstash is not running
      

      I checked logstash.err file it gives below:

      [root@rwc-host193 ~]# tail -100f /var/log/logstash/logstash.err
      May 13, 2015 9:07:04 AM org.apache.http.impl.execchain.RetryExec execute
      INFO: I/O exception (org.apache.http.conn.HttpHostConnectException) caught when processing request to {}->http://ELASTICSEARCH_IP:9200: Connect to ELASTICSEARCH_IP:9200 [/ELASTICSEARCH_IP] failed: Connection refused
      May 13, 2015 9:07:04 AM org.apache.http.impl.execchain.RetryExec execute
      INFO: Retrying request to {}->http://ELASTICSEARCH_IP:9200
      May 13, 2015 9:07:04 AM org.apache.http.impl.execchain.RetryExec execute
      INFO: I/O exception (org.apache.http.conn.HttpHostConnectException) caught when processing request to {}->http://ELASTICSEARCH_IP:9200: Connect to ELASTICSEARCH_IP:9200 [/ELASTICSEARCH_IP] failed: Connection refused
      May 13, 2015 9:07:04 AM org.apache.http.impl.execchain.RetryExec execute
      INFO: Retrying request to {}->http://ELASTICSEARCH_IP:9200
      

      and logstash.log file shows below:

      {:timestamp=>"2015-05-13T09:07:04.670000-0400", :message=>"Failed to install template: Connection refused", :level=>:error}
      

      My trial.conf file is like this:

      input {
      stdin { }
      }
      output {
      elasticsearch { host => <ELASTICSEARCH_IP> port => "9200" protocol => "http" }
        stdout { codec => rubydebug }
      }
      

      Can you please help me here as what might have gone wrong?

      Eagerly waiting for your response.

      Thanks and Regards, amitsg

      Mitchell Anicas
      DigitalOcean Employee
      DigitalOcean Employee badge
      May 13, 2015

      Make sure Elasticsearch’s network.host is set to the IP address that you are specifying in your Logstash config.

      sudo vi /etc/elasticsearch/elasticsearch.yml
      

      Change to private IP address:

      network.host: ELASTICSEARCH_private_IP
      

      Then restart Elasticsearch:

      sudo systemctl start elasticsearch
      

      Then restart Logstash.

      Hello Mod,

      What should i do if i configure Rsyslog + Elasticsearch + Kibana? How the Rsyslog configuration file look like? Otherwise, When i start Elasticsearch it’s error:

      ./elasticsearch start Failed to configure logging… org.elasticsearch.ElasticsearchException: Failed to load logging configuration at org.elasticsearch.common.logging.log4j.LogConfigurator.resolveConfig(LogConfigurator.java:139) at org.elasticsearch.common.logging.log4j.LogConfigurator.configure(LogConfigurator.java:89) at org.elasticsearch.bootstrap.Bootstrap.setupLogging(Bootstrap.java:100) at org.elasticsearch.bootstrap.Bootstrap.main(Bootstrap.java:184) at org.elasticsearch.bootstrap.Elasticsearch.main(Elasticsearch.java:32) Caused by: java.nio.file.NoSuchFileException: /usr/share/elasticsearch/config at sun.nio.fs.UnixException.translateToIOException(UnixException.java:86) at sun.nio.fs.UnixException.rethrowAsIOException(UnixException.java:102) at sun.nio.fs.UnixException.rethrowAsIOException(UnixException.java:107) at sun.nio.fs.UnixFileAttributeViews$Basic.readAttributes(UnixFileAttributeViews.java:55) at sun.nio.fs.UnixFileSystemProvider.readAttributes(UnixFileSystemProvider.java:144) at sun.nio.fs.LinuxFileSystemProvider.readAttributes(LinuxFileSystemProvider.java:97) at java.nio.file.Files.readAttributes(Files.java:1686) at java.nio.file.FileTreeWalker.walk(FileTreeWalker.java:109) at java.nio.file.FileTreeWalker.walk(FileTreeWalker.java:69) at java.nio.file.Files.walkFileTree(Files.java:2602) at org.elasticsearch.common.logging.log4j.LogConfigurator.resolveConfig(LogConfigurator.java:123) … 4 more log4j:WARN No appenders could be found for logger (node). log4j:WARN Please initialize the log4j system properly. log4j:WARN See http://logging.apache.org/log4j/1.2/faq.html#noconfig for more info.

      Any one can tell me which the file configuration that make me wrong? P/S: System: Centos6.6 Rsyslog: v8 Elasticsearch: 1.5.2

      Thanks a lot

      If I change network.host from localhost to IP address in elasticsearch.yml then Kibana 4stops working, I try trying to write to elasticsearch directly.

      ErrorAbstract@http://10.64.1.141/index.js?_b=5930:80255:19 Generic@http://10.64.1.141/index.js?_b=5930:80287:3 respond@http://10.64.1.141/index.js?_b=5930:81568:1 checkRespForFailure@http://10.64.1.141/index.js?_b=5930:81534:7 [198]</AngularConnector.prototype.request/<@http://10.64.1.141/index.js?_b=5930:80203:7 qFactory/defer/deferred.promise.then/wrappedErrback@http://10.64.1.141/index.js?_b=5930:20882:31 qFactory/defer/deferred.promise.then/wrappedErrback@http://10.64.1.141/index.js?_b=5930:20882:31 qFactory/defer/deferred.promise.then/wrappedErrback@http://10.64.1.141/index.js?_b=5930:20882:31 qFactory/createInternalRejectedPromise/<.then/<@http://10.64.1.141/index.js?_b=5930:21015:29 $RootScopeProvider/this.$get</Scope.prototype.$eval@http://10.64.1.141/index.js?_b=5930:22002:16 $RootScopeProvider/this.$get</Scope.prototype.$digest@http://10.64.1.141/index.js?_b=5930:21814:15 $RootScopeProvider/this.$get</Scope.prototype.$apply@http://10.64.1.141/index.js?_b=5930:22106:13 done@http://10.64.1.141/index.js?_b=5930:17641:34 completeRequest@http://10.64.1.141/index.js?_b=5930:17855:7 createHttpBackend/</xhr.onreadystatechange@http://10.64.1.141/index.js?_b=5930:17794:1

      Cheers

      hi, anyone has make filters to sugarcrm logs?

      i did filters to apache logs:

      filter { if [type] == “http-access” { grok { match => { “message” => “%{IPORHOST:clientip} %{USER:ident} %{USER:auth} %{USER:LoadTime} [%{HTTPDATE:timestamphttp}] (?:%{WORD:verb} %{NOTSPACE:request}(?: HTTP/%{NUMBER:httpversion})?|%{DATA:rawrequest}) %{NUMBER:response} (?:%{NUMBER:bytes}|-)” } } date { match => [ “timestamphttp”, “dd/MMM/yyyy:HH:mm:ss Z” ] } } }

      filter { if [type] == “http-error” { grok { match => { “message” => “[%{DAY} %{MONTH} %{MONTHDAY} %{TIME} %{YEAR}] [%{WORD:severity}] [client %{IP:clientip}] %{GREEDYDATA:message}” } } } }

      Sorry, i am not good in english

      Hi Mitchell,

      Thank you for the tutorial. I would like to create a elasticsearch cluster on single host, could you guide me on how to do that? I installed elasticsearch 1.5.0 and it is running as a service right now.

      HI David,

       I'm getting certificate signed by unknown authority error !!. Any suggestions ?
      

      This comment has been deleted

        HI Manicas,

        I want to Index it by Source hostname. Can you suggest me how to do it ?

        regards,

        Hemanath

        First, a great thank for this tutotial that helped me to start with ELK. Now, I am well on my POC but I’ve problem of industrialization “data security”. Of course, Shield exists but we don’t want a paid tool. My question is : In real life, nginx would be enough to secure exchanges between final customer and Kibana? How can compartmentalize different customers (of course with different indices)?

        Thanks

        Hi Mitchel, these are great tutorials. I have tried installing on Centos and Ubuntu but I had not luck getting the indices to work. I only see the logstash-* , but I dont see a drop down box to select @timestamp, or the create button, the only message that it shows is “unable to fetch mapping, Do you have indices matching the pattern?” I been wanting to use Kibana as a syslog for cisco Switches, routers, nexus and other.

        Mitchell Anicas
        DigitalOcean Employee
        DigitalOcean Employee badge
        May 7, 2015

        That means that Logstash isn’t receiving and storing logs in Elasticsearch. It is likely that your Logstash or Logstash Forwarder are not configured properly.

        Hi Mitchell,

        I am newbie to ELK setup. :)

        I have followed same steps. Installed elasticsearch on one machine, logstash on other machine. All installations done by root only. These are new Linux boxes which I got for installations. Then I started logstash by following command: sudo service logstash start But after 2-3 minutes when I check status of logstash, it shows that it’s not running like:

        [root@rwc-host1 conf.d]# sudo service logstash status
        logstash is not running
        

        I checked logstash.err file it gives below:

        [root@rwc-host193 ~]# tail -100f /var/log/logstash/logstash.err
        May 13, 2015 9:07:04 AM org.apache.http.impl.execchain.RetryExec execute
        INFO: I/O exception (org.apache.http.conn.HttpHostConnectException) caught when processing request to {}->http://ELASTICSEARCH_IP:9200: Connect to ELASTICSEARCH_IP:9200 [/ELASTICSEARCH_IP] failed: Connection refused
        May 13, 2015 9:07:04 AM org.apache.http.impl.execchain.RetryExec execute
        INFO: Retrying request to {}->http://ELASTICSEARCH_IP:9200
        May 13, 2015 9:07:04 AM org.apache.http.impl.execchain.RetryExec execute
        INFO: I/O exception (org.apache.http.conn.HttpHostConnectException) caught when processing request to {}->http://ELASTICSEARCH_IP:9200: Connect to ELASTICSEARCH_IP:9200 [/ELASTICSEARCH_IP] failed: Connection refused
        May 13, 2015 9:07:04 AM org.apache.http.impl.execchain.RetryExec execute
        INFO: Retrying request to {}->http://ELASTICSEARCH_IP:9200
        

        and logstash.log file shows below:

        {:timestamp=>"2015-05-13T09:07:04.670000-0400", :message=>"Failed to install template: Connection refused", :level=>:error}
        

        My trial.conf file is like this:

        input {
        stdin { }
        }
        output {
        elasticsearch { host => <ELASTICSEARCH_IP> port => "9200" protocol => "http" }
          stdout { codec => rubydebug }
        }
        

        Can you please help me here as what might have gone wrong?

        Eagerly waiting for your response.

        Thanks and Regards, amitsg

        Mitchell Anicas
        DigitalOcean Employee
        DigitalOcean Employee badge
        May 13, 2015

        Make sure Elasticsearch’s network.host is set to the IP address that you are specifying in your Logstash config.

        sudo vi /etc/elasticsearch/elasticsearch.yml
        

        Change to private IP address:

        network.host: ELASTICSEARCH_private_IP
        

        Then restart Elasticsearch:

        sudo systemctl start elasticsearch
        

        Then restart Logstash.

        Hello Mod,

        What should i do if i configure Rsyslog + Elasticsearch + Kibana? How the Rsyslog configuration file look like? Otherwise, When i start Elasticsearch it’s error:

        ./elasticsearch start Failed to configure logging… org.elasticsearch.ElasticsearchException: Failed to load logging configuration at org.elasticsearch.common.logging.log4j.LogConfigurator.resolveConfig(LogConfigurator.java:139) at org.elasticsearch.common.logging.log4j.LogConfigurator.configure(LogConfigurator.java:89) at org.elasticsearch.bootstrap.Bootstrap.setupLogging(Bootstrap.java:100) at org.elasticsearch.bootstrap.Bootstrap.main(Bootstrap.java:184) at org.elasticsearch.bootstrap.Elasticsearch.main(Elasticsearch.java:32) Caused by: java.nio.file.NoSuchFileException: /usr/share/elasticsearch/config at sun.nio.fs.UnixException.translateToIOException(UnixException.java:86) at sun.nio.fs.UnixException.rethrowAsIOException(UnixException.java:102) at sun.nio.fs.UnixException.rethrowAsIOException(UnixException.java:107) at sun.nio.fs.UnixFileAttributeViews$Basic.readAttributes(UnixFileAttributeViews.java:55) at sun.nio.fs.UnixFileSystemProvider.readAttributes(UnixFileSystemProvider.java:144) at sun.nio.fs.LinuxFileSystemProvider.readAttributes(LinuxFileSystemProvider.java:97) at java.nio.file.Files.readAttributes(Files.java:1686) at java.nio.file.FileTreeWalker.walk(FileTreeWalker.java:109) at java.nio.file.FileTreeWalker.walk(FileTreeWalker.java:69) at java.nio.file.Files.walkFileTree(Files.java:2602) at org.elasticsearch.common.logging.log4j.LogConfigurator.resolveConfig(LogConfigurator.java:123) … 4 more log4j:WARN No appenders could be found for logger (node). log4j:WARN Please initialize the log4j system properly. log4j:WARN See http://logging.apache.org/log4j/1.2/faq.html#noconfig for more info.

        Any one can tell me which the file configuration that make me wrong? P/S: System: Centos6.6 Rsyslog: v8 Elasticsearch: 1.5.2

        Thanks a lot

        If I change network.host from localhost to IP address in elasticsearch.yml then Kibana 4stops working, I try trying to write to elasticsearch directly.

        ErrorAbstract@http://10.64.1.141/index.js?_b=5930:80255:19 Generic@http://10.64.1.141/index.js?_b=5930:80287:3 respond@http://10.64.1.141/index.js?_b=5930:81568:1 checkRespForFailure@http://10.64.1.141/index.js?_b=5930:81534:7 [198]</AngularConnector.prototype.request/<@http://10.64.1.141/index.js?_b=5930:80203:7 qFactory/defer/deferred.promise.then/wrappedErrback@http://10.64.1.141/index.js?_b=5930:20882:31 qFactory/defer/deferred.promise.then/wrappedErrback@http://10.64.1.141/index.js?_b=5930:20882:31 qFactory/defer/deferred.promise.then/wrappedErrback@http://10.64.1.141/index.js?_b=5930:20882:31 qFactory/createInternalRejectedPromise/<.then/<@http://10.64.1.141/index.js?_b=5930:21015:29 $RootScopeProvider/this.$get</Scope.prototype.$eval@http://10.64.1.141/index.js?_b=5930:22002:16 $RootScopeProvider/this.$get</Scope.prototype.$digest@http://10.64.1.141/index.js?_b=5930:21814:15 $RootScopeProvider/this.$get</Scope.prototype.$apply@http://10.64.1.141/index.js?_b=5930:22106:13 done@http://10.64.1.141/index.js?_b=5930:17641:34 completeRequest@http://10.64.1.141/index.js?_b=5930:17855:7 createHttpBackend/</xhr.onreadystatechange@http://10.64.1.141/index.js?_b=5930:17794:1

        Cheers

        hi, anyone has make filters to sugarcrm logs?

        i did filters to apache logs:

        filter { if [type] == “http-access” { grok { match => { “message” => “%{IPORHOST:clientip} %{USER:ident} %{USER:auth} %{USER:LoadTime} [%{HTTPDATE:timestamphttp}] (?:%{WORD:verb} %{NOTSPACE:request}(?: HTTP/%{NUMBER:httpversion})?|%{DATA:rawrequest}) %{NUMBER:response} (?:%{NUMBER:bytes}|-)” } } date { match => [ “timestamphttp”, “dd/MMM/yyyy:HH:mm:ss Z” ] } } }

        filter { if [type] == “http-error” { grok { match => { “message” => “[%{DAY} %{MONTH} %{MONTHDAY} %{TIME} %{YEAR}] [%{WORD:severity}] [client %{IP:clientip}] %{GREEDYDATA:message}” } } } }

        Sorry, i am not good in english

        Quick comment, but not a complaint: this process appears to leave one’s elasticsearch install in such a state that one cannot easily manage it from the web-based _plugins facility.

        That is, I can curl to localhost:9200/_plugin but I cannot, of course, browse to it from my desktop computer.

        This isn’t so much a problem but it does make using web-based frontends for ES more difficult to use.

        First off, this is such a great tutorial. I have followed it to the ‘T’ and when I try to connect to Kibana using the FQDN/server IP, I get 502 Bad Gateway in /var/log/nginx/error.log. What gives? I get “no live upstream while connecting to upstream, client: x, server: logstash.domain” Thanks in advance!

        Mitchell Anicas
        DigitalOcean Employee
        DigitalOcean Employee badge
        June 12, 2015

        This tutorial assumes that SELinux is disabled. You might be able to run this to fix the problem:

        sudo setsebool -P httpd_can_network_connect 1
        

        Then restart Nginx.

        Hello,

        First I want to thank the Tutorial … Very good …

        I did all the above processes successfully, however when connecting to Kibana, at the stage of “configure an index pattern” is not available the “create” button, gets the message "Unable to fetch mapping. Do you have indices matching the pattern? "

        And in the left corner superir a message: “Index Patterns:. Warning No default index pattern You must select or create one to continue.”

        By analyzing the customer logs I copied the key “logstash-forwarder.crt”

        Log: /var/log/logstash-forwarder/logstash-forwarder.err

        06/12/2015 10: 10: 54.026115 Waiting for two prospectors to initialise 06/12/2015 10: 10: 54.026286 Launching harvester on new file: / var / log / messages 06/12/2015 10: 10: 54.026331 Launching harvester on new file: / var / log / secure 06/12/2015 10: 10: 54.026488 Launching harvester on new file: /var/log/boot.log 06/12/2015 10: 10: 54.026531 Launching harvester on new file: /var/log/yum.log 06/12/2015 10: 10: 54.026765 harvest: “/ var / log / messages” (offset snapshot: 0) 06/12/2015 10: 10: 54.027392 harvest: “/ var / log / secure” (offset snapshot: 0) 06/12/2015 10: 10: 54.027513 harvest, “/var/log/boot.log” (offset snapshot: 0) 06/12/2015 10: 10: 54.027609 harvest, “/var/log/yum.log” (offset snapshot: 0) 06/12/2015 10: 10: 54.027642 All prospectors initialised with 0 states to persist 06/12/2015 10: 10: 54.027932 Setting trusted CA from file: /etc/pki/tls/certs/logstash-forwarder.crt 06/12/2015 10: 11: 16.406232 Connecting to [xxxx65]: 5000 (xxxx) 06/12/2015 10: 11: 16.406517 Failure connecting to xxxx: xxxx dial tcp: 5000: connection refused

        No longer analyze what … Suspeiro that the key has not been generated corretamenta with said command in the tutorial, it’s my last suspicion.

        Can anyone help me?

        Mitchell Anicas
        DigitalOcean Employee
        DigitalOcean Employee badge
        June 12, 2015

        Logstash forwarder can’t connect to Logstash. This means that either component is misconfigured or the certificates weren’t made correctly.

        I’m getting these errors:

        {:timestamp=>“2015-06-14T12:38:56.651000+0300”, :message=>“retrying failed action with response code: 503”, :level=>:warn}

        and also

        {:timestamp=>“2015-06-14T12:42:04.361000+0300”, :message=>"too many attempts at sending event. dropping: 2015-06-14T00:18:45.000Z

        In Kibana, no results are found.

        Please help.

        Very helpful tutorial. I have Centos 6.x with ELK (old first tutorial) server. I have lots of log files. How to migrate from old server to new (this tutorial) while preserving old log files?

        I am a new beginner on ELK. My linux machine is a centos7 minima version OS on vm . My ELK server IP is 10.82.136.52. I get 2 troubleshootings : 1/i can’t see the kibana web site with ngnix config : error 502 bad gateway and locally on the server : wget http://localhost:5601 => failed connection refused 2/ for openssl generation, I get theses errors : no such file bss_file.c and DEF_LOAD conf_def.c . Would you please helping me to solve these problems. Best regards.

        Mitchell Anicas
        DigitalOcean Employee
        DigitalOcean Employee badge
        June 22, 2015

        Most likely, there is something wrong with your openssl.cnf file.

        Manicas, can you post your openssl.conf file. Should I re-install openssl on my ‘centos7 minima’ version ?

        I am a new beginner on ELK. My linux machine is a centos7 minima version OS on vm . My ELK server IP is 10.82.136.52. i can’t see the kibana web site with ngnix config : error 502 bad gateway and locally on the logstash server : wget http://localhost:5601 => failed connection refused Would you please helping me to solve these problems. Best regards.

        My ELK server IP is 10.82.136.52. I this case the logstatsh server private IP adress is the same as public IP adress you write in the tutorial, isn’it ?

        Thank a lot for this tutorial as beginner. I am on centos7 minima version on a vm virtualbox, @IP=10.82.136.52 in local network. I have no public IP 192.168.xxx, no FQDN. I instal all ELK on this server with default config but not ngnix,

        • elasticsearch wget http://localhost:9200 => connection refused
        • kibana wget http://localhost:5601 => connection refused
        • logstash : not started. how to get log files and put debug mode Would you please helping me to solve these issues. Best regards.
        Mitchell Anicas
        DigitalOcean Employee
        DigitalOcean Employee badge
        June 23, 2015

        Is SELinux enabled?

        yes sestatus return disabled

        how to get logs on logstash ? or put logstash on debug mode ? to solve starting logstash as a service

        I am behind a entreprise proxy !

        I am behing an enterprise proxy and i do all config to define it : wget, yum, ~.bash_profile, … can you give me any advice please ? best regards

        Thanks you for your help. I resume my troubleshooting : I follow the tutorial : https://www.digitalocean.com/community/tutorials/how-to-install-elasticsearch-logstash-and-kibana-4-on-centos-7 I am on centos7 minima version on a vm virtualbox, @IP=10.82.136.52 in local network. I have no public IP 192.168.xxx, no FQDN. I instal all ELK on this server with default config but no ngnix, no firewall-cmd (not started)

        • elasticsearch 1.4.4 : http://10.82.136.52:9200 => json output. log : zen-disco-join(elected as master) config = network.host=10.xxxxxx -logstash 1.5.1 : SERVICE_UNAVAILABLE no master log.err : INFO started
        • kibana4 http://10.xxxxx:5601 => Settings/Indices config index pattern web page with NO DEFAULT INDEX PATTERN => KO conf= host : “0.0.0.0” elasticsearch_url:“http://10.xxxx:9200” log => html response= statuscode 404 GET /logstatsh-*/_mapping
        • logstash-forwarder : connected 10.xxx:5000 Would you please helping me to solve these issues ? We are so near of the good results :-) Best regards.

        Hello, thank you so much for this very complete tutorial.

        But I’ve a problem with the syslog gathering. I try to collect logs from a Brocade switch. The switch is correctly configured, because I can see this with a “tcpdump” on my ELK server :

        16:29:31.252738 IP xx.xx.xx.xx.cap > yyyyyyyyyyyyy.zzzzzzz.local: SYSLOG user.info, length: 182
        

        I’ve created an input file (02-brocade-input.conf) in /etc/logstash/conf.d :

        input {
        udp {
        port => "514"
        type => "syslog"
        tags => ["syslog"]
        }
        }
        

        (I tried a lot of differents configurations of the input file, but it doesn’t work)

        And also an output file :

        output {
        elasticsearch { host => "localhost" }
        }
        

        But I can’t see anything with Kibana :(. However Kibana works, because I can see the logs from one of my CentOS servers.

        Can you help me please ?

        Best regards.

        Please am getting an error while starting Nginx:

        nginx: [emerg] “server” directive is not allowed here in /etc/nginx/conf.d/kibana.conf:1

        Any idea why this error is coming up?

        Ok I figured out the error…

        But my web page is still showing the default NGINX Test page

        Can someone please post the content of their /etc/nginx/nginx.conf and /etc/nginx/conf.d/kibana.conf

        Great tutorial, thank you.

        At the end of the the ‘Configure Logstash’ section, it says ‘sudo service logstash restart’ Should that be ‘systemctl restart logstash’ (or sudo if you’re not root)?

        Hello, How i can configure do NXLog send the logs to this logstash? I receive “CertFile” error.

        I used this for create the filters: http://www.ragingcomputer.com/2014/02/logstash-elasticsearch-kibana-for-windows-event-logs

        And this for NxLog http://www.ragingcomputer.com/2014/02/sending-windows-event-logs-to-logstash-elasticsearch-kibana-with-nxlog

        But doesn’t work, because i need to complete with the CertFile, can you help-me? Thanks

        Mitchell Anicas
        DigitalOcean Employee
        DigitalOcean Employee badge
        August 11, 2015

        Hey there. I don’t have a Windows machine to test on. Does the info in this link help at all?

        Hi,

        I’m unable to configure an index pattern.

        It gives this error - “Unable to fetch mapping. Do you have indices that match the pattern?”

        Error: Please specify a default index pattern
        at http://10.16.32.122:81/index.js?_b=5930:44791:23
        at wrappedCallback (http://10.16.32.122:81/index.js?_b=5930:20873:81)
        at http://10.16.32.122:81/index.js?_b=5930:20959:26
        at Scope.$eval (http://10.16.32.122:81/index.js?_b=5930:22002:28)
        at Scope.$digest (http://10.16.32.122:81/index.js?_b=5930:21814:31)
        at Scope.$apply (http://10.16.32.122:81/index.js?_b=5930:22106:24)
        at HTMLDocument.<anonymous> (http://10.16.32.122:81/index.js?_b=5930:19104:24)
        at HTMLDocument.jQuery.event.dispatch (http://10.16.32.122:81/index.js?_b=5930:4409:9)
        at HTMLDocument.elemData.handle (http://10.16.32.122:81/index.js?_b=5930:4095:28)
        

        I changed my logstash.conf server and client to listen at 5001. Could someone help me out with this?

        Mitchell Anicas
        DigitalOcean Employee
        DigitalOcean Employee badge
        August 17, 2015

        That happens when Logstash isn’t receiving any logs from Logstash Forwarder, usually due to a configuration issue. Try looking through the previous comments for potential solutions.

        I just wanted to thank you for this amazing guide incredible. Im just somewhat stuck at the part Copy SSL Certificate and Logstash Forwarder Package im trying to forward all my pfsense2.2.2(192.168.3.254) logs to my ELK(192.168.3.199) server when you say: scp /etc/pki/tls/certs/logstash-forwarder.crt user@server_private_IP:/tmp

        would that be on my ELK server or on my pfsense command i need to run?

        I tried running scp /etc/pki/tls/certs/logstash-forwarder.crt root@192.168.3.254:/tmp but it did not work says The authenticity of host ‘192.168.3.254 (192.168.3.254)’ can’t be established.

        I was wondering if someone could help me out?

        Also when you say:Paste the following code block into the file. Be sure to update the server_name to match your server’s name: would it be my ELK server or my pfsense firewall?

        Thank you

        Mitchell Anicas
        DigitalOcean Employee
        DigitalOcean Employee badge
        August 18, 2015

        This tutorial is for logging for Linux servers. I think if you want to monitor a Pfsense firewall, you can log into your dashboard and add the Logstash Server as a remote syslog server. You would also have to configure a syslog input on your Logstash server.

        Thank you for your response. I think i got the part for pfSense, what im confused with the part when you say " be sure to update the server_name to match your server’s name:" that part can i name it from example.com to logserver or 192.168.3.199? And once I finish and try to access Kibana on my browser i enter 192.168.3.199 which is the logstash server but no luck did I miss something or what part should I redo?

        Thank you again

        Mitchell Anicas
        DigitalOcean Employee
        DigitalOcean Employee badge
        August 19, 2015

        If you’re not using a domain name, you should use the public IP address of your ELK server there.

        Hi there thank you for your reply. this is what i changed

            server {
                listen 80;
        
                server_name 192.168.3.199;
        
                auth_basic "Restricted Access";
                auth_basic_user_file /etc/nginx/htpasswd.users;
        
                location / {
                    proxy_pass http://localhost:5601;
                    proxy_http_version 1.1;
                    proxy_set_header Upgrade $http_upgrade;
                    proxy_set_header Connection 'upgrade';
                    proxy_set_header Host $host;
                    proxy_cache_bypass $http_upgrade;        
                }
            }


        Then on my URL i would input 192.168.3.199:5601 no luck then on putty i tried

        wget http://localhost:5601


        and i would get Connecting to localhost (localhost)|::1|:5601… failed: Connection refused.

        Did i Miss something?

        Thank you again

        Mitchell Anicas
        DigitalOcean Employee
        DigitalOcean Employee badge
        August 19, 2015

        192.168.x.x is a private address. You should be using the server’s public IP address there. Then you need to access http://your_public_ip to get to Kibana.

        Hi, Thank you again for your reply sorry for my ignorance. As i put in the my Extenal ip on the part where you said I would need to also open the NAT ports on 80,5061 which I did and no luck :( I was wondering if instead of external IP would it be possible just on the LAN as if just accessing 192.168.3.199 on my computer when connected to the LAN. In which part would i need to edit to make it possible

        Thank you again and sorry for my incompetence

        Mitchell Anicas
        DigitalOcean Employee
        DigitalOcean Employee badge
        August 21, 2015

        Yeah, you should be able to access it over 192.168.3.199 on port 80. Sorry, I assumed you were using a cloud server. You may have a firewall issue. It might help to describe your setup and what you are trying to do.

        Hi, Thank you again for replying and I should be the one saying sorry not you :). Here is my setup

        http://s16.postimg.org/pwdhjmlr9/Drawing2.jpg

        Thank you again

        Mitchell Anicas
        DigitalOcean Employee
        DigitalOcean Employee badge
        August 21, 2015

        So everything is going through your router? Just use the private IP address for everything, and make sure that all of the ports in use are allowed on the router (among your servers).

        Hi, Thank you so much for replying again , I reinstalled again from scratch but this time every part in the guide that said localhost i would replace it with 192.168.3.199 but still nothing :( Please see pic Did I miss something?

        http://s10.postimg.org/ni35qxddl/Clipboarder_2015_08_23.png http://s10.postimg.org/6wvjb9m9l/Clipboarder_2015_08_23_002.png http://s10.postimg.org/gg584q9rt/Clipboarder_2015_08_23_005.png

        Thank you again

        **NVM, it works now. Must be intermittent connection issue. **

        Yum error when installing logstash. CentOS Linux release 7.1.1503 (Core)

        sudo yum -y install logstash
        
         One of the configured repositories failed (Unknown),
         and yum doesn't have enough cached data to continue. At this point the only
         safe thing yum can do is fail. There are a few ways to work "fix" this:
        
             1. Contact the upstream for the repository and get them to fix the problem.
        
             2. Reconfigure the baseurl/etc. for the repository, to point to a working
                upstream. This is most often useful if you are using a newer
                distribution release than is supported by the repository (and the
                packages for the previous distribution release still work).
        
             3. Disable the repository, so yum won't use it by default. Yum will then
                just ignore the repository until you permanently enable it again or use
                --enablerepo for temporary usage:
        
                    yum-config-manager --disable <repoid>
        
             4. Configure the failing repository to be skipped, if it is unavailable.
                Note that yum will try to contact the repo. when it runs most commands,
                so will have to try and fail each time (and thus. yum will be be much
                slower). If it is a very temporary problem though, this is often a nice
                compromise:
        
                    yum-config-manager --save --setopt=<repoid>.skip_if_unavailable=true
        
        failed to retrieve repodata/repomd.xml from centos-7-x86_64
        error was [Errno 14] HTTP Error 404 - Not Found


        After logged in to Kibana for first time. I did not see the dropdown menu with @timestamp, instead it says “Unable to fetch mapping. Do you have indices matching the pattern?”

        Mitchell Anicas
        DigitalOcean Employee
        DigitalOcean Employee badge
        August 31, 2015

        This usually means that one or more components are misconfigured, and your logs aren’t getting stored in Elasticsearch. If you take a look at the diagram in the Our Goal section, the components in question are everything between Elasticsearch and Logstash Forwarder.

        Great tutorial Saved me TONS of time and scratching my head…

        Now that I can get into kibana… it wants me to “Configure an index pattern” I get the concept… but have no idea where to do that. Some googling reveals that I might need to make a .kibana file with a default index type in it. Looking in my log files confirms that (to some degree) “POST /elasticsearch/.kibana/visualization/_search?size=100 HTTP/1.1”, upstream: “http://[::1]:5601/elasticsearch/.kibana/visualization/_search?size=100”, But I am not sure exactly which “elastisearch” directory I am supposed to put that in. I have over a dozen various paths with a directory named “elastisearch” in them.

        Any clues THANK YOU !

        Any reason you haven’t used the Kibana repo?

        [kibana-4.1]
        name=Kibana repository for 4.1.x packages
        baseurl=http://packages.elasticsearch.org/kibana/4.1/centos
        gpgcheck=1
        gpgkey=http://packages.elasticsearch.org/GPG-KEY-elasticsearch
        enabled=1


        This comment has been deleted

          Hey, on a vanilla ELK stack droplet, i am trying to install a new logstash plugin

          root@metrics:/opt/logstash# bin/plugin install logstash-input-http
          Validating logstash-input-http
          

          …and that is it, the process hangs right there. The process list shows an idle logstash process, but after some minutes it just dies away, and the shell connection breaks with a broken pipe.

          Any idea where to start looking?

          Thanks

          Mitchell Anicas
          DigitalOcean Employee
          DigitalOcean Employee badge
          September 21, 2015

          I’m not sure. I installed the plugin on my own setup (Ubuntu though), and it had this output:

          Validating logstash-input-http
          Installing logstash-input-http
          /opt/logstash/vendor/jruby/lib/ruby/shared/rubygems/installer.rb:507 warning: executable? does not in this environment and will return a dummy value
          Installation successful
          

          This comment has been deleted

            Hi, I am very impressed by this tutorial. Unfortunately I am getting the dreaded message: “Unable to fetch mapping. Do you have indices matching the pattern?” Googling did not help. The configuration on the client seems correct. The server side too looks good. [root@elk ~]# curl ‘localhost:9200/_cat/indices?v’ health status index pri rep docs.count docs.deleted store.size pri.store.size yellow open .kibana 1 1 1 0 2.5kb 2.5kb [root@elk ~]# Are there any log files you’d like me to tail and paste here.

            I basically followed the tutorial.

            This is from the nginx error log: tail -f /var/log/nginx/error.log

            2015/09/24 04:54:26 [error] 2076#0: 33 connect() failed (111: Connection refused) while connecting to upstream, client: 192.168.1.14, server: elk.kartikv.com, request: "GET /elasticsearch/logstash-/_mapping/field/?ignore_unavailable=false&allow_no_indices=false&include_defaults=true HTTP/1.1", upstream: "http://[::1]:5601/elasticsearch/logstash-/_mapping/field/*?ignore_unavailable=false&allow_no_indices=false&include_defaults=true", host: “elk.kartikv.com”, referrer: “http://elk.kartikv.com/

            Mitchell Anicas
            DigitalOcean Employee
            DigitalOcean Employee badge
            September 24, 2015

            Is the Kibana process running? It should be listening on port 5601.

            1. netstat -anp | grep :5601

            [root@elk ~]# netstat -anp | grep :5601 tcp 0 0 127.0.0.1:5601 0.0.0.0:* LISTEN 682/node [root@elk ~]#

            Kamal Nasser
            DigitalOcean Employee
            DigitalOcean Employee badge
            September 25, 2015

            Try replacing

            proxy_pass http://localhost:5601;
            

            with

            proxy_pass http://127.0.0.1:5601;
            

            It looks like nginx is trying to connect to Kibana over IPv6 while it’s IPv4-only.

            This comment has been deleted

              [root@sys1 ~]# telnet elk 5001 Trying 192.168.1.235… Connected to elk. Escape character is ‘^]’. ^CConnection closed by foreign host.

              [root@elk logstash]# tail -f logstash.log <snip>

              “Got error to send bulk of actions: blocked by: [SERVICE_UNAVAILABLE/1/state not recovered / initialized];[SERVICE_UNAVAILABLE/2/no master];”, :level=>:error} <snip>

              rebooted, no more errors in logstash log, nothing awry in elasticsearch log or in nginx log

              Sorry nginx error log [root@elk nginx]# tail -f error.log 2015/09/25 08:21:26 [error] 2080#0: *40 connect() failed (111: Connection refused) while connecting to upstream, client: 192.168.1.14, server: elk.kartikv.com, request: “GET /bower_components/font-awesome/fonts/fontawesome-webfont.woff?v=4.2.0 HTTP/1.1”, upstream: “http://[::1]:5601/bower_components/font-awesome/fonts/fontawesome-webfont.woff?v=4.2.0”, host: “elk.kartikv.com”, referrer: “http://elk.kartikv.com/#/settings/indices/?_g=()

              So it seems some indices have to be manually entered for it to all start… I followed the suggestion given here: https://github.com/elastic/kibana/issues/2055

              and added an entry, the chose the one which says “The index settings can also be defined with JSON:”

              and restarted elasticsearch and followed the rest of the tutorial(working with the GUI): https://www.digitalocean.com/community/tutorials/how-to-install-elasticsearch-logstash-and-kibana-4-on-centos-7

              It all works now. Thanks to everyone for their help.

              It suddenly stopped working, this is the error message in /var/log/logstash/logstash.log: :timestamp=>“2015-09-26T07:29:26.148000-0400”, :message=>“Got error to send bulk of actions: blocked by: [SERVICE_UNAVAILABLE/1/state not recovered / initialized];[SERVICE_UNAVAILABLE/2/no master];”, :level=>:error} {:timestamp=>“2015-09-26T07:29:26.149000-0400”, :message=>“Failed to flush outgoing items”, :outgoing_count=>1, :exception=>“Java::OrgElasticsearchClusterBlock::ClusterBlockException”, :backtrace=>[“org.elasticsearch.cluster.block.ClusterBlocks.globalBlockedException(org/elasticsearch/cluster/block/ClusterBlocks.java:151)”, “org.elasticsearch.cluster.block.ClusterBlocks.globalBlockedRaiseException(org/elasticsearch/cluster/block/ClusterBlocks.java:141)”, “org.elasticsearch.action.bulk.TransportBulkAction.executeBulk(org/elasticsearch/action/bulk/TransportBulkAction.java:215)”, “org.elasticsearch.action.bulk.TransportBulkAction.access$000(org/elasticsearch/action/bulk/TransportBulkAction.java:67)”, “org.elasticsearch.action.bulk.TransportBulkAction$1.onFailure(org/elasticsearch/action/bulk/TransportBulkAction.java:153)”, “org.elasticsearch.action.support.TransportAction$ThreadedActionListener$2.run(org/elasticsearch/action/support/TransportAction.java:137)”, “java.util.concurrent.ThreadPoolExecutor.runWorker(java/util/concurrent/ThreadPoolExecutor.java:1142)”, “java.util.concurrent.ThreadPoolExecutor$Worker.run(java/util/concurrent/ThreadPoolExecutor.java:617)”, “java.lang.Thread.run(java/lang/Thread.java:745)”], :level=>:warn} {:timestamp=>“2015-09-26T07:30:27.152000-0400”, :message=>“Got error to send bulk of actions: blocked by: [SERVICE_UNAVAILABLE/1/state not recovered / initialized];[SERVICE_UNAVAILABLE/2/no master];”, :level=>:error} ^C

              Yes, the only error I am now getting is in /var/log/logstash/logstash.log

              {:timestamp=>“2015-09-26T08:02:59.293000-0400”, :message=>“Got error to send bulk of actions: blocked by: [SERVICE_UNAVAILABLE/1/state not recovered / initialized];[SERVICE_UNAVAILABLE/2/no master];”, :level=>:error}

              Just when everything was working, I got this error in the logstash-forwarder systems. 2015/09/26 14:37:03.434672 Failed to tls handshake with 192.168.1.235 read tcp 192.168.1.235:5001: i/o timeout logstash-forwarder-0.4.0-1.x86_64

              This issue has been resolved thanks to google. I googled and found that upgrading elasticsearch to the latest version alleviates the issue. I also increased the logstash-forwarder timeout to 5 minutes(from 15 seconds). I now have three logstash forwarders supplying logs to the logstash server. I am however keeping my fingers crossed.

              How to rotate /var/log/logstash/logstash.log? It fills up the drive and then everything breaks. Simply doing a server# > /var/log/logstash/logstash.log does not work What I have done is downloaded “curator” https://github.com/elasticsearch/curator and I do this (NOT AT ALL the best approach):

              /var/log/logstash/logstash.log curator delete indices --all-indices Create an index with: curl -XPUT ‘http://localhost:9200/twitter/’ -d ‘{ “settings” : { “index” : { “number_of_shards” : 3, “number_of_replicas” : 2 } } }’

              Someone please advise me on best practices in this regard.

              It’s possible to start Kibana using systemctl.

              You may create file /etc/systemd/system/kibana4.service with the following contents:

              [Service]
              ExecStart=/opt/kibana/bin/kibana
              Restart=always
              StandardOutput=syslog
              StandardError=syslog
              SyslogIdentifier=kibana4
              User=root
              Group=root
              Environment=NODE_ENV=production
              
              [Install]
              WantedBy=multi-user.target
              

              Then you can use the following commands:

              systemctl start kibana4.service
              systemctl enable kibana4.service
              

              Excellent tutorial, thank you

              As always, your tutorials are amazing! Thank you very much.

              One thing though - Elastic has replaced logstash-forwarder with filebeat. Can you please update the tutorial?

              SELinux was blocking the Nginx reverse proxy. Nginx showed me “502 Bad Gateway” when I browsed to the site and in the error.log I got: (13: Permission denied) The fix was:

              # grep nginx /var/log/audit/audit.log | audit2allow -M nginx
              # semodule -i nginx.pp
              

              Thanks for a very informative and exhaustive document. The only thing I found missing was to enable the CentOS CR repository in order to install nginx on CentOS 7.

              Hi , I follow this, and seems everything been started, but when I try to Connect to Kibana, what I got just the test page, could you please tell me any wrong with me? I just use the ELK private IP. Thanks in advance.

              The installation steps for filebeat are not working any more, since the enabled: false option was removed from filebeat. So, in your tutorial, instead of adding enabled: false to filebeat.yml file, simply comment out the elasticsearch and it’s host lines, this will fix the problem when filebeat service is not sending reports to logstash server (or sends a small portion of logs data when it is restarted).

              followed the above & installed ELK stack , but getting below error when starting FILEBEAT service

              2016/01/10 15:36:02.224146 publish.go:230: INFO No outputs are defined. Please define one under the output section. Error Initialising publisher: No outputs are defined. Please define one under the output section. 2016/01/10 15:36:02.224147 beat.go:101: CRIT No outputs are defined. Please define one under the output section.

              But outputs are configured as shown by you

              @manicas Thank you for such a well-rounded tutorial. If you can please tell how to configure LOGSTASH in such a way that i can separate logs from different hosts and filter them with respect to time, logs type, and other filters while visualizing in KIBANA.

              For some reason my index is not auto refreshing and data is not getting reflected continously in Kibana? If i restart filebeat on the client machines, the index and kibana gets refreshed with updated data. Any thoughts?

              Hi. Im new in elasticsearch and kibna , and in linux 2 :) , i try to install elasticsearch ,kibana, logstash, in one server and i try to gather syslogs from my local server , but when open Kibana (Configure an index pattern) Index Patterns Warning No default index pattern. You must select or create one to continue and i don’t know how and when i create mapping and index . so please how can i solve this i need solution plzzz

              Thanks for a good tutorial, but please note that to get this working on two debian jessie systems, I had to turn off ipv6 on the elk server. It appears the logstash program opens an ipv6 port in preference to ipv4. netstat -a revealed this.

              thank you for nice tutorial. But here is a problem bother me for a while.Here’s the problem,I put ELK and filebeat on the same Cent OS 6.5 server. I Generate SSL Certificates with the first way (Option 1: IP Address) .So I vi /etc/ssl/openssl.cnf and add subjectAltName = IP: 127.0.0.1 vi /etc/filebeat/filebeat.yml

              host:[“127.0.0.1:5044”]

              and then everything is based on your tutorial.When I started the filebeat client It says:

              Starting filebeat: 2016/02/17 07:53:37.553210 transport.go:125: ERR SSL client failed to connect with: x509: certificate signed by unknown authority (possibly because of “crypto/rsa: verification error” while trying to verify candidate authority certificate “serial:14099465705021883074”)

              I tryied some way to add trusted root certificates to the server but didn’t work.

              Then I change the 127.0.0.1 to my server’s real ip (10.139.110.135) and remake the crt.this time I started filebeat client it says:

              Starting filebeat: 2016/02/17 06:34:47.724982 transport.go:125: ERR SSL client failed to connect with: x509: certificate is valid for , not localhost

              Any idea?Hope for your reply.Thanks

              Going through the tutorial and I’m on the “load the sample dashboards, visualizations and Beats index patterns into Elasticsearch” step. Running “./load.sh” returns:

              Loading dashboards to http://localhost:9200 in .kibana Loading search Cache-transactions: curl: (7) Failed to connect to localhost:9200; Connection refused

              Any help would be greatly appreciated

              I got a problem that maybe caused by character set.Here’s the problem,there are some Chinese characters in my logs,and the character set of the server that store the log is zh_CN.GBK.And the character set of my ELKServer is en_US.UTF-8. Then the logs that contained Chinese characters showed in Kibana are some unrecognizable codes.So do you have any idea about this problem. Sorry about my poor English.Hope for your reply,thanks.

              You can use the following script for installation and configuration of ELK stack Server as well as Clients:-

              #!/bin/bash
              
              # ==================== Configure_Repositories function ==============================
              configure_repo() {
              tput setaf 2; echo "Configuring Repositories..."; tput sgr 0
              echo
              # ---------------------------------------------------------------------
              rpm --import http://packages.elastic.co/GPG-KEY-elasticsearch
              # ---------------------------------------------------------------------
              printf "[elasticsearch-2.x] \nname=Elasticsearch repository for 2.x packages \nbaseurl=http://packages.elastic.co/elasticsearch/2.x/centos \ngpgcheck=1 \ngpgkey=http://packages.elastic.co/GPG-KEY-elasticsearch \nenabled=1 \n" > /etc/yum.repos.d/elasticsearch.repo
              printf "[kibana-4.4] \nname=Kibana repository for 4.4.x packages \nbaseurl=http://packages.elastic.co/kibana/4.4/centos \ngpgcheck=1 \ngpgkey=http://packages.elastic.co/GPG-KEY-elasticsearch \nenabled=1 \n" > /etc/yum.repos.d/kibana.repo
              printf "[nginx] \nname=nginx repo \nbaseurl=http://nginx.org/packages/rhel/6/x86_64/ \ngpgcheck=0 \nenabled=1 \n" > /etc/yum.repos.d/nginx.repo
              printf "[logstash-2.2] \nname=logstash repository for 2.2 packages \nbaseurl=http://packages.elasticsearch.org/logstash/2.2/centos \ngpgcheck=1 \ngpgkey=http://packages.elasticsearch.org/GPG-KEY-elasticsearch \nenabled=1 \n" > /etc/yum.repos.d/logstash.repo
              # ---------------------------------------------------------------------
              tput setaf 2; echo "Downloading prerequisites for ELK stack..."; tput sgr 0
              cd $ELK_DOWNLOAD_FILES
              wget --no-cookies --no-check-certificate --header "Cookie: gpw_e24=http%3A%2F%2Fwww.oracle.com%2F; oraclelicense=accept-securebackup-cookie" "http://download.oracle.com/otn-pub/java/jdk/8u65-b17/jdk-8u65-linux-x64.rpm"
              curl -L -O https://download.elastic.co/beats/dashboards/beats-dashboards-1.1.0.zip
              curl -O https://gist.githubusercontent.com/thisismitch/3429023e8438cc25b86c/raw/d8c479e2a1adcea8b1fe86570e42abab0f10f364/filebeat-index-template.json
              }
              
              # ==================== Installing Prerequisites function ==============================
              install_components() {
              tput setaf 2; echo "Installing required components for ELK stack..."; tput sgr 0
              sed -i s/SELINUX=enforcing/SELINUX=disabled/g /etc/selinux/config
              yum clean all >>$INSTALL_LOG
              cd $ELK_DOWNLOAD_FILES
              yum install jdk-8u65-linux-x64.rpm -y 2>>$INSTALL_LOG >>$INSTALL_LOG
              
              x=("elasticsearch" "kibana" "nginx" "httpd-tools" "logstash")
              y=("elasticsearch-2.x" "kibana-4.4" "nginx" "null" "logstash-2.2")
              for i in {0..4}
                      do
                              install_check
              done
              
              }
              
              install_check() {
              yum list installed ${x[$i]} 2>>$INSTALL_LOG >>$INSTALL_LOG
              
              if [ "$?" = "0" ]; then
                      tput setaf 2; echo "Application ${x[$i]} is already Installed...";tput sgr 0
              else
                      tput setaf 1; echo "Installing Application ${x[$i]} ...";tput sgr 0
                      install_app
              fi
              }
              
              install_app() {
              if [ "$i" = "3" ] ; then
                      yum install ${x[$i]} -y >>$INSTALL_LOG
              
              else
                      yum --enablerepo="${y[$i]}" install ${x[$i]} -y >>$INSTALL_LOG
              fi
              
              if [ "$?" = "0" ]; then
                      tput setaf 2; echo "Application ${x[$i]} Installed successfully...";tput sgr 0
              else
                      error_exit
              fi
              }
              
              # ==================== Configuring Components function ==============================
              config_components() {
              tput setaf 2; echo "Configuring ELK Components..."; tput sgr 0
              config_elastic
              config_kibana
              config_nginx
              config_ssl
              config_logstash
              load_kibana
              load_filebeat
              config_firewall
              }
              
              # ==================== Configure Elastic Search function ==============================
              config_elastic() {
              sed -i_bac 's/#.*network.host.*$/network.host: localhost/' /etc/elasticsearch/elasticsearch.yml
              chkconfig --add elasticsearch
              service elasticsearch start
              tput setaf 2; echo "Configured ElasticSearch successfully..."; tput sgr 0
              }
              
              # ==================== Configure Kibana function ==============================
              config_kibana() {
              sed -i_bac 's/#.*server.host.*$/server.host: "localhost"/' /opt/kibana/config/kibana.yml
              chkconfig --add kibana
              service kibana start
              tput setaf 2; echo "Configured Kibana successfully..."; tput sgr 0
              }
              
              # ==================== Configure Nginx function ==============================
              config_nginx() {
              tput setaf 2; echo "Enter a password for Kibana Administrator User (kibanaadmin):"; tput sgr 0
              htpasswd -c /etc/nginx/htpasswd.users kibanaadmin
              cp -p /etc/nginx/nginx.conf{,.bak}
              printf "user  nginx; \n worker_processes  1; \n error_log  /var/log/nginx/error.log warn; \n pid        /var/run/nginx.pid; \n events { \n     worker_connections  1024; \n } \n http { \n     include       /etc/nginx/mime.types; \n     default_type  application/octet-stream; \n     log_format  main  '$remote_addr - $remote_user [$time_local] "$request" ' \n                       '$status $body_bytes_sent "$http_referer" ' \n                       '"$http_user_agent" "$http_x_forwarded_for"'; \n     access_log  /var/log/nginx/access.log  main; \n     sendfile        on; \n     #tcp_nopush     on; \n     keepalive_timeout  65; \n     #gzip  on; \n     include /etc/nginx/conf.d/*.conf; \n } \n" > /etc/nginx/nginx.conf
              echo -e "server {\n    listen 80;\n    server_name $SERVER_NAME;\n    auth_basic \"Restricted Access\";\n    auth_basic_user_file /etc/nginx/htpasswd.users;\n    location / {\n        proxy_pass http://localhost:5601;\n        proxy_http_version 1.1;\n        proxy_set_header Upgrade \$http_upgrade;\n        proxy_set_header Connection 'upgrade';\n        proxy_set_header Host \$host;\n        proxy_cache_bypass \$http_upgrade;        \n    }\n}\n" > /etc/nginx/conf.d/kibana.conf
              chkconfig --add nginx
              service nginx start
              tput setaf 2; echo "Configured Nginx successfully..."; tput sgr 0
              }
              
              # ==================== SSL Configuration function ==============================
              config_ssl() {
              cp -p /etc/pki/tls/openssl.cnf{,.bak}
              sed -i_bac "/^\[ v3_ca \]/a \subjectAltName = IP: $SERVER_IP" /etc/pki/tls/openssl.cnf
              cd /etc/pki/tls
              openssl req -config /etc/pki/tls/openssl.cnf -x509 -days 3650 -batch -nodes -newkey rsa:2048 -keyout private/logstash-forwarder.key -out certs/logstash-forwarder.crt >>$INSTALL_LOG
              tput setaf 2; echo "Configured SSL successfully..."; tput sgr 0
              }
              
              # ==================== Logstash Configuration function ==============================
              config_logstash() {
              echo -e 'input { \n   beats { \n     port => 5044 \n     ssl => true \n     ssl_certificate => "/etc/pki/tls/certs/logstash-forwarder.crt" \n     ssl_key => "/etc/pki/tls/private/logstash-forwarder.key" \n   } \n } \n' > /etc/logstash/conf.d/02-beats-input.conf
              echo -e 'filter {\n   if [type] == "syslog" {\n     grok {\n       match => { "message" => "%{SYSLOGTIMESTAMP:syslog_timestamp} %{SYSLOGHOST:syslog_hostname} %{DATA:syslog_program}(?:\[%{POSINT:syslog_pid}\])?: %{GREEDYDATA:syslog_message}" }\n       add_field => [ "received_at", "%{@timestamp}" ]\n       add_field => [ "received_from", "%{host}" ]\n     }\n     syslog_pri { }\n     date {\n       match => [ "syslog_timestamp", "MMM  d HH:mm:ss", "MMM dd HH:mm:ss" ]\n     }\n   }\n }\n' > /etc/logstash/conf.d/10-syslog-filter.conf
              echo -e 'output {       \n   elasticsearch {    \n     hosts => ["localhost:9200"]      \n     sniffing => true \n     manage_template => false \n     index => "%{[@metadata][beat]}-%{+YYYY.MM.dd}"   \n     document_type => "%{[@metadata][type]}"    \n   }  \n }    \n' > /etc/logstash/conf.d/30-elasticsearch-output.conf
              tput setaf 3; echo "Checking Configuration of Logstash..."; tput sgr 0
              service logstash configtest
              chkconfig --add logstash
              service logstash start
              tput setaf 2; echo "Configured Logstash successfully..."; tput sgr 0
              }
              
              # ==================== Load Kibana Dashboard function ==============================
              load_kibana() {
              tput setaf 3; echo "Load Kibana Dashboard..."; tput sgr 0
              cd $ELK_DOWNLOAD_FILES
              unzip beats-dashboards-*.zip >>$INSTALL_LOG
              cd beats-dashboards-*
              sh ./load.sh >>$INSTALL_LOG
              tput setaf 3; echo "Kibana Dashboard loaded..."; tput sgr 0
              }
              
              # ==================== Load Filebeat function ==============================
              load_filebeat() {
              tput setaf 6; echo "Load File beat..."; tput sgr 0
              cd $ELK_DOWNLOAD_FILES
              curl -XPUT 'http://localhost:9200/_template/filebeat?pretty' -d@filebeat-index-template.json
              tput setaf 6; echo "ELK Server is ready to receive Filebeat data, let's move onto setting up Filebeat on each client server."; tput sgr 0
              tput setaf 6; tput bold; printf "Connect to Kibana DashBoard using link \"http://`uname -n`\"\nAfter entering the "kibanaadmin" credentials, you should see a page prompting you to configure a default index pattern.\n"; tput sgr 0
              }
              
              # ==================== Configure firewall function ==============================
              config_firewall() {
              tput setaf 1; echo "Configuring firewall on ELK Server..."; tput sgr 0
              for p in 5044 9200 5601 80
                      do
                              iptables -I INPUT -j ACCEPT -p tcp --dport $p >>$INSTALL_LOG
                              iptables -I INPUT -j ACCEPT -p udp --dport $p >>$INSTALL_LOG
                              iptables -I OUTPUT -j ACCEPT -p tcp --dport $p >>$INSTALL_LOG
                              iptables -I OUTPUT -j ACCEPT -p udp --dport $p >>$INSTALL_LOG
                      done
              /etc/init.d/iptables save
              /etc/init.d/iptables restart
              tput setaf 2; echo "Firewall is configured successfully..."; tput sgr 0
              }
              
              # ==================== Configure Client function ==============================
              config_client()
              {
              tput setaf 2; read -rp "Enter Client Server Private IP: " CLIENT_IP ; tput sgr 0
              ssh-keygen -t rsa -f /root/.ssh/id_rsa -q -P ""
              tput setaf 2; echo "Enter credentials of Client Server:" ; tput sgr 0
              ssh-copy-id $CLIENT_IP
              echo "Installation log of Client Server $CLIENT_IP:" >> $INSTALL_LOG
              scp /etc/pki/tls/certs/logstash-forwarder.crt root@$CLIENT_IP:/tmp >> $INSTALL_LOG
              ssh $CLIENT_IP "mkdir -p /etc/pki/tls/certs; cp /tmp/logstash-forwarder.crt /etc/pki/tls/certs/"
              tput setaf 2; echo "Copied SSL Certficate..."
              echo "Installing Filebeat Package on Client Server..."; tput sgr 0
              ssh $CLIENT_IP "rpm --import http://packages.elastic.co/GPG-KEY-elasticsearch; echo -e '[beats]\nname=Elastic Beats Repository\nbaseurl=https://packages.elastic.co/beats/yum/el/\$basearch\nenabled=1\ngpgkey=https://packages.elastic.co/GPG-KEY-elasticsearch\ngpgcheck=1\n' > /etc/yum.repos.d/elastic-beats.repo; yum -y install filebeat" >> $INSTALL_LOG
              
              if [ "$?" = "0" ]; then
                      echo -e '#!/bin/bash' > /tmp/t.sh
                      echo -e "sed -i_bac -e '/- \/var/ s/^/#/' -e '/ paths:/a \        - /var/log/messages' -e '/ paths:/a \        - /var/log/secure' -e 's/#document_type:.*$/document_type: syslog/' -e '/elasticsearch:/,/# Logstash/ s/^/#/' -e 's/#logstash:/logstash:/' -e \"/logstash:/,+2 s/#hosts: \[\\\"localhost:/hosts: \[\\\"$SERVER_IP:/\" -e '/hosts.*5044/a \    bulk_max_size: 1024' -e '/logstash:/,+30 s/#tls:/tls:/' -e '/ tls:/,+5 s/#certificate_authorities:.*/certificate_authorities: \[\"\/etc\/pki\/tls\/certs\/logstash-forwarder.crt\"\]/' /etc/filebeat/filebeat.yml\nexit" >>/tmp/t.sh
                      scp /tmp/t.sh $CLIENT_IP:/tmp >> $INSTALL_LOG
                      ssh $CLIENT_IP "sh /tmp/t.sh; service filebeat start; chkconfig --add filebeat;"
                      tput setaf 2 ; echo "Configured client successfully..."; tput sgr 0
              else
                      error_exit
              fi
              
              }
              
              # ==================== Exit function ==============================
              function error_exit()
              {
                      tput setaf 7; tput setab 1; echo "Unknown Error occured, check installation log located @ $INSTALL_LOG for more information";tput sgr 0
                      exit 1
              }
              
              # ========================= BEGIN ==========================
              # ========================================================
              # ========================================================
              
              # ========================= VARIABLES INITIALIZATION ==========================
              mkdir /tmp/elk_downloads 2>/dev/null
              ELK_DOWNLOAD_FILES=/tmp/elk_downloads
              SERVER_NAME=$(uname -n)
              touch /tmp/elk_downloads/install_log
              INSTALL_LOG=/tmp/elk_downloads/install_log
              tput setaf 2; read -rp "Enter ELK Server Private IP: " SERVER_IP; tput sgr 0
              #read -rp "Enter Client Server Private IP: " CLIENT_IP
              
              # ========================= FUNCTIONS INVOCATIONS ==========================
                  
                  BG_BLUE="$(tput setab 4)"
                  BG_BLACK="$(tput setab 0)"
                  FG_GREEN="$(tput setaf 2)"
                  FG_WHITE="$(tput setaf 7)"
              
                  # Screen size
                  row=$(tput lines)
                  col=$(tput cols)
              
                  # Save screen
                  tput smcup
              
                  # Display menu until selection == 0
                  while [[ $REPLY != 0 ]]; do
                    echo -n ${BG_BLUE}${FG_WHITE}
                    clear
                    tput sc; tput cup $((row/3)) $((col/3)); tput setab 1; tput bold; tput setaf 7; printf "Improvisation: aljoantony@gmail.com\n"; tput rc
                  cat<<EOF
                  ==============================
                    ELK Stack Installation Menu
                  ------------------------------
                  Please enter your choice:
                  (1) Configure repo
                  (2) Install Components
                  (3) Configure Components
                  (4) Configure Client
                         (0)Quit
                  ------------------------------
              EOF
                    read -p "Enter selection [0-4] > " selection
              
                    # Clear area beneath menu
                    tput cup 10 0
                    echo -n ${BG_BLACK}${FG_GREEN}
                    tput ed
                    tput cup 11 0
                    tput sc; tput cup $((row/3)) $((col/3)); tput setab 1; tput bold; tput setaf 7; printf "Improvisation: aljoantony@gmail.com\n"; tput rc
                    # Act on selection
                    case $selection in
                      1)  configure_repo
                          ;;
                      2)  install_components
                          ;;
                      3)  config_components
                          ;;
                      4)  config_client
                          ;;
                      0)  break
                          ;;
                      *)  echo "Invalid entry."
                          ;;
                    esac
                    printf "\n\nPress any key to continue."
                    read -n 1
                  done
              
                  # Restore screen
                  tput rmcup
              
              # ========================= END ==========================
              # =======================================================
              # =======================================================
              
              
              Elasticsearch is up and running, responds to API
              executing a query directly on Elasticsearch like http://elasticserver.com:9200/applogs/_search?q=* returns lots of results (see below on how a single found record looks like)
              Kibana is up and running, even finds the applogs index exposed by Elasticsearch
              Kibana also shows the correct properties and data type of the filebeat documents
              "Discover" tab doesn't show any results...even when setting the time period to a couple of years...
              

              Any ideas??

              I want to parse log query dns. i use grok filter. But i dont know how to run logstash with filter. my log dns: 16-Mar-2016 16:48:00.086 queries: info: client 192.168.1.3#53345: query: kenh14.vn IN A + (192.168.1.2) filter { if [type] == “dns-queries” { grok { match => {“message” => “%{MONTHDAY:day}-%{MONTH:month}-%{YEAR:year} %{TIME:timestamp} queries: info: client %{IPV4:dns_client_ip}#%{NONNEGINT:dns_uuid}?.query: %{HOSTNAME:dns_dest} %{WORD:dns_type} %{WORD:dns_record}?.%{IPV4:dns_server}” } } } }

              It not work. it can’t parse log . can you help me ?

              Mitchell, first of all thanks for this awesome tutorial - for wring and keep updating it! Second, i’ve used a CentOS 7 VM for the ELK stack (with Elasticsearch, Kibana, Nginx & Logstash) and another VM with Filebeat. I’m using the latest versions of these tools, per the repos you gave and the OS is fully updated. SELinux and Firewall are disabled, and the 2 VMs are on the same network. The issue is that I don’t have Filebeat-YYYY.MM.DD or Filebeat-@timestamp options in the indexes\indices patterns. I’m getting the “Unable to fetch mapping. Do you have indices matching the pattern?” message. I can access the Kibana, via Nginx without issues. I CAN SEE logs from the client VM, grabbed via Filebeat when choosing “filebeat-*” index pattern When typing in the open text-box of index pattern, “filebeat-@timestamp” (which also auto-complete it self when writing “filebeat-” I’m getting a fatal error message with the error: null is not an object (evaluating ‘index.timeField.name’).

              What am I doing wrong? When looking on similar comments in the past I saw some replies about Logstash-forwarder, is it something replaced by Filebeat? as I don’t see anything related to it (besides the CERT & KEY file names) in the whole ELK Stack VM system.

              Thanks in advance

              @citrusr2d2 please I have the same problem as you. how you solve the problem

              I have 3 files under /conf.d

              30-elasticsearch-output.conf

              output { elasticsearch { hosts => [“localhost:9200”] sniffing => true manage_template => false index => “%{[@metadata][beat]}-%{+YYYY.MM.dd}” document_type => “%{[@metadata][type]}” } }

              10-syslog-filter.conf

              filter { if [type] == “syslog” { grok { match => { “message” => “%{SYSLOGTIMESTAMP:syslog_timestamp} %{SYSLOGHOST:syslog_hostname} %{DATA:syslog_program}(?:[%{POSINT:syslog_pid}])?: %{GREEDYDATA:syslog_message}” } add_field => [ “received_at”, “%{@timestamp}” ] add_field => [ “received_from”, “%{host}” ] } syslog_pri { } date { match => [ “syslog_timestamp”, “MMM d HH:mm:ss”, “MMM dd HH:mm:ss” ] } } }

              02-beats-input.conf input { beats { port => 5044 ssl => true ssl_certificate => “/etc/pki/tls/certs/logstash-forwarder.crt” ssl_key => “/etc/pki/tls/private/logstash-forwarder.key” } }

              and i want to config logstash to get cisco asa logs i have this tuto to help http://ict.renevdmark.nl/2015/10/22/cisco-asa-alerts-and-kibana/

              and i’m lost how to put this config all together right plz some one help

              Is this ELK stack using the rsyslog at all? I found another tutorial that I wanted to use for my firewall but they use syslog-ng. I dont want to break my ELK stack from your tutorial. Wondering if trying to run syslog-ng instead will break it.

              I install complete ELK on CentOS 7. But when i send log from CentOS 6 Client. It very slow to recives log or no recives log. how can i check log send from Client to ELK realtime. And may be i don’t use certificate like tutorial ? Sorrry because my english :(

              I am getting the following errors. It indicates that a kibana process is running but that the error logs indicate a fatal error happened (that the port is already being used). Indeed it is because the process is still running.

              [root@startup-elk ~]# tail -f /var/log/kibana/kibana.stderr /var/log/kibana/kibana.stdout

              {“type”:“log”,“@timestamp”:“2016-06-15T12:04:00+00:00”,“tags”:[“fatal”],“pid”:2384,“level”:“fatal”,“message”:“listen EADDRINUSE 127.0.0.1:5601”,“error”:{“message”:“listen EADDRINUSE 127.0.0.1:5601”,“name”:“Error”,“stack”:“Error: listen EADDRINUSE 127.0.0.1:5601\n at Object.exports._errnoException (util.js:870:11)\n at exports._exceptionWithHostPort (util.js:893:20)\n at Server._listen2 (net.js:1236:14)\n at listen (net.js:1272:10)\n at net.js:1381:9\n at GetAddrInfoReqWrap.asyncCallback [as callback] (dns.js:63:16)\n at GetAddrInfoReqWrap.onlookup [as oncomplete] (dns.js:82:10)”,“code”:“EADDRINUSE”}}

              ==> /var/log/kibana/kibana.stderr <== FATAL { [Error: listen EADDRINUSE 127.0.0.1:5601] cause: { [Error: listen EADDRINUSE 127.0.0.1:5601] code: ‘EADDRINUSE’, errno: ‘EADDRINUSE’, syscall: ‘listen’, address: ‘127.0.0.1’, port: 5601 }, isOperational: true, code: ‘EADDRINUSE’, errno: ‘EADDRINUSE’, syscall: ‘listen’, address: ‘127.0.0.1’, port: 5601 }

              [root@startup-elk ~]# service kibana status kibana is not running

              [root@startup-elk ~]# netstat -apln | grep 5601 tcp 0 0 127.0.0.1:5601 0.0.0.0:* LISTEN 2243/node

              [root@startup-elk ~]# ps -eaf | grep kiba kibana 2243 1 1 07:56 ? 00:00:06 /opt/kibana/bin/…/node/bin/node /opt/kibana/bin/…/src/cli

              Hello, after passing full tutorial i have some issues i cant fix last 3 days. Server and client are Centos 7 Elasticsearch, kibana , logstash, nginx working.

              I can ping from server to client machine and reverse.

              Issue i get on Client side : after installing filebeat and copying certificate i cant get logs in my kibana.

              CLI-Log /usr/bin/filebeat[41833]: transport.go:125: SSL client failed to connect with: dial tcp x.x.x.x:5044: getsockopt: no route to host

              My config files are same as in tutorial. So basically i cant conect client with server, i have static ip on both.

              I’m trying to read my elk stack’s local logs, including /var/log/messages. In my case I haven’t started using filebeat yet. Kibana keeps prompting me to “Configure an index pattern”, because logstash was forwarding data to elasticsearch. I checked the logstash logs and found that it’s a files permissions issue. I fixed this by running the following on my elk server:

              chmod -R /var/log

              Or better yet, run:

              setfacl -R -m user:logstash:rwX /var/log

              Hi…I am very new to Openstack. Your tutorial is really good and helped me a lot. However I am stuck at the last part of the tutorial. below is the output that I am getting. curl -XGET ‘http://<Ip of ELK server>:9200/filebeat-*/_search?pretty’ { “took” : 1, “timed_out” : false, “_shards” : { “total” : 0, “successful” : 0, “failed” : 0 }, “hits” : { “total” : 0, “max_score” : 0.0, “hits” : [ ] } }

              And the kibana gui result gives me plugin:elasticsearch Unable to connect to Elasticsearch at http://localhost:9200 I am not using localhost as such. I have a controller and a compute node on Openstack where I am trying ELK. Can you help me?

              Why was is necessary to install NGINX? Can’t this step be missed out?

              filebeat failed to send logs and its status on ubuntu 16.04:

              transport.go:125: SSL client failed to connect with: x509: cannot validate certificat

              I configured with DNS method for tls and able to ping FQDN from client and server.

              Mitchell, Like many others… thanks for a great tutorial. And again, like some others I’ve ran into a problem :)

              I was able to go through your steps successfully until the configuring Filebeat on the client. I got it installed however my Elk server is not receiving any logs.

              curl -XGET 'http://localhost:9200/filebeat-*/_search?pretty'
              

              returns:

              {
                "took" : 1,
                "timed_out" : false,
                "_shards" : {
                  "total" : 0,
                  "successful" : 0,
                  "failed" : 0
                },
                "hits" : {
                  "total" : 0,
                  "max_score" : 0.0,
                  "hits" : [ ]
                }
              }
              

              I’ve checked and rechecked my Filebeat.yml file and it’s correct. I did check teh Elk server and according to netstat port 5044 is not listening. Even though the 02-beats-input.conf file is setup like yours with 5044 used.

              Any help would be greatly appreciated.

              Great tutorial. Clear, concise, and it works!

              Great tutorial! It works for me. Look forward to your advanaced solutions for elasticsearchcluster setup and store log in database, i.g. redis. :-)

              Try DigitalOcean for free

              Click below to sign up and get $200 of credit to try our products over 60 days!

              Sign up

              Join the Tech Talk
              Success! Thank you! Please check your email for further details.

              Please complete your information!

              Congratulations on unlocking the whale ambience easter egg!

              Click the whale button in the bottom left of your screen to toggle some ambient whale noises while you read.

              Thank you to the Glacier Bay National Park & Preserve and Merrick079 for the sounds behind this easter egg.

              Interested in whales, protecting them, and their connection to helping prevent climate change? We recommend checking out the Whale and Dolphin Conservation.

              Become a contributor for community

              Get paid to write technical tutorials and select a tech-focused charity to receive a matching donation.

              DigitalOcean Documentation

              Full documentation for every DigitalOcean product.

              Resources for startups and SMBs

              The Wave has everything you need to know about building a business, from raising funding to marketing your product.

              Get our newsletter

              Stay up to date by signing up for DigitalOcean’s Infrastructure as a Newsletter.

              New accounts only. By submitting your email you agree to our Privacy Policy

              The developer cloud

              Scale up as you grow — whether you're running one virtual machine or ten thousand.

              Get started for free

              Sign up and get $200 in credit for your first 60 days with DigitalOcean.*

              *This promotional offer applies to new accounts only.