Tutorial

How To Install WordPress with LAMP on Ubuntu 16.04

How To Install WordPress with LAMP on Ubuntu 16.04
Not using Ubuntu 16.04?Choose a different version or distribution.
Ubuntu 16.04

Introduction

WordPress is the most popular CMS (content management system) on the internet. It allows you to easily set up flexible blogs and websites on top of a MySQL backend with PHP processing. WordPress has seen incredible adoption and is a great choice for getting a website up and running quickly. After setup, almost all administration can be done through the web frontend.

In this guide, we’ll focus on getting a WordPress instance set up on a LAMP stack (Linux, Apache, MySQL, and PHP) on an Ubuntu 16.04 server.

Prerequisites

In order to complete this tutorial, you will need access to an Ubuntu 16.04 server.

You will need to perform the following tasks before you can start this guide:

  • Create a sudo user on your server: We will be completing the steps in this guide using a non-root user with sudo privileges. You can create a user with sudo privileges by following our Ubuntu 16.04 initial server setup guide.
  • Install a LAMP stack: WordPress will need a web server, a database, and PHP in order to correctly function. Setting up a LAMP stack (Linux, Apache, MySQL, and PHP) fulfills all of these requirements. Follow this guide to install and configure this software.
  • Secure your site with SSL: WordPress serves dynamic content and handles user authentication and authorization. TLS/SSL is the technology that allows you to encrypt the traffic from your site so that your connection is secure. The way you set up SSL will depend on whether you have a domain name for your site.
    • If you have a domain name… the easiest way to secure your site is with Let’s Encrypt, which provides free, trusted certificates. Follow our Let’s Encrypt guide for Apache to set this up.
    • If you do not have a domain… and you are just using this configuration for testing or personal use, you can use a self-signed certificate instead. This provides the same type of encryption, but without the domain validation. Follow our self-signed SSL guide for Apache to get set up.

When you are finished the setup steps, log into your server as your sudo user and continue below.

Step 1: Create a MySQL Database and User for WordPress

The first step that we will take is a preparatory one. WordPress uses MySQL to manage and store site and user information. We have MySQL installed already, but we need to make a database and a user for WordPress to use.

To get started, log into the MySQL root (administrative) account by issuing this command:

  1. mysql -u root -p

You will be prompted for the password you set for the MySQL root account when you installed the software.

First, we can create a separate database that WordPress can control. You can call this whatever you would like, but we will be using wordpress in this guide to keep it simple. You can create the database for WordPress by typing:

  1. CREATE DATABASE wordpress DEFAULT CHARACTER SET utf8 COLLATE utf8_unicode_ci;

Note: Every MySQL statement must end in a semi-colon (;). Check to make sure this is present if you are running into any issues.

Next, we are going to create a separate MySQL user account that we will use exclusively to operate on our new database. Creating one-function databases and accounts is a good idea from a management and security standpoint. We will use the name wordpressuser in this guide. Feel free to change this if you’d like.

We are going to create this account, set a password, and grant access to the database we created. We can do this by typing the following command. Remember to choose a strong password here for your database user:

  1. GRANT ALL ON wordpress.* TO 'wordpressuser'@'localhost' IDENTIFIED BY 'password';

You now have a database and user account, each made specifically for WordPress. We need to flush the privileges so that the current instance of MySQL knows about the recent changes we’ve made:

  1. FLUSH PRIVILEGES;

Exit out of MySQL by typing:

  1. EXIT;

Step 2: Install Additional PHP Extensions

When setting up our LAMP stack, we only required a very minimal set of extensions in order to get PHP to communicate with MySQL. WordPress and many of its plugins leverage additional PHP extensions.

We can download and install some of the most popular PHP extensions for use with WordPress by typing:

  1. sudo apt-get update
  2. sudo apt-get install php-curl php-gd php-mbstring php-mcrypt php-xml php-xmlrpc

Note

Each WordPress plugin has its own set of requirements. Some may require additional PHP packages to be installed. Check your plugin documentation to discover its PHP requirements. If they are available, they can be installed with apt-get as demonstrated above.

We will restart Apache to leverage these new extensions in the next section. If you are returning here to install additional plugins, you can restart Apache now by typing:

  1. sudo systemctl restart apache2

Step 3: Adjust Apache’s Configuration to Allow for .htaccess Overrides and Rewrites

Next, we will be making a few minor adjustments to our Apache configuration. Currently, the use of .htaccess files is disabled. WordPress and many WordPress plugins use these files extensively for in-directory tweaks to the web server’s behavior.

Additionally, we will enable mod_rewrite, which will be needed in order to get WordPress permalinks to function correctly.

Enable .htaccess Overrides

Open the primary Apache configuration file to make our first change:

  1. sudo nano /etc/apache2/apache2.conf

To allow .htaccess files, we need to set the AllowOverride directive within a Directory block pointing to our document root. Towards the bottom of the file, add the following block:

/etc/apache2/apache2.conf
. . .

<Directory /var/www/html/>
	AllowOverride All
</Directory>

. . .

When you are finished, save and close the file.

Enable the Rewrite Module

Next, we can enable mod_rewrite so that we can utilize the WordPress permalink feature:

  1. sudo a2enmod rewrite

Enable the Changes

Before we implement the changes we’ve made, check to make sure we haven’t made any syntax errors:

  1. sudo apache2ctl configtest

The output might have a message that looks like this:

Output
AH00558: apache2: Could not reliably determine the server's fully qualified domain name, using 127.0.1.1. Set the 'ServerName' directive globally to suppress this message Syntax OK

If you wish to suppress the top line, just add a ServerName directive to the /etc/apache2/apache2.conf file pointing to your server’s domain or IP address. This is just a message however and doesn’t affect the functionality of our site. As long as the output contains Syntax OK, you are ready to continue.

Restart Apache to implement the changes:

  1. sudo systemctl restart apache2

Step 4: Download WordPress

Now that our server software is configured, we can download and set up WordPress. For security reasons in particular, it is always recommended to get the latest version of WordPress from their site.

Change into a writable directory and then download the compressed release by typing:

  1. cd /tmp
  2. curl -O https://wordpress.org/latest.tar.gz

Extract the compressed file to create the WordPress directory structure:

  1. tar xzvf latest.tar.gz

We will be moving these files into our document root momentarily. Before we do, we can add a dummy .htaccess file and set its permissions so that this will be available for WordPress to use later.

Create the file and set the permissions by typing:

  1. touch /tmp/wordpress/.htaccess
  2. chmod 660 /tmp/wordpress/.htaccess

We’ll also copy over the sample configuration file to the filename that WordPress actually reads:

  1. cp /tmp/wordpress/wp-config-sample.php /tmp/wordpress/wp-config.php

We can also create the upgrade directory, so that WordPress won’t run into permissions issues when trying to do this on its own following an update to its software:

  1. mkdir /tmp/wordpress/wp-content/upgrade

Now, we can copy the entire contents of the directory into our document root. We are using the -a flag to make sure our permissions are maintained. We are using a dot at the end of our source directory to indicate that everything within the directory should be copied, including hidden files (like the .htaccess file we created):

  1. sudo cp -a /tmp/wordpress/. /var/www/html

Step 5: Configure the WordPress Directory

Before we do the web-based WordPress setup, we need to adjust some items in our WordPress directory.

Adjusting the Ownership and Permissions

One of the big things we need to accomplish is setting up reasonable file permissions and ownership. We need to be able to write to these files as a regular user, and we need the web server to also be able to access and adjust certain files and directories in order to function correctly.

We’ll start by assigning ownership over all of the files in our document root to our username. We will use sammy as our username in this guide, but you should change this to match whatever your sudo user is called. We will assign group ownership to the www-data group:

  1. sudo chown -R sammy:www-data /var/www/html

Next, we will set the setgid bit on each of the directories within the document root. This causes new files created within these directories to inherit the group of the parent directory (which we just set to www-data) instead of the creating user’s primary group. This just makes sure that whenever we create a file in the directory on the command line, the web server will still have group ownership over it.

We can set the setgid bit on every directory in our WordPress installation by typing:

  1. sudo find /var/www/html -type d -exec chmod g+s {} \;

There are a few other fine-grained permissions we’ll adjust. First, we’ll give group write access to the wp-content directory so that the web interface can make theme and plugin changes:

  1. sudo chmod g+w /var/www/html/wp-content

As part of this process, we will give the web server write access to all of the content in these two directories:

  1. sudo chmod -R g+w /var/www/html/wp-content/themes
  2. sudo chmod -R g+w /var/www/html/wp-content/plugins

This should be a reasonable permissions set to start with. Some plugins and procedures might require additional tweaks.

Setting up the WordPress Configuration File

Now, we need to make some changes to the main WordPress configuration file.

When we open the file, our first order of business will be to adjust some secret keys to provide some security for our installation. WordPress provides a secure generator for these values so that you do not have to try to come up with good values on your own. These are only used internally, so it won’t hurt usability to have complex, secure values here.

To grab secure values from the WordPress secret key generator, type:

  1. curl -s https://api.wordpress.org/secret-key/1.1/salt/

You will get back unique values that look something like this:

Warning! It is important that you request unique values each time. Do NOT copy the values shown below!

Output
define('AUTH_KEY', '1jl/vqfs<XhdXoAPz9 DO NOT COPY THESE VALUES c_j{iwqD^<+c9.k<J@4H'); define('SECURE_AUTH_KEY', 'E2N-h2]Dcvp+aS/p7X DO NOT COPY THESE VALUES {Ka(f;rv?Pxf})CgLi-3'); define('LOGGED_IN_KEY', 'W(50,{W^,OPB%PB<JF DO NOT COPY THESE VALUES 2;y&,2m%3]R6DUth[;88'); define('NONCE_KEY', 'll,4UC)7ua+8<!4VM+ DO NOT COPY THESE VALUES #`DXF+[$atzM7 o^-C7g'); define('AUTH_SALT', 'koMrurzOA+|L_lG}kf DO NOT COPY THESE VALUES 07VC*Lj*lD&?3w!BT#-'); define('SECURE_AUTH_SALT', 'p32*p,]z%LZ+pAu:VY DO NOT COPY THESE VALUES C-?y+K0DK_+F|0h{!_xY'); define('LOGGED_IN_SALT', 'i^/G2W7!-1H2OQ+t$3 DO NOT COPY THESE VALUES t6**bRVFSD[Hi])-qS`|'); define('NONCE_SALT', 'Q6]U:K?j4L%Z]}h^q7 DO NOT COPY THESE VALUES 1% ^qUswWgn+6&xqHN&%');

These are configuration lines that we can paste directly in our configuration file to set secure keys. Copy the output you received now.

Now, open the WordPress configuration file:

  1. nano /var/www/html/wp-config.php

Find the section that contains the dummy values for those settings. It will look something like this:

/var/www/html/wp-config.php
. . .

define('AUTH_KEY',         'put your unique phrase here');
define('SECURE_AUTH_KEY',  'put your unique phrase here');
define('LOGGED_IN_KEY',    'put your unique phrase here');
define('NONCE_KEY',        'put your unique phrase here');
define('AUTH_SALT',        'put your unique phrase here');
define('SECURE_AUTH_SALT', 'put your unique phrase here');
define('LOGGED_IN_SALT',   'put your unique phrase here');
define('NONCE_SALT',       'put your unique phrase here');

. . .

Delete those lines and paste in the values you copied from the command line:

/var/www/html/wp-config.php
. . .

define('AUTH_KEY',         'VALUES COPIED FROM THE COMMAND LINE');
define('SECURE_AUTH_KEY',  'VALUES COPIED FROM THE COMMAND LINE');
define('LOGGED_IN_KEY',    'VALUES COPIED FROM THE COMMAND LINE');
define('NONCE_KEY',        'VALUES COPIED FROM THE COMMAND LINE');
define('AUTH_SALT',        'VALUES COPIED FROM THE COMMAND LINE');
define('SECURE_AUTH_SALT', 'VALUES COPIED FROM THE COMMAND LINE');
define('LOGGED_IN_SALT',   'VALUES COPIED FROM THE COMMAND LINE');
define('NONCE_SALT',       'VALUES COPIED FROM THE COMMAND LINE');

. . .

Next, we need to modify some of the database connection settings at the beginning of the file. You need to adjust the database name, the database user, and the associated password that we configured within MySQL.

The other change we need to make is to set the method that WordPress should use to write to the filesystem. Since we’ve given the web server permission to write where it needs to, we can explicitly set the filesystem method to “direct”. Failure to set this with our current settings would result in WordPress prompting for FTP credentials when we perform some actions.

This setting can be added below the database connection settings, or anywhere else in the file:

/var/www/html/wp-config.php
. . .

define('DB_NAME', 'wordpress');

/** MySQL database username */
define('DB_USER', 'wordpressuser');

/** MySQL database password */
define('DB_PASSWORD', 'password');

. . .

define('FS_METHOD', 'direct');

Save and close the file when you are finished.

Step 6: Complete the Installation Through the Web Interface

Now that the server configuration is complete, we can complete the installation through the web interface.

In your web browser, navigate to your server’s domain name or public IP address:

http://server_domain_or_IP

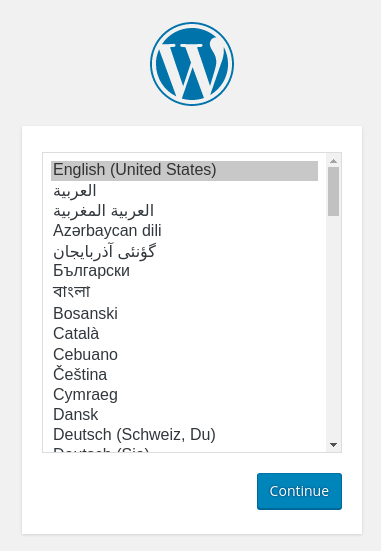
Select the language you would like to use:

WordPress language selection

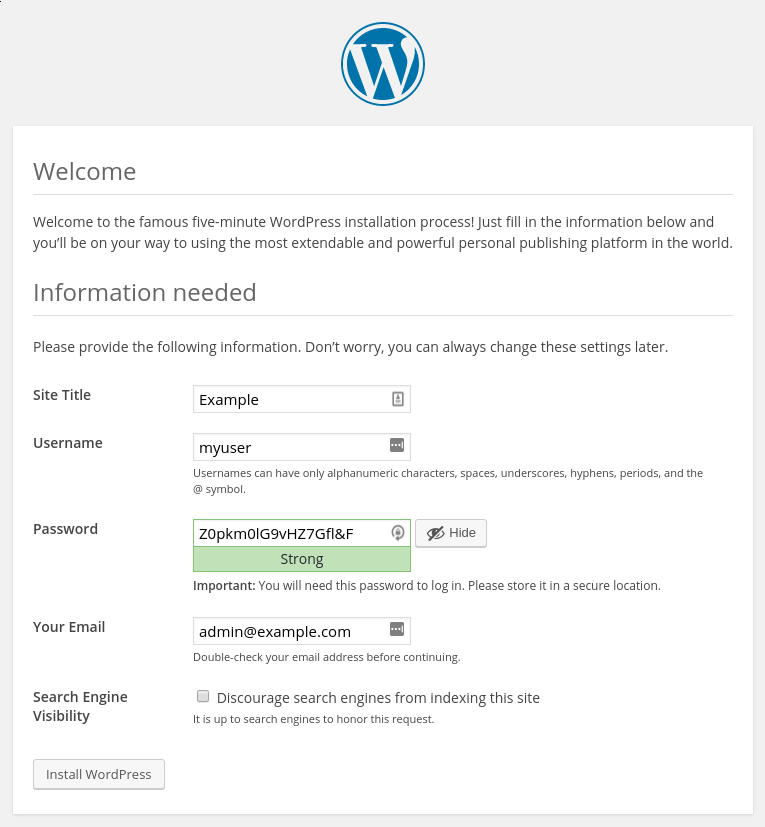
Next, you will come to the main setup page.

Select a name for your WordPress site and choose a username (it is recommended not to choose something like “admin” for security purposes). A strong password is generated automatically. Save this password or select an alternative strong password.

Enter your email address and select whether you want to discourage search engines from indexing your site:

WordPress setup installation

When you click ahead, you will be taken to a page that prompts you to log in:

WordPress login prompt

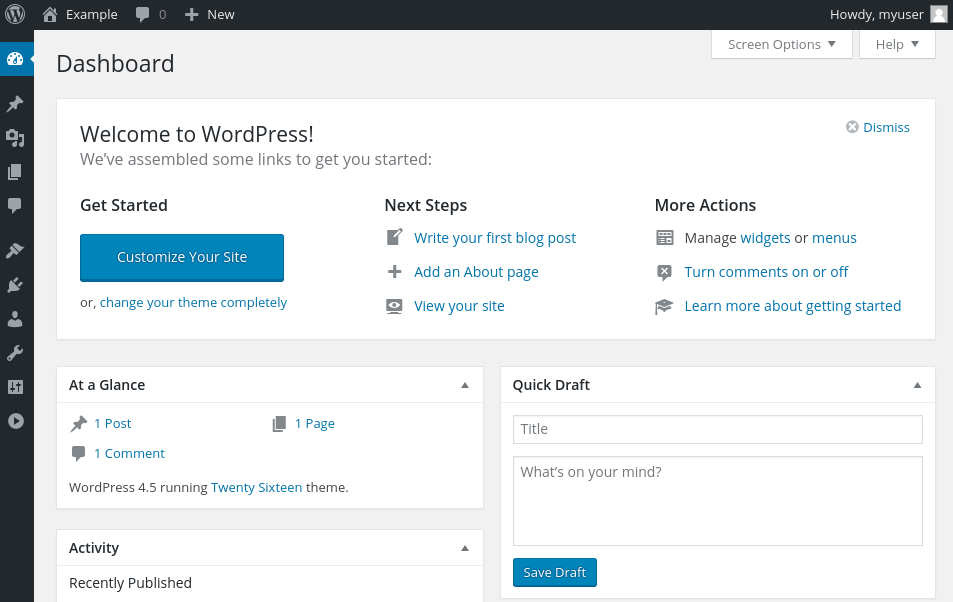
Once you log in, you will be taken to the WordPress administration dashboard:

WordPress login prompt

Upgrading WordPress

As WordPress upgrades become available, you will be unable in install them through the interface with the current permissions.

The permissions we selected here are meant to provide a good balance between security and usability for the 99% of times between upgrading. However, they are a bit too restrictive for the software to automatically apply updates.

When an update becomes available, log back into your server as your sudo user. Temporarily give the web server process access to the whole document root:

  1. sudo chown -R www-data /var/www/html

Now, go back the WordPress administration panel and apply the update.

When you are finished, lock the permissions down again for security:

  1. sudo chown -R sammy /var/www/html

This should only be necessary when applying upgrades to WordPress itself.

Conclusion

WordPress should be installed and ready to use! Some common next steps are to choose the permalinks setting for your posts (can be found in Settings > Permalinks) or to select a new theme (in Appearance > Themes). If this is your first time using WordPress, explore the interface a bit to get acquainted with your new CMS.

Thanks for learning with the DigitalOcean Community. Check out our offerings for compute, storage, networking, and managed databases.

Learn more about our products

About the authors

Still looking for an answer?

Ask a questionSearch for more help

Was this helpful?
 
60 Comments
Leave a comment...

This textbox defaults to using Markdown to format your answer.

You can type !ref in this text area to quickly search our full set of tutorials, documentation & marketplace offerings and insert the link!

Is there a way to automate this so that I can run a script with user-init (user data) when I setup a droplet?

Well you can use server pilot, or deploy the 1 click app, but those use 14.04 not 16.04. Another option would be writing a sh script ;) but that can get complicated

I can’t update wordpress. I got this message.

Unpacking the update…

The update cannot be installed because we will be unable to copy some files. This is usually due to inconsistent file permissions.: wp-admin/includes/update-core.php

Installation Failed

Justin Ellingwood
DigitalOcean Employee
DigitalOcean Employee badge
May 9, 2016

@SummonD: Hey, sorry about that. The tutorial was updated recently to account for that.

Basically, the permissions in this guide offer better security for the majority of your time, between updates. They’re a bit too restrictive to use the WordPress update button as-is. For those purposes, you’ll need to temporarily change ownership to loosen permissions a bit, update, and then tighten them again.

Since you initially followed this tutorial before it was updated, the first time you do this, you might need to create and adjust the permissions of the upgrade directory:

  1. sudo mkdir -p /var/www/html/wp-content/upgrade
  2. sudo chmod g+ws /var/www/html/wp-content/upgrade
  3. sudo chown sammy:www-data /var/www/html/wp-content/upgrade

Now, each time you upgrade WordPress itself, log into the server and time:

  1. sudo chown -R www-data /var/www/html

In the WordPress interface, apply the pending update.

Once the upgrade is complete, lock down the permissions again for security purposes:

  1. sudo chown -R sammy /var/www/html

That should allow you to apply any updates securely and relatively easily.

If you’re having an error adding a new plugin “Installation failed: Could not create directory.” You may be having an issue that sometimes happens from trying to create the ‘upgrade’ folder. People may assume that if it already exists, they don’t need to configure it.

sudo mkdir -p /var/www/html/wp-content/upgrade

Results in an error

mkdir: cannot create directory ‘/tmp/wordpress/wp-content/upgrade’: File exists

If you unpack the .tar file (took a screenshot of the FTP client and Console), you’ll see a file is already there named ‘upgrade’ with no file extension. Users will need to remove the file before they can proceed.

sudo rm -r /tmp/wordpress/wp-content/upgrade
mkdir /tmp/wordpress/wp-content/upgrade

If they have already installed Wordpress, they’ll need to change the path to wherever they installed it.

sudo rm -r /var/www/html/upgrade

I’m confused. Are you saying that DO has modified the file permissions in our installations on our behalf? (I got to this page after finding a comment in my wp-config.php that links here).

I’m also confused because you seem to be saying the changes were made for better security, but they happen to prevent Wordpress from being able to auto-update. So, is that really a good trade-off to make?

This comment has been deleted

    @jellingwood Now I can update my Wordpress already. Thank you so much.

    Do SSH updates (secure updates) work on Ubuntu 16? I set them up in a way that should work and the WordPress update connect but I get the error:

    An error occurred while updating Akismet: Unable to locate WordPress Content directory (wp-content).
    

    thanks!

    what additional steps might be taken to apply this tutorial to several seperate WP installs in the document root? (not WP multisite) How might this affect Apache/SSL settings?

    cheers, this community rocks.

    This tutorial is great. It installs Wordpress in the web root. If I want to have several instances of WP in the same Ubuntu install would I just change all the directories to the virtual directories?

    is also OK that wordpress ask me for FTP/SFTP/SSH credential only for delete a plugin ?

    Justin, Thank you for your tutorial, and especially for the clear explanations you provide along the way. I think I am close to having everything set up; but there is a hitch. Having (I think) successfully set everything up, I try to access the Wordpress through the web interface, and I get the Apache 2 Ubuntu Default Page. Any suggestions to what I might have or have not done? Thanks again, Kym

    That is the same thing that happened to me. Any solution?

    Same here. Any solution?

    Guys, just make sure you deleted default index.html file maded by initial Apache install in /var/www/html/ directory.

    same here, Does someone know the solution?

    I found in a lot make sure the root dir points to the wordpress folder

    I got this error message, how do I solve it?

    user:~$ sudo systemctl restart apache2.service
    
    Failed to restart apache2.service: No such method 'RestartUnit'
    See system logs and 'systemctl status apache2.service' for details.
    

    I did this instead, but the last command still gives that error.

    sudo service apache2 restart
    

    Any chance that updating the do_user_scripts at github for 16.04 is on the horizon? I’m looking at the 15.10 one (https://github.com/digitalocean/do_user_scripts/blob/master/Ubuntu-15.10/cms/wordpress.sh) and not sure how much needs to be modified.

    Ryan Quinn
    DigitalOcean Employee
    DigitalOcean Employee badge
    July 5, 2016

    The update was pretty basic but is now available here. The changes made include:

    • Updated package names from php5 to php7.0
    • Modified the password generation section to prevent sporadic errors due to non-alphanumerics

    We have also added updated LEMP and LAMP stack scripts for Ubuntu 16.04.

    Great, thanks for that! My WordPress is all set up, but that’ll be handy for future droplets. Now, onto your postfix tutorials (wouldn’t mind seeing that script updated for 16.04 as well ;)

    I prepare my WordPress blog but the logo which is appearing in the top of the front page is broken. I made a check for for permissions in upload folder ant it is 755. I think is not the problem. The theme I use is the “Gadget”. Any idea?

    My web site is www.cartography.gr

    This comment has been deleted

      Not sure if this tutorial is outdated or what… I was able to do almost everything without a hitch. The only thing you need to fix is the download url for wordpress files. It is wordpress.org not .com now.

      Anyways, I got all the files on the server and configured everything according to the tutorial but I am stuck. There is no wordpress setup page when I try to access my IP through web browsers. Do you have any idea what would cause this?

      I also didn’t get the wordpress setup page going to the ip address, only the apache info page. Using /wp-login.php gave me the error page that said: Error establishing a database connection

      Which is at least a wordpress error I recall. Not sure what I have done wrong. Any ideas would be helpful.

      This comment has been deleted

        Just follow your guid, But can not install any theme or plugin. “Installation failed: Could not create directory.” I chown www-data:www-data and it works, What did I miss?

        How do you copy and past the secure keys into the wp-config.php file?

        If using a one-click LAMP image, be sure to remove /var/www/html/index.html file (or change the configuration) because the server defaults to .html files before .php files.

        Thank you!

        Turns out on MySQL 5.7 the line:

        GRANT ALL ON wordpress.* TO ‘wordpressuser’@‘localhost’ IDENTIFIED BY ‘password’;

        did not not work for me; this command seems to be deprecated in MySQL. I used:

        CREATE USER ‘wordpressuser’;

        Then:

        ALTER USER ‘wordpressuser’@‘localhost’ IDENTIFIED BY ‘password’;

        (I know this can be done as a one-liner, but it worked when I did it in two steps and rather than speculating on the exact code of the one-liner I thought I’d post what I’m certain already worked. I’m sure someone far cleverer than I will soon post the one-line solution).

        You’re right, MySQL no longer accepts the implicit creation of a user with GRANT. Somebody somewhere has decided that’s a bad practice and users should be created specifically before use, from about 5.7 onward.

        Brining your two lines together worked for me, so: CREATE USER ‘wordpressuser’@‘localhost’ IDENTIFIED BY ‘password’;

        That’s the only update I found in the entire series of excellent tutorials and I now have a working Wordpress server using SSL - I guess next is understanding why it all worked :-). Thanks to DigitalOcean for publishing and maintaining this - really incredibly useful resource!

        I must have made something wrong, Im getting an error 500, or a DNS error for my computer name :(

        What do I have to delete to start over again? Do I have to reinstall all ubuntu?

        Thanks!

        Getting same issue here - may I ask what you did to fix?

        I am unable to install the WordPress… To grab secure values from the WordPress secret key generator, type:

        Unable to understand what I really need to do after generating secret keys.

        Justin Ellingwood
        DigitalOcean Employee
        DigitalOcean Employee badge
        October 6, 2016

        @krishnag: You should copy the values you generate on your own machine into the configuration file to replace the lines that have 'put your unique phrase here' in them. You can also visit the salt generator directly in your web browser if that’s easier.

        These are randomly generated secure values that are essential to the security of your WordPress installation. They must be unique, which is why we cannot provide the exact lines within this guide.

        I got this error when I try to access the wordpress on a broswer Forbidden

        You don’t have permission to access / on this server. Server unable to read htaccess file, denying access to be safe any idea? I follow all the steps one by one

        same here, did you fix it?

        Have you fixed the error bro? I am facing this error/

        Thank you for an excellent guide!

        I followed every step including all the prerequistes. And as part of that also this one: https://www.digitalocean.com/community/tutorials/how-to-set-up-apache-virtual-hosts-on-ubuntu-16-04

        Now I’m stuck at the place where you go to setting up WP through the web interface. I should go to mydomain.com but I get to the “example.com” (which is the one I wan’t to controll with WP) domains small test page I setup during the above mentioned guide.

        How do I enter the WP setup page?

        And do I need to undo some of the changes made through the above mentioned guide?

        Thanks!

        Im stuck with the same problem. Were you able to find a solution?

        I’m running into the same issue also. @jellingwood @ryanpq - Do you guys have any recommendations for this?

        Justin Ellingwood
        DigitalOcean Employee
        DigitalOcean Employee badge
        October 24, 2016

        @DrFresh @iannelson03 @gwolf3 Hey, sorry about the delay.

        If you modified the document root location for your domain to be something like /var/www/html/example.com, you will want to move the WordPress files there instead of at /var/www/html. This means that in steps 4 and 5, anywhere where the /var/www/html directory is referenced (alone or as a part of a longer path), replace that with the document root you configured (/var/www/html/example.com in the example you’re using). This is where the files for that domain are expected to be located since the Apache document root was modified. After making these changes, make sure you restart Apache.

        Afterwards, if you are still having problems, you can see if accessing the installer directly helps. You can get there by accessing http://example.com/wp-admin/install.php. You should be redirected here by default when visiting http://example.com after everything is configured correctly, but sometimes it helps to visit the installation URL explicitly.

        I hope that helps a bit. Good luck!

        This is a great guide and its my go to now. However, being this setup is now php 7, how do we edit the PHP config to allow for larger than 2m file uploads ? I already updated thee values in /etc/php/7.0/cli/php.ini to increase the values, and restarted Apache, but still stuck at 2mb. Google didn’t yield me anything. Anyone ?

        I followed all these steps and it pretty much has worked great, except for permalinks.

        I’ve found so many suggestions on forums about how to fix this but nothing works.

        I checked the /etc/apache2/apache2.conf file and it has AllowOverride All set accordingly.

        sudo a2enmod rewrite is already enabled.

        I tried adding the wordpress info for .htaccess into the vhosts config file, as suggested by a forum/tutorial, but that didn’t work either.

        Please update these docs to show how to enable permalink changes. I get 404 whenever I switch from Plain permalinks to Post Name.

        Thanks!

        Hi There, thanks for awesome How-to. I just one problem I am struggling with. After doing everything, I get the standard Apache Ubuntu Default page. I dont get the wordpress page. Any clue what I am doing wrong?

        All step are complete but not open WordPress installation page my website is ojas

        Namaste folks, I need some help.

        I have a droplet, and I have created two virtual directories for two different domains. I am trying to install WordPress on another domain, but I am getting an error message that “Error establishing a database connection”.

        I followed this tutorial and was able to install WordPress for my first domain. However, not able to succeed for another domain in the same droplet.

        Namaskara, Krishna

        Hi Krishna,

        Were you able to fix this problem?

        If yes then how did you create the two virtual directories?

        Thanks in advance.

        Pali Madra

        Im trying to create a clean installation with Wordpress and LAMP After the Cert is setup and wordpress is almost ready to install.

        I go to my Https website and i get “error to many redirects”

        I add to my .htaccess

        RewriteEngine On
        RewriteCond %{HTTPS} !on
        RewriteRule (.*) https://%{HTTP_HOST}%{REQUEST_URI}
        

        how Should i fix this?

        When I navigate to http://<server_domain> with my domain the page reads “Error establishing a database connection” I have double checked the wp-config.php and confirmed that the database, username and password Please Help!

        I’m with the same issue “Error establishing a database connection” when trying to run the page.

        Hi all, my offer with script and description to DigitalOcean articles was declined, but I still want to share my solution. It works not with Ubuntu, but it works with Debian, automated and optimized. All you need to do during installation process - just answer with questions like “Yes”, “No”, “Username”, “Password” and that’s it. In the end you will have fully installed & configured LAMP stack with WordPress (language English or Russian you can choose during installation process) and some simple but useful plugins. Also I have added option to install & configure “Let’s Encrypt” SSL cert.

        You can find my script here (version without HTTPS install & config): https://github.com/sm0k3net/WordPress/blob/master/wp_lamp.sh

        Version with HTTPS install & config: https://github.com/sm0k3net/WordPress/blob/master/wp_lamp_https.sh

        Please, let me know if you will have any questions regarding my scripts.

        To run script you need just to log into “root” user, wget it and give rights for exectuion:

        $ wget https://raw.githubusercontent.com/sm0k3net/WordPress/master/wp_lamp.sh
        $ chmod +x wp_lamp.sh
        $ ./wp_lamp.sh
        

        Hi, thanks a lot for your excellent guide. I’m just missing one point: "what steps caused the apache server to display wordpress install screen in the browser in Step 6: Complete the Installation Through the Web Interface ? Thanks in advance.

        Ok i followed this tutorial and now on 6th step when i go onto my website the only thing that is there is:

        <?php
        /**
         * Front to the WordPress application. This file doesn't do anything, but loads
         * wp-blog-header.php which does and tells WordPress to load the theme.
         *
         * @package WordPress
         */
        
        /**
         * Tells WordPress to load the WordPress theme and output it.
         *
         * @var bool
         */
        define('WP_USE_THEMES', true);
        
        /** Loads the WordPress Environment and Template */
        require( dirname( __FILE__ ) . '/wp-blog-header.php' );
        

        Any idea whats the problem?

        Hi, thanks for the guide! I was wondering if I want to set a landing page like [my-domain-name]/index.html with the file in /var/www/[my-domain-name]/public_html/index.html (the Apache Virtual Hosts were set properly), and use WordPress as a subdirectory in like [my-domain-name]/blog, what details should be changed in the guide?

        Can I do this with LEMP stack

        Justin Ellingwood
        DigitalOcean Employee
        DigitalOcean Employee badge
        January 24, 2017

        @DavidSaint If you are planning on using LEMP, this guide can get you started.

        I went through all these steps but the web interface to install Wordpress doesn’t appear when I navigate to my ip address. What might be wrong?

        @olliew What errors if any are you seeing,

        What step did you get until?

        @jgacuca I’m not seeing any errors. I’m still just seeing the default apache page. I had done everything up to Step 6: Complete the Installation Through the Web Interface

        I went to http://example.com/wp-admin/install.php (replacing example.com with my ip address) and its just a blank page :( http://myipaddress/wp-login.php is also blank.

        Great guide. One problem. With this configuration you can’t upload anything to Media within Wordpress. To fix this, just do sudo chmod -R g+w /var/www/html/wp-content/uploads

        Hi, I followd the guide but I’m getting an error saying “Your PHP installation appears to be missing the MySQL extension which is required by WordPress.”

        Never mind! Fixed it by running

        sudo apt-get install php7.0-mysqlnd


        and restarting apache

        sudo service apache2 reload


        in step 6 please tell me how to know “server’s domain name or public IP address” ??

        please help me!!

        Justin Ellingwood
        DigitalOcean Employee
        DigitalOcean Employee badge
        February 21, 2017

        @AjayPandey This section from the prerequisite guide should help you find your public IP address.

        Thanks for this helpful tutorial, @jellingwood.

        I have everything setup, but as is, adding media and uploading plugins through the WordPress UI still fails. Uploading plugins gives a Unable to create directory wp-content/uploads/2017/03. Is its parent directory writable by the server? and adding media fails silently.

        I expect this has to do with linux permissions, but I don’t understand the details.

        If I follow the steps at the bottom of this tutotial to temporarily grant ownership of the files and directories to my root-access user, that works, but for non-admins who simply need to upload stuff through the UI, it’s a pain to have to have an admin open it every time.

        Is there a safe way to get the best of both worlds?

        EDIT: I got the user permissions switched in my description above. When I change ownership of the files and folders to the www-data user things work fine, but when I switch everything back to being owned by the root-access account (sammy in the tutorial) uploads fail again.

        As I’m looking into this further (and this may be a helpful resource for someone else), do the directory and file permissions recommended (under the File Permissions header) in this WordPress article mesh with this tutorial’s approach?

        For anyone who ran into this issue, I found that my uploads directory wasn’t writable (unlike the upgrade and plugins directory was). So, the instructions in the tutorial should read:

        As part of this process, we will give the web server write access to all of the content in these two directories:

        sudo chmod -R g+w /var/www/html/wp-content/themes
        sudo chmod -R g+w /var/www/html/wp-content/plugins
        sudo chmod -R g+w /var/www/html/wp-content/uploads
        

        and not, as they currently are:

        As part of this process, we will give the web server write access to all of the content in these two directories:

        sudo chmod -R g+w /var/www/html/wp-content/themes
        sudo chmod -R g+w /var/www/html/wp-content/plugins
        

        To anyone who completed the tutorial and still sees the apache2 default page: First, try deleting the index.html file in var/www/html and reload the page. If that doesn’t work try clearing the cache and reload. This worked for me.

        When I run “sudo apt-get install php-curl php-gd php-mbstring php-mcrypt php-xml php-xmlrpc”, I found the following error:

        Processing triggers for libapache2-mod-php7.0 (7.0.15-0ubuntu0.16.04.4) … Setting up libcurl3:amd64 (7.47.0-1ubuntu2.2) … Setting up libmcrypt4 (2.5.8-3.3) … Setting up libxslt1.1:amd64 (1.1.28-2.1) … Setting up php7.0-curl (7.0.15-0ubuntu0.16.04.4) … locale: Cannot set LC_CTYPE to default locale: No such file or directory locale: Cannot set LC_ALL to default locale: No such file or directory

        Creating config file /etc/php/7.0/mods-available/curl.ini with new version Setting up php-curl (1:7.0+35ubuntu6) … Setting up php7.0-mbstring (7.0.15-0ubuntu0.16.04.4) … locale: Cannot set LC_CTYPE to default locale: No such file or directory locale: Cannot set LC_ALL to default locale: No such file or directory

        Great tutorial!! Thank you so much. You saved me hours of work!

        At Step 6, when I input

        http://server_domain_or_IP
        

        I get the same “It works!” Ubuntu welcome page, but when I add

        http://server_domain_or_IP/wp-config.php
        

        which redirects to

        http://server_domain_or_IP/wp-admin/install.php
        

        and I get the installation page

        Do I remove

        /var/www/html/index.php
        

        or did I miss something?

        Justin Ellingwood
        DigitalOcean Employee
        DigitalOcean Employee badge
        May 18, 2017

        @smats004 Don’t remove the index.php page. That file belongs to WordPress. The “it works” page is provided by a .html file.

        If you want to not see the “It works” page, you will need to either adjust the adjust the /etc/apache2/mods-enabled/dir.conf file as specified in the prerequisite guide so that PHP files are preferred, or you can remove the .html file that is being served.

        to be able to run the Wordpress installation I ran:

        find /path/to/your/wordpress/install/ -type d -exec chmod 755 {} \;
        
        find /path/to/your/wordpress/install/ -type f -exec chmod 644 {} \;
        

        When I finished the installation, I couldn’t install plugins or themes I also redo the complete Step 5 section Adjusting the Ownership and Permissions with:

        sudo chown -R www-data:www-data /var/www/html
        

        After doing this I was able to install a plugin and tested it…

        pls help, i follow all step on this guide but when its install wordpress step i got problem, curl -O https://wordpress.org/latest.tar.gz i type this and than my screen become full of Putty and than when i press enter its writing Killed and i follow next code (tar xzvf latest.tar.gz) but says there is no such a file or directory, what should i do ?

        I went through the whole process twice and cannot access the wordpress online interface off my domain name. Is there a common critical error? I combed through all my commands twice and did not find a flaw.

        One mistake I did make along the way is typed curl -0 https://wordpress… instead of curl -O.

        The terminal went a little haywire after that but the file was downloaded when I realized the error.

        I believe that i am very close, but when i load the wordpress setup page i’m getting the following error:

        Your wp-config.php file has an empty database table prefix, which is not supported

        When i load wp-config.php into nano the table prefix is still listing the default prefix.

        I reworked the setup two times now thinking i may have missed a permission setting, but I think I’ve done everything correctly.

        Useful stuff. I followed the article step by step, and to my surprise everything worked without any single issue.

        I have met with this issue when I am trying to upload a custom theme: The uploaded file exceeds the upload_max_filesize directive in php.ini. Could you someone please help.

        reached the final step of input domain ip i get an 403 error, You don’t have permission to access / on this server. Server unable to read htaccess file, denying access to be safe

        Thank you so much for this tutorial! :)

        First off, thank you for writing this up!

        That said, I am getting stuck on step 6, where previously I would point my browser to the IP Address of my Ubuntu server I would get the “it works” apache page, but once I go back to the ip address for the server I now get"

        Forbidden

        You don’t have permission to access / on this server. Apache/2.4.18 (Ubuntu) Server at 192.168.1.xxx Port 80

        If I go back into the apache2 config and change the <Directory /var/www/html/> back to its default, it returns me to the apache2 “it works” page, but nothing for the wordpress.

        What am I missing?

        -Josh

        This worked for me.

        When an update becomes available, log back into your server as your sudo user. Temporarily give the web server process access to the whole document root:

        sudo chown -R www-data /var/www/html Now, go back the WordPress administration panel and apply the update.

        When you are finished, lock the permissions down again for security:

        sudo chown -R sammy /var/www/html This should only be necessary when applying upgrades to WordPress itself.

        Following this article I manage to install WordPress with no issue but when I change the Permalink Settings to post-name I started getting (404 Not Found nginx/1.10.0 (Ubuntu) ) any idea how to fix this issue ?

        I had a blank page by http://my_Server_IP Problem were the permissions. this solved it:

        chown www-data:www-data  -R * # Let Apache be owner
        find . -type d -exec chmod 755 {} \;  # Change directory permissions rwxr-xr-x
        find . -type f -exec chmod 644 {} \;  # Change file permissions rw-r--r--
        

        when I arrive at the “Step 4: Download WordPress”, I’ve moved into the /tmp directory and typed “curl -O https://wordpress.org/latest.tar.gz” on the terminal. However, when I hit enter, an error occured. And, it doesn’t tell me what the error is, it just shows a weird pattern. A part of the pattern is somthing like this:

        �3����*�����q����f�F~���������=��{q��� ����O?�?���v���>{�loߟ��{�&����W��A\c�v�4B��ʤ�+��͐�[,�Y�ФCy|�`j]C��%`tm\����zi?�{�����(�u�$(�yg ��+�0f^os�2��E��nv�)��gἬa��R6�/;J�`��F0os#����P XBZx$����B²�����BrtCUm��b�d$||�<NGF��Z�gwh)9�=)�8���/�[�w>F���!�M�o�CP ��n�X���B%���n��’O�����U��Q6A��n��pasad@sandbox:/tmp$ c62;c62;c62;c62;c62;c62;c62;c62;c62;c62;c62;c62;c62;c62;c62;c62;c62;c62;c62;c62;c62;c62;c62;c62;c62;c62;c62;c62;c62;c62;c62;c62;c62;c62;c62;c62;c62;c62;c62;c62;c62;c62;c62;c62;c62;c62;c62;c62;c62;c62;c62;c62;c62;c62;c62;c62;c62;c62;c62;c62;c62;c62;c62;c62;c62;c62;c62;c62;c62;c62;c62;c62;c62;c6c62;c62;c62;c62;c62;c62

        PLEASE HELP ME GUYS, I HAVE A WORDPRESS PROJECT TO BE DONE, THANKS A LOT!

        I try setting up the wordpress in blog.mysite.com with your tutorial. when I tried to access the blog.mysite.com it showed the code from index.php instead of setup page. Why did this happen? Could you give the solution?

        Hi Justin, Thank you for this tutorial - very clear. However, when I get to step 6 and browse to my server’s IP address, I get an HTTP error 500. Prior to commencing the Wordpress install I worked through the “How To Install Linux, Apache, MySQL, PHP (LAMP) stack on Ubuntu 16.04” and was getting the Apache default page no trouble. I’ve gone back through the tutorial and checked every step. Do you have any advice on where I might have gone wrong? If not, I’ll try a fresh install on a new droplet first thing tomorrow (with backups at key points!). Regards, Richard

        Thank you for the great tutorial.

        How do I go about it if I want to have two WordPress installs - one for a particular domain and the other for another domain? @dgbau and @charliec27c2333 had the same question but I cannot find an answer. Any thoughts would be helpful.

        Thanks, Pali Madra

        I followed this step-by-step. Also double checked everything against this tutorial https://www.tecmint.com/install-wordpress-on-ubuntu-16-04-with-lamp/.

        Did this twice on two different droplets but I still cannot access the WP web interface. It just displays me the apache default index.html.

        Apache2 error.log and access.log don’t tell any story of what is happening.

        How should I go about solving this?

        Thanks!

        Hello, this is a really cool guide, it helped me allot! But could you add a line about setting Header always set X-Frame-Options SAMEORIGIN in the .htaccess file. Many site editor plugins require X-Frames (which often get blocked without that line) and working it out took me ages as a LAMP / WP newbie. Again thanks, Great guide.

        Try DigitalOcean for free

        Click below to sign up and get $200 of credit to try our products over 60 days!

        Sign up

        Join the Tech Talk
        Success! Thank you! Please check your email for further details.

        Please complete your information!

        Become a contributor for community

        Get paid to write technical tutorials and select a tech-focused charity to receive a matching donation.

        DigitalOcean Documentation

        Full documentation for every DigitalOcean product.

        Resources for startups and SMBs

        The Wave has everything you need to know about building a business, from raising funding to marketing your product.

        Get our newsletter

        Stay up to date by signing up for DigitalOcean’s Infrastructure as a Newsletter.

        New accounts only. By submitting your email you agree to our Privacy Policy

        The developer cloud

        Scale up as you grow — whether you're running one virtual machine or ten thousand.

        Get started for free

        Sign up and get $200 in credit for your first 60 days with DigitalOcean.*

        *This promotional offer applies to new accounts only.