
Note: You may want to consider using Let’s Encrypt instead of the StartSSL.com process below. Let’s Encrypt is a new certificate authority that provides a free and easy way of creating SSL/TLS certificates that are trusted in most web browsers. Check out the tutorial to get started: How To Secure Apache with Let’s Encrypt on Ubuntu 14.04
Prerequisites
Before we get started, here are the web tools you need for this tutorial:
<ol>
    <li><a href="https://www.google.com/intl/en/chrome/browser">Google Chrome</a> browser</li>
    <li>Apache installed on your VPS (cloud server)</li>
    <li>A domain name you own</li>
    <li>Access to an email address at that domain, either:
        <ol>
            <li>postmaster@duable.co</li>
            <li>hostmaster@duable.co</li>
            <li>webmaster@duable.co</li>
        </ol>
    </li>
</ol>
StartSSL.com offers completely free verified (your users won't have to see those scary red screens saying "this site isn't trusted" anymore) SSL certificates that you can use on your website. This is a great deal as most companies charge $50-$60 for similar services. The free version is a bit tricky to set up, but it's well worth it.
To get started, browse to StartSSL.com and using the toolbar on the left, navigate to StartSSL Products and then to StartSSL™ Free. Choose the link for Control Panel from the top of the page.
Make sure you are using Google Chrome
<ol>
<li>Choose the <strong>Express Signup.</strong> option</li>
<li>Enter your personal information, and click continue.</li>
<li>You'll get an email with a verification code inside it shortly. Copy and paste that email into the form on StartSSL's page.</li>
<li>They will review your request for a certificate and then send you an email with the new info. This process might take as long as 6 hours though, so be patient.</li>
<li>Once the email comes, use the link provided and the new authentication code (at the bottom of the email) to continue to the next step.</li>
<li>They will ask you to Generate a private key and you will be provided with the choice of "High" or "Medium" grade. Go ahead and choose "High".</li>
<li>Once your key is ready, click Install.</li>
<li>Chrome will show a popdown that says that the certificate has been succesfully installed to Chrome.</li>
</ol>
<p>This means your browser is now authenticated with your new certificate
and you can log into the StartSSL authentication areas using your new
certificate. Now, we need to get a properly formatted certificate set up for
use on your VPS. Click on the <a
href="https://www.startssl.com/?app=12">Control panel</a> link again, and
choose the Authenticate option. Chrome will show a popup asking if you want
to authenticate and will show the certificate you just installed. Go ahead
and authenticate with that certificate to enter the control panel.</p>
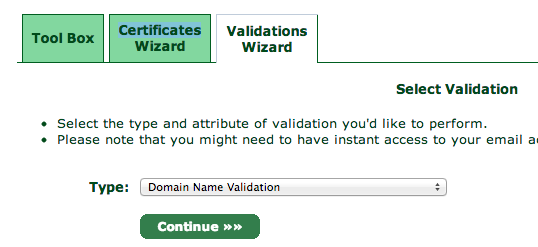
<p>You will need to validate your domain name to prove that you own the
domain you are setting up a certificate for. Click over to the Validations
Wizard in the <a href="https://www.startssl.com/?app=12">Control panel</a>
and set Type to Domain Name Validation. You'll be prompted to choose
from an email at your domain, something like postmaster@yourdomain.com.</p>
Check the email inbox for the email address you selected. You will get yet another verification email at that address, so like before, copy and paste the verification code into the StartSSL website.
Next, go to the Certificates Wizard tab and choose to create a Web Server SSL/TLS Certificate.

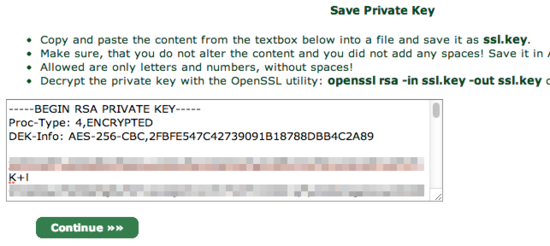
Hit continue and then enter in a secure password, leaving the other settings as is.
You will be shown a textbox that contains your private key. Copy and paste the contents into a text editor and save the data into a file called ssl.key.
When you click continue, you will be asked which domain you want to create the certificate for:
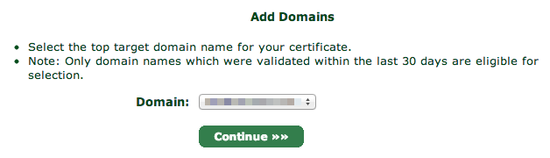
Choose your domain and proceed to the next step.
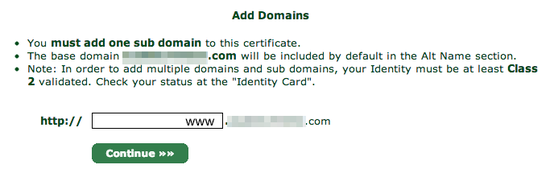
You will be asked what subdomain you want to create a certificate for. In most cases, you want to choose www here, but if you'd like to use a different subdomain with SSL, then enter that here instead:
StartSSL will provide you with your new certificate in a text box, much as it did for the private key:
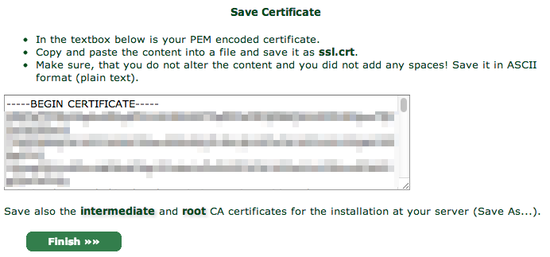
Again, copy and paste into a text editor, this time saving it as ssl.crt.
You will also need the StartCom Root CA and StartSSL's Class 1 Intermediate Server CA in order to authenticate your website though, so for the final step, go over to the Toolbox pane and choose StartCom CA Certificates:
At this screen, right click and Save As two files:
<ul>
    <li>StartCom Root CA (PEM Encoded) (save to ca.pem)</li>
    <li>Class 1 Intermediate Server CA (save to sub.class1.server.ca.pem)</li>
</ul>
For security reasons, StartSSL encrypts your private key (the ssl.key file), but your web server needs the unencrypted version of it to handle your site's encryption. To unencrypt it, copy it onto your server, and use the following command to decrypt it into the file private.key:
openssl rsa -in ssl.key -out private.key
OpenSSL will ask you for your password, so enter it in the password you typed in on StartSSL's website.
At this point you should have five files. If you're missing any, double-check the previous steps and re-download them:
<ul>
    <li>ca.pem - StartSSL's Root certificate</li>
    <li>private.key - The unencrypted version of your private key (be very careful no one else has access to this file!)</li>
    <li>sub.class1.server.ca.pem - The intermediate certificate for StartSSL</li>
    <li>ssl.key - The encrypted version of your private key (does not need to be copied to server)</li>
    <li>ssl.crt - Your new certificate</li>
</ul>
You can discard the ssl.key file. If you haven't already copied the others onto your server you upload them there now:
scp {ca.pem,private.key,sub.class1.server.ca.pem,ssl.crt} YOURSERVER:~
<h2>Activating the certificate in Apache</h2>
Having a certificate isn't any good if you can't actually use it. This section explains how to configure Apache to use your new SSL certificate. These instructions are for Apache running on recent versions of Ubuntu VPS. For other Linux-based distros or web servers, you'll have to adjust accordingly.
First, create the folders where we'll store the keys. Enable Apache's SSL module, and restart Apache.
sudo a2enmod ssl
sudo service apache2 restart
sudo mkdir -p /etc/apache2/ssl
Copy the files you set up in the previous section into the /etc/apache2/ssl folder on your VPS.
sudo mkdir -p /etc/apache2/ssl
cp ~/{ca.pem,private.key,sub.class1.server.ca.pem,ssl.crt} /etc/apache2/ssl
Execute:
ls /etc/apache2/ssl
And it should return:
ca.pem
ssl.crt
private.key
sub.class1.server.ca.pem
Now, open your apache2 configuration file. Unless you've already modified the default configuration, input:
nano /etc/apache2/sites-enabled/000-default
It should look something like this:
<VirtualHost *:80>
    ServerAdmin webmaster@localhost

    DocumentRoot /var/www
    <Directory />
        Options FollowSymLinks
        AllowOverride None
    </Directory>
    <Directory /var/www/>
        Options Indexes FollowSymLinks MultiViews
        AllowOverride None
        Order allow,deny
        allow from all
    </Directory>

    ScriptAlias /cgi-bin/ /usr/lib/cgi-bin/
    <Directory "/usr/lib/cgi-bin">
        AllowOverride None
        Options +ExecCGI -MultiViews +SymLinksIfOwnerMatch
        Order allow,deny
        Allow from all
    </Directory>

    ErrorLog ${APACHE_LOG_DIR}/error.log

    # Possible values include: debug, info, notice, warn, error, crit,
    # alert, emerg.
    LogLevel warn

    CustomLog ${APACHE_LOG_DIR}/access.log combined

    Alias /doc/ "/usr/share/doc/"
    <Directory "/usr/share/doc/">
        Options Indexes MultiViews FollowSymLinks
        AllowOverride None
        Order deny,allow
        Deny from all
        Allow from 127.0.0.0/255.0.0.0 ::1/128
    </Directory>

</VirtualHost>
Copy the entire script above (from <VirtualHost *:80> to </VirtualHost>), paste it below the existing one, and change the top line from:
<VirtualHost *:80>
to
<VirtualHost *:443>
And add the following lines after the <VirtualHost *:443> line:
SSLEngine on
SSLProtocol all -SSLv2
SSLCipherSuite ALL:!ADH:!EXPORT:!SSLv2:RC4+RSA:+HIGH:+MEDIUM

SSLCertificateFile /etc/apache2/ssl/ssl.crt
SSLCertificateKeyFile /etc/apache2/ssl/private.key
SSLCertificateChainFile /etc/apache2/ssl/sub.class1.server.ca.pem
The end result should look like this:
<VirtualHost *:80>
    ServerAdmin webmaster@localhost

    DocumentRoot /var/www
    <Directory />
        Options FollowSymLinks
        AllowOverride None
    </Directory>
    <Directory /var/www/>
        Options Indexes FollowSymLinks MultiViews
        AllowOverride None
        Order allow,deny
        allow from all
    </Directory>

    ScriptAlias /cgi-bin/ /usr/lib/cgi-bin/
    <Directory "/usr/lib/cgi-bin">
        AllowOverride None
        Options +ExecCGI -MultiViews +SymLinksIfOwnerMatch
        Order allow,deny
        Allow from all
    </Directory>

    ErrorLog ${APACHE_LOG_DIR}/error.log

    # Possible values include: debug, info, notice, warn, error, crit,
    # alert, emerg.
    LogLevel warn

    CustomLog ${APACHE_LOG_DIR}/access.log combined

    Alias /doc/ "/usr/share/doc/"
    <Directory "/usr/share/doc/">
        Options Indexes MultiViews FollowSymLinks
        AllowOverride None
        Order deny,allow
        Deny from all
        Allow from 127.0.0.0/255.0.0.0 ::1/128
    </Directory>

</VirtualHost>

<VirtualHost *:443>
    SSLEngine on
    SSLProtocol all -SSLv2
    SSLCipherSuite ALL:!ADH:!EXPORT:!SSLv2:RC4+RSA:+HIGH:+MEDIUM

    SSLCertificateFile /etc/apache2/ssl/ssl.crt
    SSLCertificateKeyFile /etc/apache2/ssl/private.key
    SSLCertificateChainFile /etc/apache2/ssl/sub.class1.server.ca.pem
    ServerAdmin webmaster@localhost

    DocumentRoot /var/www
    <Directory />
        Options FollowSymLinks
        AllowOverride None
    </Directory>
    <Directory /var/www/>
        Options Indexes FollowSymLinks MultiViews
        AllowOverride None
        Order allow,deny
        allow from all
    </Directory>

    ScriptAlias /cgi-bin/ /usr/lib/cgi-bin/
    <Directory "/usr/lib/cgi-bin">
        AllowOverride None
        Options +ExecCGI -MultiViews +SymLinksIfOwnerMatch
        Order allow,deny
        Allow from all
    </Directory>

    ErrorLog ${APACHE_LOG_DIR}/error.log

    # Possible values include: debug, info, notice, warn, error, crit,
    # alert, emerg.
    LogLevel warn

    CustomLog ${APACHE_LOG_DIR}/access.log combined

    Alias /doc/ "/usr/share/doc/"
    <Directory "/usr/share/doc/">
        Options Indexes MultiViews FollowSymLinks
        AllowOverride None
        Order deny,allow
        Deny from all
        Allow from 127.0.0.0/255.0.0.0 ::1/128
    </Directory>

</VirtualHost>
Save your files and restart Apache with:
sudo service apache2 restart
You can check Apache's log files to see if there are any show stopping errors with this command:
cat /var/log/apache2/error.log
If everything looks good, try accessing your site in your web browser using an HTTPS URL (e.g. https://www.YOURSITE.com). When your site loads, you should see a little green padlock icon next to the URL. Click on it and you should see the following. The connections tab should show that the site's identity has been verified by StartCom.

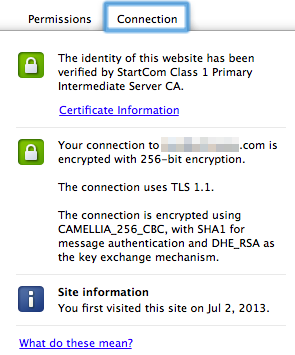
Congratulations! You are all set!
<p>Reference Links:</p>
Here are some of the other posts I consulted when putting this together. If you run into any problems they might be a source of inspiration on how to fix them:
<ul>
    <li><a href="http://www.debian-administration.org/articles/349">Apache SSL Configuration</a></li>
    <li><a href="http://jasoncodes.com/posts/startssl-free-ssl">StartSSL Apache Guides</a></li>
</ul>
Thanks for learning with the DigitalOcean Community. Check out our offerings for compute, storage, networking, and managed databases.
About the author
Still looking for an answer?
This textbox defaults to using Markdown to format your answer.
You can type !ref in this text area to quickly search our full set of tutorials, documentation & marketplace offerings and insert the link!
I have tried to use startssl 3 times does not work but it does weirdly. I guess they hate me
@mlwalk3r: Have you tried contacting them? They usually respond very quickly.
Some of these articles need to be written for utter newbies, for example - when it says upload to server, where should abouts should I upload it to?
@212nath: The command you need to run to upload the files to the droplet is right below that paragraph:
<img src=“http://i.imgur.com/GwiGmeq.png” alt=“Screenshot” />
For SSH copy with scp you can use:
scp ca.pem private.key sub.class1.server.ca.pem ssl.crt username@ip_of_your_server:/home/username/
Otherwise, great howto.
And it is better to edit /etc/apache2/sites-enabled/default-ssl because editing 000-default broke my access to domain.com/iredadmin and awstats.
Nice howto,
But is here a tutorial on how to enable ssl on only one-two pages? I only want ssl on my register page and login page. Eg. mysite.com/register mysite.com/login. I bought two SSL certs, one for my desktop site and one for my mobile version. mysite.com m.mysite.com
@KiwoT: You can’t protect only two pages easily. Why do you want to do that? The cookies will be passed in clear-text (thus the session keys) which would render SSL useless.
Wont SSL slow down the website and add overhead to the server resources? Thats why I only wanted to use my SSL on my login page and registration page. Seen alot of other websites doing this, but is it a bad idea? thanks.
@KiwoT: The performance overhead isn’t that great so I recommend enabling it on all pages.
 This work is licensed under a Creative Commons Attribution-NonCommercial- ShareAlike 4.0 International License.
Become a contributor for community
Get paid to write technical tutorials and select a tech-focused charity to receive a matching donation.

DigitalOcean Documentation
Full documentation for every DigitalOcean product.

Resources for startups and AI-native businesses
The Wave has everything you need to know about building a business, from raising funding to marketing your product.
The developer cloud
Scale up as you grow — whether you're running one virtual machine or ten thousand.

Get started for free
Sign up and get $200 in credit for your first 60 days with DigitalOcean.*

*This promotional offer applies to new accounts only.