What's New on DigitalOcean App Platform
- Published:
- 25 min read
Welcome to What’s New on DigitalOcean App Platform— your regular roundup of the latest updates for App Platform. Here, we’ll share new feature releases, technical tutorials, or video walkthroughs to help you stay ahead of the curve and keep building. Check back for new insights and inspiration, or get started now: Deploy Your First App on App Platform
Week of February 23rd
Product Update Build Your Backend in Minutes: Supabase Template is Now Available on DigitalOcean App Platform
Modern applications need more than just a database. They need authentication, auto-generated APIs, file storage, and real-time subscriptions. Supabase is a powerful open-source Firebase alternative that transforms PostgreSQL into a complete backend platform. With its developer-friendly SDKs and instant API generation, Supabase is a top request from teams who want full control over their infrastructure without sacrificing speed.
Today, we’re excited to announce native Supabase template support on DigitalOcean App Platform. Deploy a production-ready Supabase backend with one click, complete with managed PostgreSQL, authentication, REST API, file storage, and real-time capabilities.
Benefits
-
Instant Backend: Get authentication, auto-generated REST APIs, file storage, and real-time subscriptions without writing backend code.
-
Production-Ready Security: Every deployment includes JWT authentication, Row Level Security (RLS), and secure credential management out of the box.
-
Self-Hosted Control: Keep your data, auth credentials, and file storage on infrastructure you control—no vendor lock-in.
-
Full-Stack Ready: Deploy Supabase alongside your frontend application in a single App Platform project.
Architecture Overview
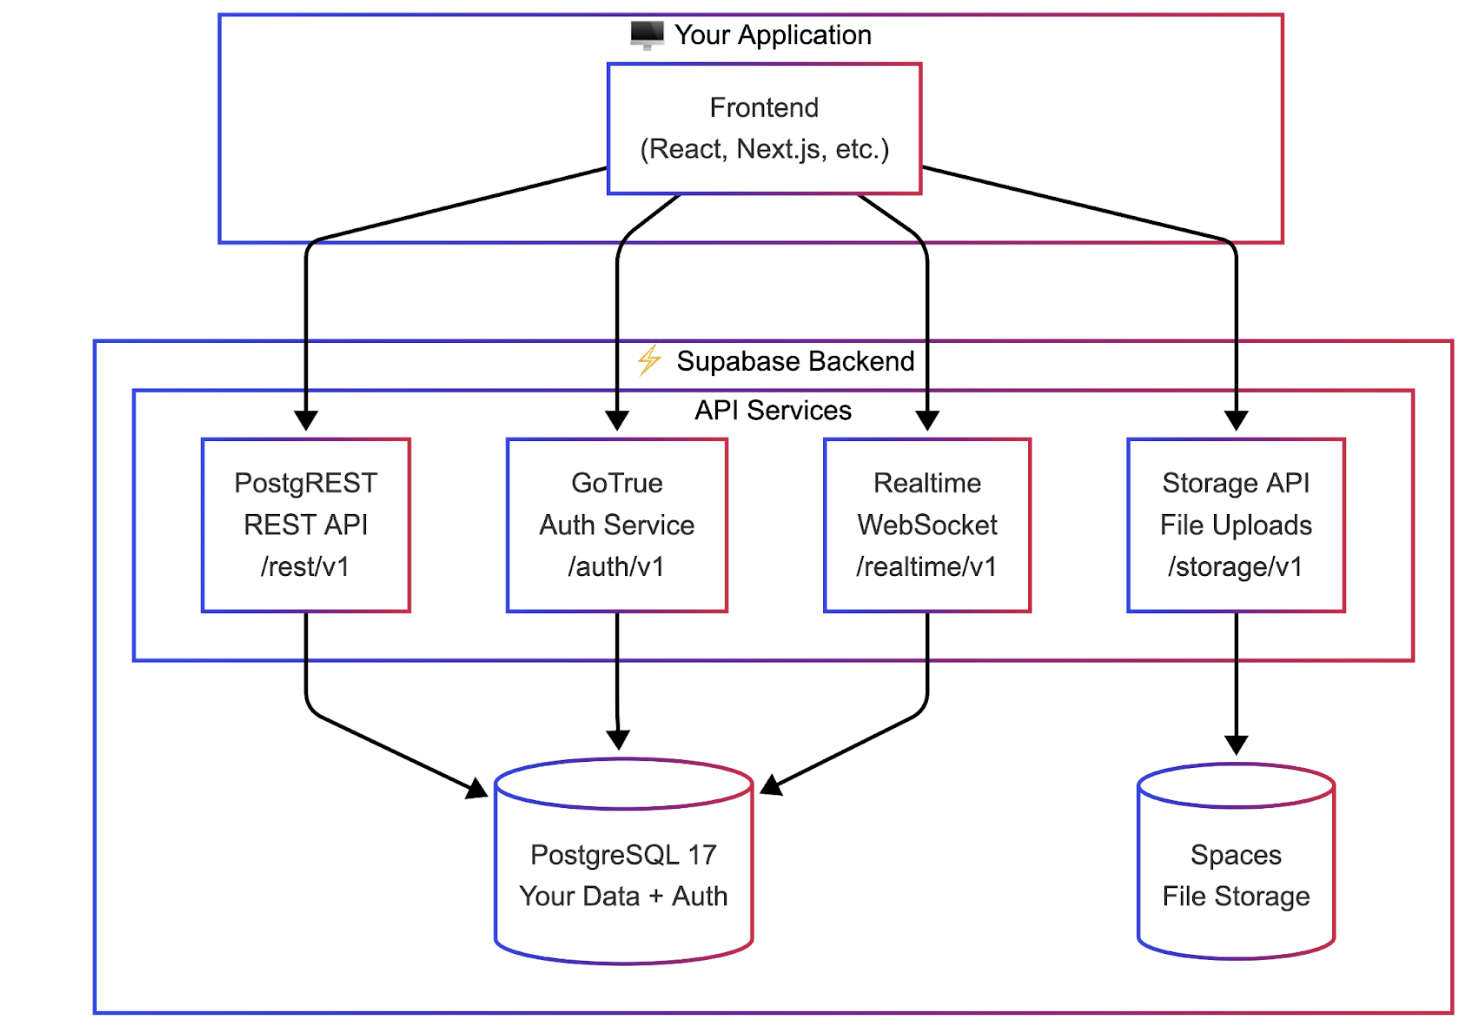
The Supabase template deploys a complete backend stack that auto-generates APIs from your PostgreSQL schema. Your frontend applications connect through four specialized services that handle data, authentication, files, and real-time updates.
How Supabase Works
Unlike traditional backends where you write API endpoints manually, Supabase auto-generates them from your database schema:
Row Level Security (RLS) policies on your tables control who can access what - users only see their own data, automatically.
How to Get Started
The template repository contains everything you need to deploy Supabase on App Platform:
github.com/AppPlatform-Templates/supabase-appplatform
You have three deployment paths:
-
One-Click: Use the Deploy to DigitalOcean button in the repository for instant deployment
-
Console or CLI: Fork the repo and deploy via the DigitalOcean Control Panel or doctl CLI
-
AI-Assisted: Use an AI coding assistant with App Platform Skills for guided, full-stack deployments
Deploying with AI Assistants
AI assistants can deploy your complete stack—Supabase backend plus your frontend application—in a single workflow. We recommend using DigitalOcean App Platform Skills. Clone the skills repository to your assistant’s skills directory:
# For Claude, Cursor, Codex, or Gemini

git clone https://github.com/digitalocean-labs/do-app-platform-skills.git \

  $HOME/.[claude|cursor|codex|gemini]/skills/do-app-platform-skills**
Verify your assistant has access by asking: “Do you have access to DigitalOcean App Platform skills?”
Then use a prompt like:
Prompt: Build NexusChat on DigitalOcean App Platform

Build NexusChat, a real-time AI-powered chatroom that showcases Supabase capabilities: authentication with user profiles, chat rooms with instant messaging via Realtime subscriptions, image sharing via Storage, and an AI assistant triggered by @ai mentions using the Gradient API. This demonstrates a complete full-stack pattern for Supabase on App Platform.


Use the skills from https://github.com/digitalocean-labs/do-app-platform-skills and reference the Supabase template at https://github.com/AppPlatform-Templates/supabase-appplatform.


Before starting, check if progress-artifacts.md exists—if so, read it to resume from the previous session. Create a detailed implementation plan with checkable tasks, execute phase by phase, and keep artifacts updated so I can start a new session at any time and you'll pick up exactly where we left off.

  - Session continuity: Maintain progress-artifacts.md (gitignored) with GitHub repo, App Platform app ID/URL, secrets status (configured/missing), database cluster info, current phase, and completed tasks—update after every major step

  - App database design: Design your application tables with PostgREST-compatible foreign keys (reference public.profiles, not auth.users), enable RLS on all tables, and use the auth.uid() helper function for JWT claims in policies

  - Deployment: Do NOT deploy Studio or Meta services. GitHub Actions workflow injects secrets via sed, deploys with doctl apps update, and uses --force-rebuild for static site updates

  - Verification: Use browser automation to perform real end-to-end testing—test auth flow, database operations, realtime subscriptions, and AI integration before marking each phase complete
The assistant will create a detailed plan covering database setup, RLS policies, frontend configuration, and deployment - then execute each step with your approval.
What’s Included
-
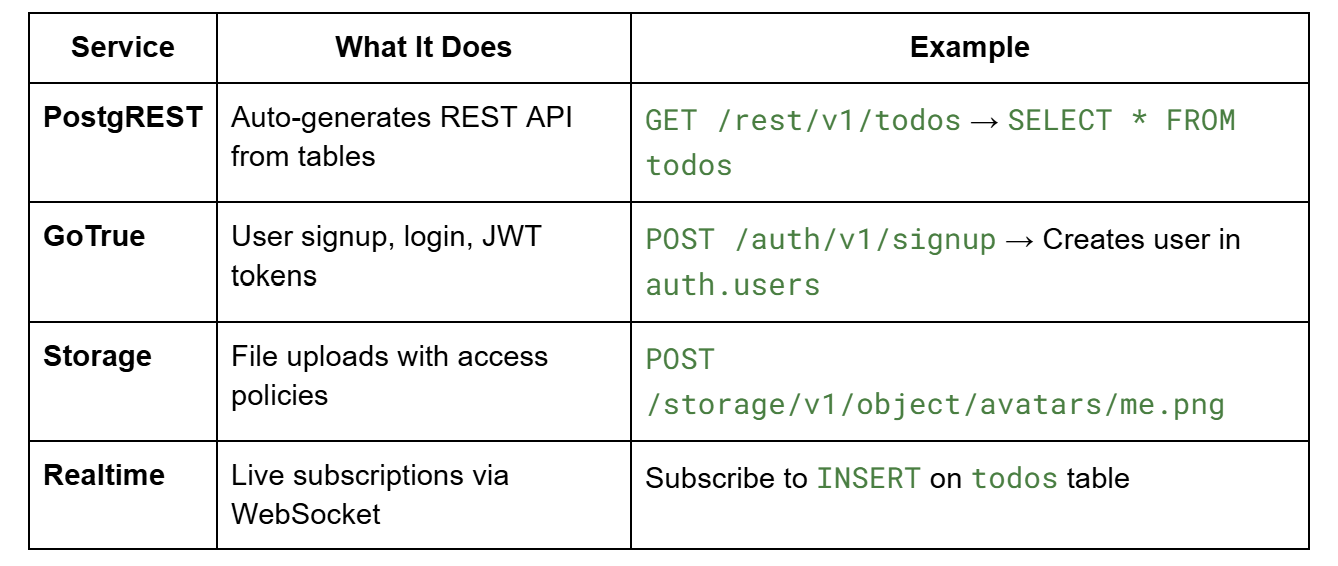
PostgREST for auto-generated REST APIs from your schema
-
GoTrue for email/password authentication and JWT tokens
-
Storage API for file uploads to DigitalOcean Spaces
-
Realtime for WebSocket subscriptions on database changes
-
PostgreSQL 17 with pre-configured roles (anon, authenticated, service_role)
-
Database initialization with auth helper functions and RLS support
For database management, use any PostgreSQL client (pgAdmin, DBeaver, psql) or run Supabase Studio locally for a visual interface.
Get Started
The Supabase template is available in all App Platform regions today. Visit the template repository to deploy, and check out the Supabase documentation for guides on authentication, RLS policies, and client SDKs.
Week of February 16th
Product Update Native .NET Buildpack Support is Now Available on App Platform
The .NET ecosystem continues to power a significant share of enterprise and cloud-native applications, from web APIs and microservices to full-stack applications built with ASP.NET Core. Developers building with C#, F#, and Visual Basic need a deployment experience that matches the productivity of the framework itself: push code, and let the platform handle the rest.
Today, we’re excited to announce native .NET buildpack support on DigitalOcean App Platform. You can now deploy your .NET applications directly from a Git repository without writing or maintaining Dockerfiles. App Platform automatically detects your .NET project, installs the correct SDK version, and builds your application for production.
Benefits
-
Zero Configuration: Push your .NET code to a Git repository, and App Platform handles runtime detection, SDK installation, and build configuration automatically—no Dockerfile required.
-
Multi-Language Support: Build applications in C#, Visual Basic, or F# using the .NET and ASP.NET Core frameworks, all with the same streamlined deployment experience.
-
Automatic SDK Management: App Platform selects the appropriate .NET SDK version based on your project’s TargetFramework or global.json configuration, supporting .NET 8.0, 9.0, and 10.0.
-
Production-Ready Defaults: The buildpack compiles with the Release configuration by default and automatically detects ASP.NET Core web applications to configure the correct process type.
How Detection Works
Once you connect your Git repository, App Platform identifies your application as a .NET project by looking for specific files in your repository root.
App Platform confirms a .NET application if it detects any of the following:
-
Solution files: *.sln, *.slnx
-
Project files: *.csproj, *.vbproj, *.fsproj
-
File-based apps: *.cs
Once detected, the buildpack takes over:
-
SDK Detection: Determines the required .NET SDK version from your TargetFramework property or global.json file
-
Dependency Restore: Runs dotnet restore to fetch NuGet packages
-
Build & Publish: Runs dotnet publish with the Release configuration
-
Process Registration: Automatically registers ASP.NET Core projects as web process types
Supported Runtimes
App Platform uses the Heroku .NET buildpack (version 42) and supports the following SDK versions on Ubuntu 22:
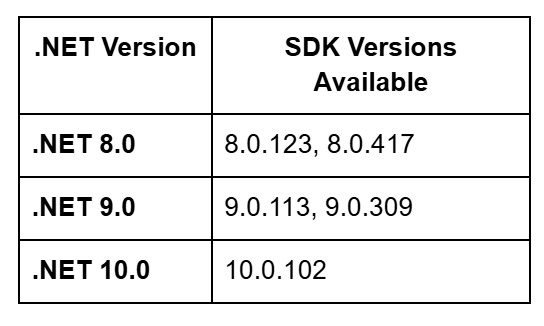
The buildpack supports Target Framework Moniker (TFM) values in the format net{major_version}.0, such as net8.0, net9.0, and net10.0.
How to Get Started
Deploying a .NET application to App Platform takes just a few steps:
-
Via Control Panel: Create a new app, connect your Git repository, and App Platform automatically detects your .NET project and configures the build.
-
Via CLI: Use doctl apps create with an app spec pointing to your repository.
-
Via API: Call the Apps API to create and deploy your application programmatically.
For applications that need to bind to a specific port, ensure your code reads from the PORT environment variable:
var port = Environment.GetEnvironmentVariable("PORT") ?? "5000";

builder.WebHost.UseUrls($"http://*:{port}");
Week of February 9th
Product Update Heroku Migration Guide We’ve published a detailed migration guide that maps every Heroku concept—dynos, config vars, release phases, Heroku Scheduler, add-ons—to its App Platform equivalent, with step-by-step instructions for data migration, DNS cutover, and production validation.
Learn more about how we plan to support teams making the transition.
Week of February 2nd
Product Update OpenClaw is Now Available on DigitalOcean App Platform
OpenClaw on DigitalOcean App Platform is now available to help you move from proof of concept to sustained production operation with elastic scaling, safe defaults, and simpler day-to-day operations. Learn more about this new offering.
Week of January 19th
Product Update Automate Your Workflows: n8n Template is Now Available on DigitalOcean App Platform
Workflow automation has become essential for modern development teams looking to eliminate repetitive tasks and connect their favorite tools. n8n is a powerful, fair-code licensed automation platform that gives full control over your data and workflows. With over 400 integrations and a visual workflow builder, n8n is a top request from developers who want automation without vendor lock-in.
Today, we’re excited to announce native n8n template support on DigitalOcean App Platform. Deploy a production-ready n8n instance with one click, complete with managed PostgreSQL, SSL/TLS encryption, and automatic health monitoring.
Benefits
-
One-Click Deployment: Deploy n8n directly from the control panel or CLI without managing servers or complex configurations.
-
Production-Ready Infrastructure: Every deployment includes PostgreSQL 17, SSL/TLS encryption, automated backups, and health monitoring out of the box.
-
Flexible Scaling: Start simple and scale horizontally with queue mode and workers as your automation needs grow.
-
Self-Hosted Control: Keep your workflow data, credentials, and execution history on infrastructure you control.
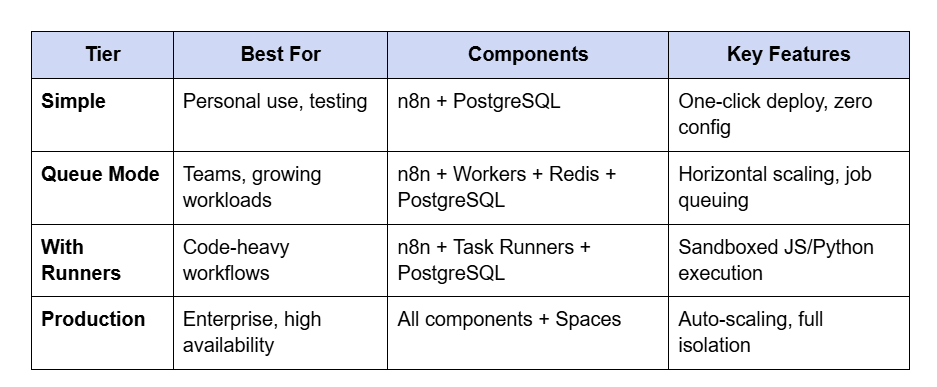
Architecture Overview
The n8n template supports deployments ranging from a simple all-in-one instance to a fully distributed production architecture with auto-scaling workers.
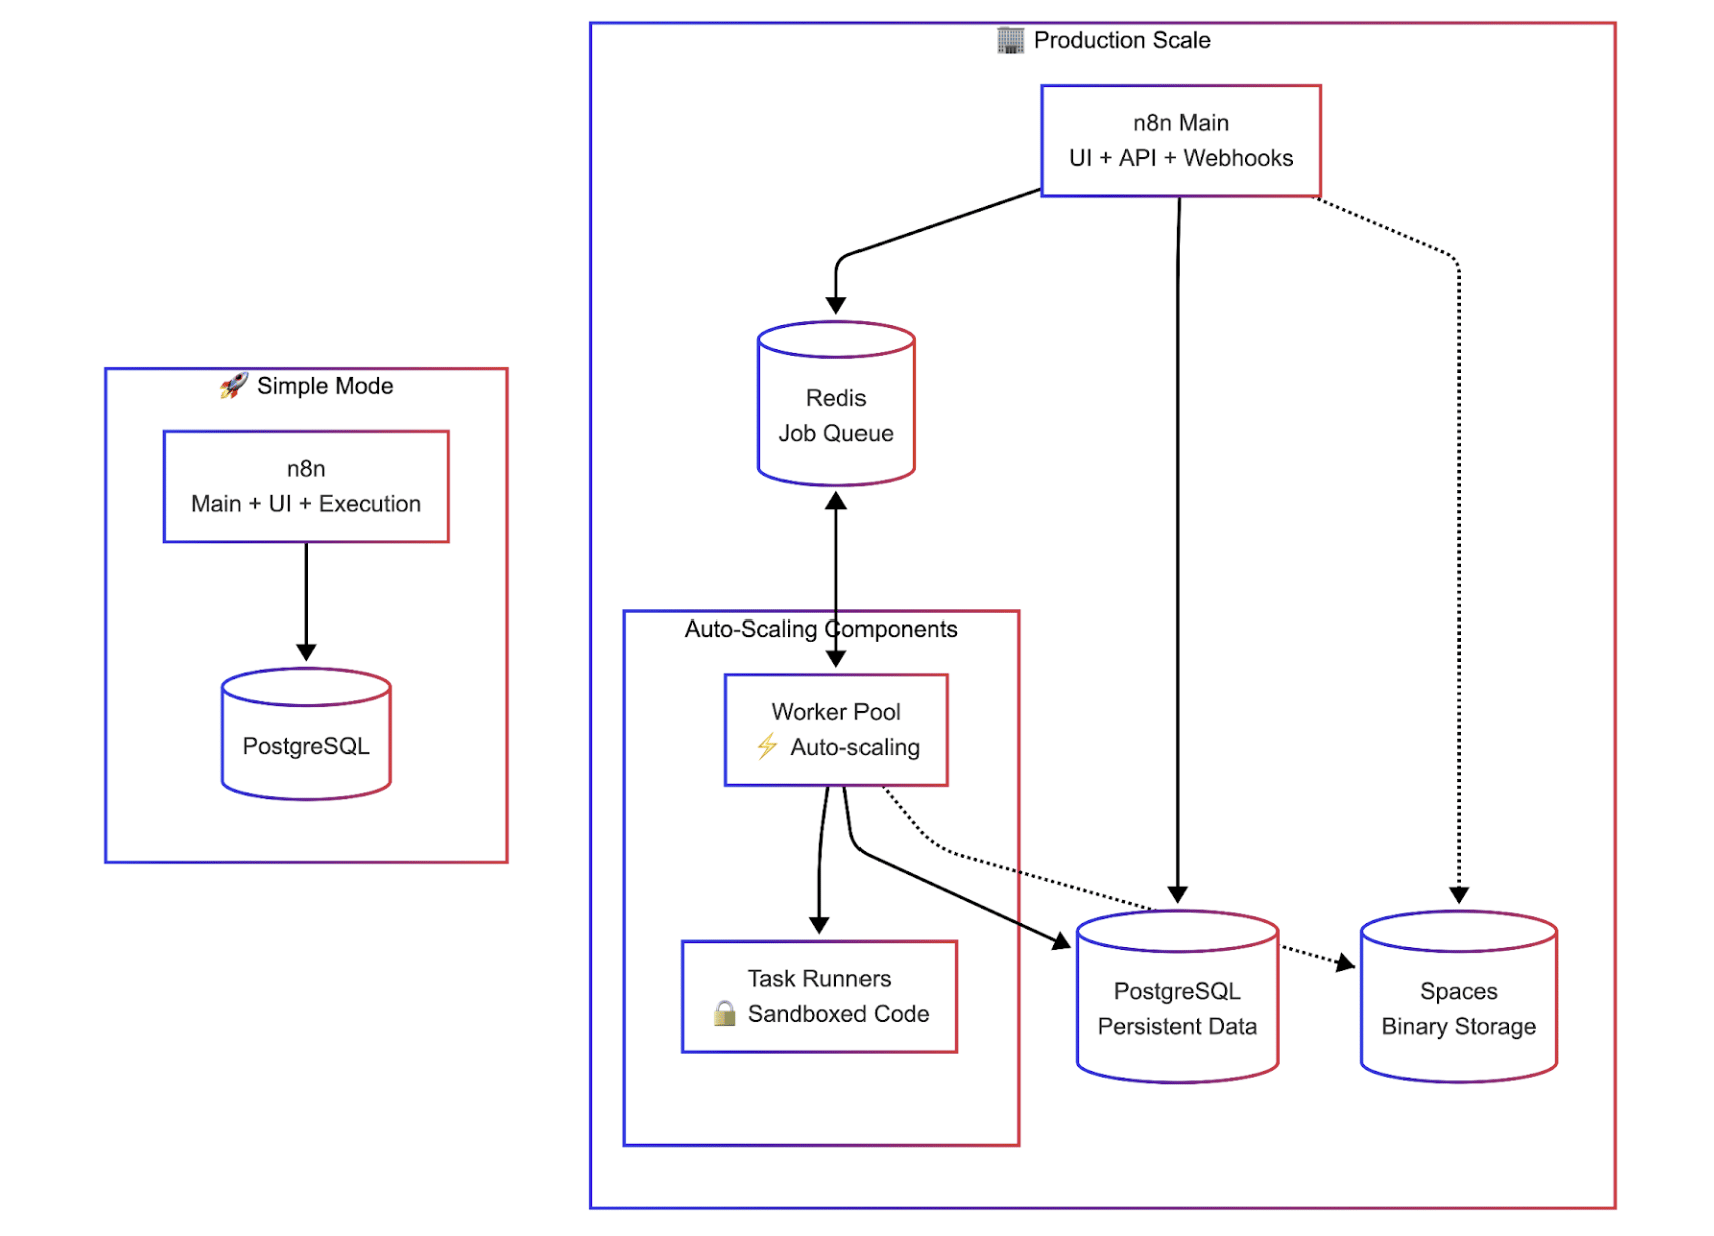
Deployment Tiers
How to Get Started
The template repository contains everything you need to deploy n8n on App Platform:
github.com/AppPlatform-Templates/n8n-appplatform
You have three deployment paths:
-
One-Click: Use the Deploy to DigitalOcean button in the repository for instant deployment
-
Console or CLI: Fork the repo and deploy via the DigitalOcean Control Panel or doctl CLI
-
AI-Assisted: Use an AI coding assistant with App Platform Skills for guided, customizable deployments
Deploying with AI Assistants
For AI-assisted deployments, we recommend using DigitalOcean App Platform Skills. Clone the skills repository to your assistant’s skills directory:
bash
# For Claude, Cursor, Codex, or Gemini_

git clone https://github.com/digitalocean-labs/do-app-platform-skills.git \

  $HOME/.[claude|cursor|codex|gemini]/skills/do-app-platform-skills**
Verify your assistant has access by asking: “Do you have access to DigitalOcean App Platform skills?”
Then use a prompt like:
bash
Prompt:

Build and Validate n8n on DigitalOcean App Platform

Build a production‑grade n8n deployment on DigitalOcean App Platform using queue mode with workers and task runners, managed Postgres, Valkey, and Spaces for binary data. Create and run a set of test workflows (CPU, IO, Binary) to validate the deployment and document results.Use the skills from https://github.com/digitalocean-labs/do-app-platform-skills and reference the n8n template at https://github.com/AppPlatform-Templates/n8n-appplatform. Use the production spec pattern (main service + workers + runners) from the template’s .do/examples/production.yaml.Before starting, check if progress-artifacts.md exists—if so, read it to resume from the previous session. Create a detailed implementation plan with checkable tasks, execute phase by phase, and keep artifacts updated so I can start a new session at any time and you’ll pick up exactly where we left off.

Session continuity: Maintain progress-artifacts.md (gitignored) with GitHub repo URL, App Platform app ID/URL, secrets status (configured/missing), database cluster IDs, Spaces bucket, current phase, and completed tasks—update after every major step

Deployment: Use GitHub Actions for deploys. Never expose secrets in the repo; use GitHub Secrets or bindable variables. Do not write tokens into any committed files

App topology: Queue mode with workers and task runners; Postgres as primary DB; Valkey/Redis for queues; Spaces for binary data

Workflow testing: Create and run 3 workflows:

CPU: Code node with a simple loop

IO: HTTP request to a public endpoint

Binary: HTTP request that downloads a small file to trigger binary storage

Documentation: Update scalability-plan.md with setup, workflows used, and results. Create/maintain observability.md with API endpoints and a short AI‑assistant playbook for metric collection

Verification: Use browser automation to validate the n8n UI, run workflows, and confirm executions are recorded before marking phases complete**
The assistant will walk you through the deployment, help configure your tier, and manage secrets securely.
What’s Included
-
n8n v1.122.2 (latest stable)
-
PostgreSQL 17 for persistent workflow and credential storage
-
SSL/TLS encryption on all endpoints
-
Automated backups via managed database
-
Health monitoring with automatic restarts
For production deployments handling file uploads or binary data, configure DigitalOcean Spaces for persistent storage.
Get Started
The n8n template is available in all App Platform regions today. Visit the template repository to deploy, and check out the n8n documentation for workflow tutorials
Week of December 1st
Product Update Speed Up Your JavaScript Apps: Native Bun Support is Now Available on App Platform
The JavaScript ecosystem is evolving fast, and Bun has emerged as a favorite for developers who crave speed. With its all-in-one runtime, bundler, and package manager, Bun offers significantly faster startup times and lower memory usage than traditional runtimes. Bun is the most up-voted active feature request for App Platform in the ideas portal in Nov 2025.
Today, we are excited to announce native Bun support on DigitalOcean App Platform.
You can now deploy Bun applications directly from your code repository without writing a single line of configuration. App Platform’s Cloud Native Buildpacks will automatically detect, build, and run your Bun apps.
Benefits
-
Performance: Bun is designed for speed. By running your apps on Bun natively within App Platform, you leverage faster package installation and quicker startup times.
-
Zero Configuration: You don’t need to maintain a Dockerfile. Just push your code, and we handle the runtime setup.
-
Seamless Next.js Support: Bun works natively with Next.js, allowing you to deploy your full-stack React applications with the same ease.
Deployment Paths in App Platform
App Platform supports three distinct workflows as part of deployment.
-
Cloud Native Buildpacks (The “Code-First” Way): You simply connect a GitHub, GitLab, or Bitbucket repository. We analyze your code, detect the language, and build it automatically.
-
Dockerfiles: You include a Dockerfile in your repo. We detect it and build the image according to your instructions.
-
Pre-Built Images: You build the container image locally and push it to the DigitalOcean Container Registry (DOCR). We deploy exactly what you pushed.
How Bun Detection Works
Our build system looks at your repository’s root directory to determine how to build your app. App Platform confirms you are using Bun if it detects either of these lockfiles in your repository:
- bun.lock
Once detected, the buildpack takes over:
-
Install: Runs bun install to fetch dependencies. (Note: If your bun.lock hasn’t changed, App Platform re-uses the cached node_modules to speed up the build).
-
Build: Runs bun run build. You can override this by defining a build_command in the App Spec. To run actions before or after dependencies install, you can also use digitalocean-prebuild and digitalocean-postbuild package.json scripts.
-
Start: Defaults to bun run start to launch your application.
The bun version is selected in the following order:
-
From the BUN_VERSION environment variable.
-
From .bun-version file.
-
From .runtime.bun.txt file.
-
If no version is specified, it uses the latest version from Bun’s GitHub Releases. App Platform will cache your Bun and Node versions to ensure faster subsequent builds unless you change the requested version.
Migrating from Node.js to Bun
Converting an existing Node.js application on App Platform to use the Bun runtime is simple. You generally don’t need to change your application code, just your project metadata.
-
Step 1: Remove Node Artifacts. Delete your package-lock.json (or yarn.lock). This tells App Platform “stop treating this as a standard Node app.”
-
Step 2: Generate Bun Artifacts. Run bun install locally. This generates the bun.lock file.
-
Step 3: Push Changes. Commit these changes to your repository. When App Platform sees the new commit, it will drop the Node buildpack and pick up the Bun buildpack automatically.
Use Bun as Package Manager
-
If you intend to use Bun as your package manager but Node.js as your runtime, Node.js will be installed in the following scenarios:
-
If you define bun as Package Manager in your package.json. Update your package.json as follows:
JSON
{

  "packageManager": "bun@1.2.0"

}
- If any script in package.json contains node, like this:
JSON
**

{

  "scripts": {

    "start": "node src/index.js"

  }

}
Next.js Configuration
If you are deploying a Next.js project (including those using ISR), you must update your scripts to explicitly use the Bun runtime for the build and dev processes.
Update your package.json as follows:
JSON
**

{

  "scripts": {

    "dev": "bun --bun next dev",  //or remove this line, as app platform uses the build script

    "build": "bun --bun next build"

  }

}
This ensures that Next.js utilizes Bun’s runtime features correctly during the build process on App Platform.
Get Started
Native Bun support is available in all regions today.
-
New App? Just link your GitHub repo containing a bun.lock file.
-
Existing App? Switch your package manager and push the update to trigger a new build.
Check out the official Bun Buildpack documentation for advanced configuration options.
Week of November 24th
Product Update Streamline Your Workflow: Environment Support is Now Available for App Platform
Simplify the complexity of managing growing application portfolios with the new Environment Support for App Platform (powered by Projects) and App Cloning, a new feature to replicate your apps in just a few clicks. Check out the full blog post: (https://www.digitalocean.com/blog/environment-support-app-platform)
Week of November 17th
Product Update Migrating to DigitalOcean App Platform: A Guided, AI-Assisted Start
PaaS platforms have made deploying modern applications seamless. But as applications mature, many teams look for predictable costs, flexibility in composing multi-services applications, and simpler infrastructure control, without sacrificing developer experience.
That’s where DigitalOcean App Platform comes in.
We designed an App Platform to let developers “bring their code, any way they want,” while managing everything from scaling to SSL, databases, and global CDN, all in one place. Recently, we’ve added AI-assisted tooling to make it easier for developers (and AI coding assistants) to help with migrations.
This post explains the conceptual foundation of App Platform and how developers can collaborate with AI assistants (like Claude Code, Cursor, or Gemini) to migrate apps step-by-step, and with the human still in control. This process uses a detailed migration guide, which you can find on GitHub (https://github.com/digitalocean-labs/mcp-digitalocean/blob/main/pkg/registry/apps/docs/vercel-migration-guide.md) . It’s designed to be fed directly to an AI assistant, supporting various scenarios, whether you’re migrating a live Vercel app, deploying from just a GitHub repository, or even starting from local source code.
App Platform in a Nutshell
App Platform lets you run multiple apps, each composed of components or resources. An app may contain a static site, a backend web service, functions or background workers, and cron jobs.
Each component scales independently and runs inside managed containers. You only pay for container instances and bandwidth, no hidden infrastructure costs.
Developers can deploy to App Platform through several input paths.
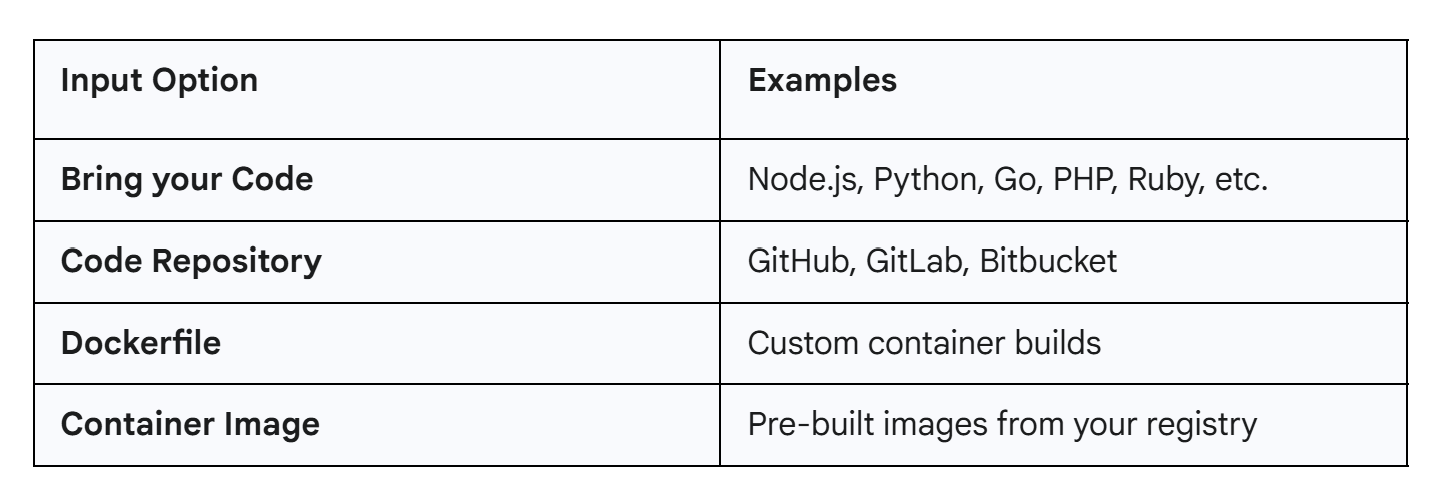
From there, you can choose to:
-
Auto-deploy directly from Git or your container registry
-
Integrate App Platform into your CI/CD pipeline through APIs
Every App Platform deployment is defined by a simple YAML file called an AppSpec. The AppSpec defines your entire app architecture: components, databases, routes, environment variables, in one declarative file. Two deployment models are supported:
- Git-based (Pull Model)
-
App Platform watches your repo and auto-deploys on code changes
-
AppSpec is managed internally—you don’t need to include it
- API/CI-based (Push Model) for CI/CD pipelines and automation
-
You control deployments via CLI or API
-
You must provide your AppSpec file
🤖 AI-Assisted Migration: Vercel → App Platform
While migrating from Vercel or similar platforms isn’t instant, our new AI-assisted instructions streamline the process. This “co-pilot” approach combines automation with human validation, offering a balance of control and convenience.
What the AI Assistant Does
-
Analyzes your repository
-
Generates a draft AppSpec YAML
-
Detects common build or run issues
-
Suggests fixes automatically (up to three retry attempts)
-
Creates configuration for environment variables and databases
What You Do
-
Verify and test builds locally
-
Provide or confirm environment variables
-
Approve configuration updates
-
Validate deployments and DNS changes
This ensures accuracy without losing ownership of your app.
🚀 How to Get Started
Before you begin, you’ll need a DigitalOcean App Platform account and, ideally, the doctl command-line tool installed and authenticated. Having the MCP setup is a plus. These are the primary ways the assistant will interact with your account.
The migration guide supports several starting points, and the AI assistant will help you determine the best path:
-
Scenario A: Full Vercel Migration: You have a live Vercel app and Vercel account access. The assistant will use the vercel CLI to pull environment variables and settings.
-
Scenario B: Repository-Only: You just have a GitHub repository (it might be on Vercel, or not). This is simpler and doesn’t require Vercel credentials.
-
Scenario C: Local Source Code: You have code locally and want to get it on App Platform, with the assistant helping you create a new repository.
Note on MCP Servers: You might see references to “MCP servers” in the guide. These are optional and not required for users. The doctl and gh CLIs are the primary tools used for the migration.
To start, simply find the “Vercel to App Platform Migration Guide” (available on the DigitalOcean-Labs GitHub) and load it into your AI assistant. Then, state your goal, like: “Help me migrate my app to DigitalOcean App Platform using this guide.”
🔍 A Typical Migration Walkthrough
Step 1. Local Testing
Before deployment, test locally:
pnpm install pnpm build
This catches build or dependency issues early, saving multiple failed deployment attempts.
Step 2. Generate App Spec
Example AI-generated configuration for a Next.js SaaS app:
name: my-saas-app region: nyc1
services:
- name: web
github:
repo: yourname/your-saas-app
branch: main
deploy_on_push: true
source_dir: /
build_command: “” # auto-detect
run_command: “” # auto-detect
http_port: 8080
instance_size_slug: basic-xxs
envs:
- key: DATABASE_URL value: ${db.DATABASE_URL}
- key: STRIPE_SECRET_KEY value: “sk_live_…” type: SECRET
databases:
- name: db engine: PG version: “18”
App Platform buildpacks automatically detect the framework, no manual commands needed.
Step 3. Deploy and Troubleshoot
doctl apps create --spec app-spec.yaml
If something fails (e.g., missing lockfile or port error), the AI assistant reads logs, proposes corrections, and redeploys—while you stay in the loop.
** 🧱 Multi-Component Deployments**
App Platform shines when hosting multiple services together:
monorepo/ ├── apps/web # Frontend ├── apps/api # Backend └── worker # Background processor
Each runs as a separate component in one app, sharing databases and internal networking—no need for Kubernetes.
🔄 What Migrates Smoothly
✅ Next.js, React, Vue, Express, Python, Go, and Rails
✅ API routes (/api/*)
✅ Managed PostgreSQL and Redis (ValKey)
✅ Encrypted environment variables
✅ Custom domains with automatic SSL
✅ Native background workers and cron jobs
✅ Git-based deployments with preview URLs
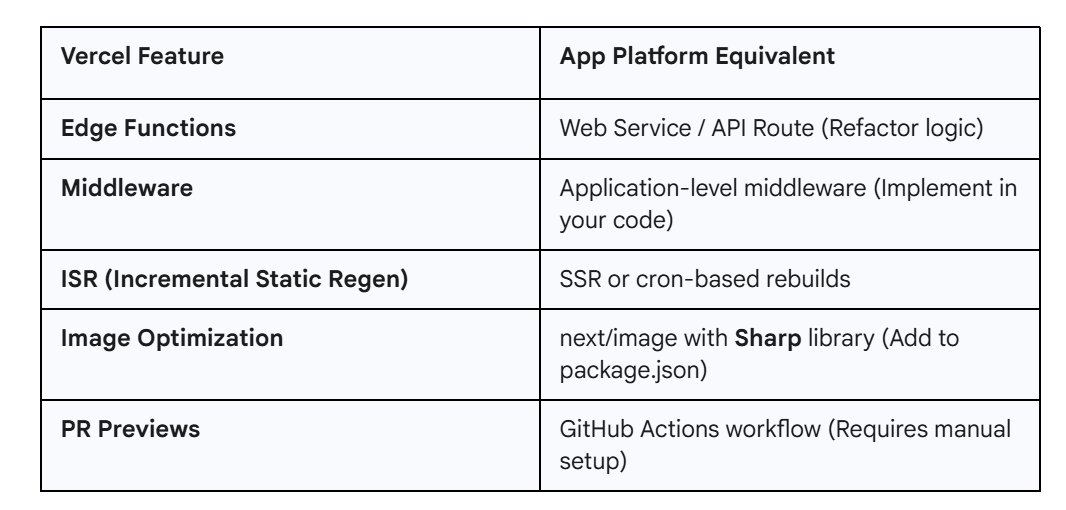
⚠️ What Needs Human Touch
Some Vercel-specific features need adaptation. The AI assistant will identify these, but you will need to implement the changes.
💾 Database Migration
Schema migration is straightforward—but data migration is manual by design:
Export from Vercel pg_dump $VERCEL_DATABASE_URL > backup.sql
Import to App Platform psql $APP_PLATFORM_DATABASE_URL < backup.sql
This ensures you retain full control of production data integrity.
🧭 Rollback Plan
Before updating DNS:
-
Test thoroughly on the .ondigitalocean.app URL
-
Keep the original app live during propagation
-
Document rollback steps (DNS, deployment, or code revert)
Rollback is as simple as reverting DNS or redeploying a previous version—App Platform keeps the last 10 deployments for one-click recovery.
💡 When to Use This Approach
This guided process works best for:
-
Standard frameworks (Next.js, React, Express)
-
Straightforward build pipelines
-
Teams comfortable with basic DevOps commands
-
Apps not reliant on Vercel-exclusive features
It is less ideal for:
-
Heavy edge function usage
-
Complex, multi-region architectures
-
Apps requiring custom caching or GPU workloads
✨ Why AI Assistance Matters
Without AI, migration means reading multiple docs, manual YAML, guessing errors, and managing retries.
With AI, you get a guided workflow, automated error diagnosis, safe retries with explanations, environment variable mapping, and rollback instructions. AI amplifies your expertise; it doesn’t replace it.
Whether you’re moving an existing app or starting fresh, App Platform gives you the simplicity of a managed PaaS and the flexibility of modular components—without the hidden complexity.
To get started with running your Vercel App on App Platform, use our work-in-progress markdown instructions (https://github.com/digitalocean-labs/mcp-digitalocean/blob/main/pkg/registry/apps/docs/vercel-migration-guide.md).
Week of October 6th
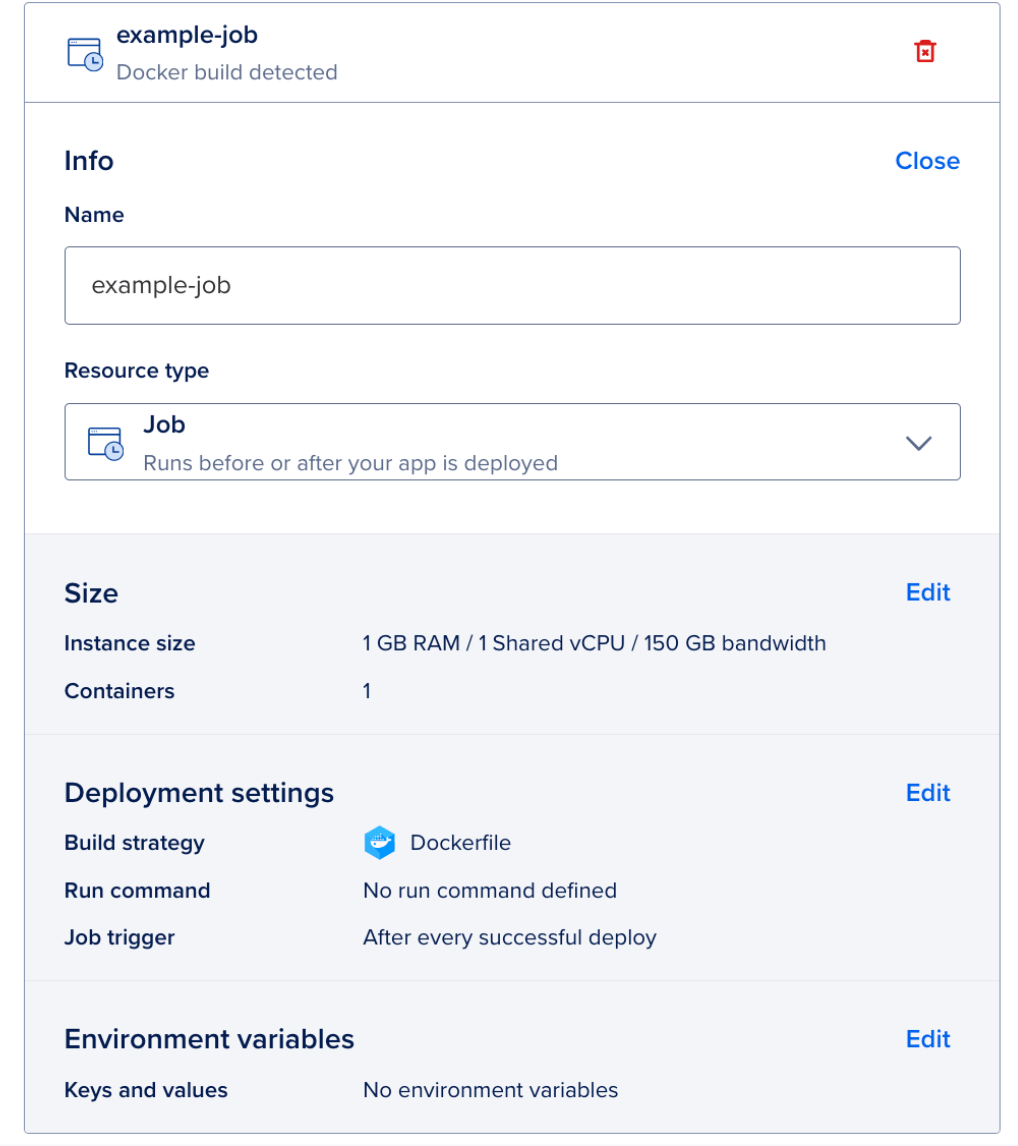
Product Update DigitalOcean now supports Cron Jobs
Great news: support for Cron Jobs, a highly requested feature for DigitalOcean App Platform, is now in general availability.
This new capability allows you to automate essential and repetitive tasks in your deployed applications, bringing classic Unix scheduling power directly into our modern Platform-as-a-Service (PaaS) environment.
Cron Jobs saves you time and helps ensure operations run predictably and efficiently so you can focus on building.
The Power of Automation for Your App
Until now, running scheduled tasks in deployed apps often required setting up a separate Droplet or a third-party service. The new Cron Job component is designed for any process that needs to run regularly in the background, unlocking powerful automation for common application needs, such as:
-
Running nightly database backups
-
Cleaning up old data
-
Sending daily notifications or reports
You can schedule jobs to run automatically at fixed intervals, whether every 15 minutes, daily at midnight, or on a custom schedule using Cron expressions.
With Cron Jobs you can keep your Droplet running — just add an App Platform Cron Job for your periodic tasks. If all you need is a single Cron Job and nothing else, you can now spin up an App Platform app with just one Cron Job component.
How to get started
DigitalOcean App Platform Cron Jobs leverage the standard cron expression format, giving you granular control over when your code executes.
You can configure your Cron Jobs by following these steps:
- In the Apps section of the DigitalOcean Control Panel, select your app, then click the Create drop-down and choose Create Resources From Source Code to add a Job.
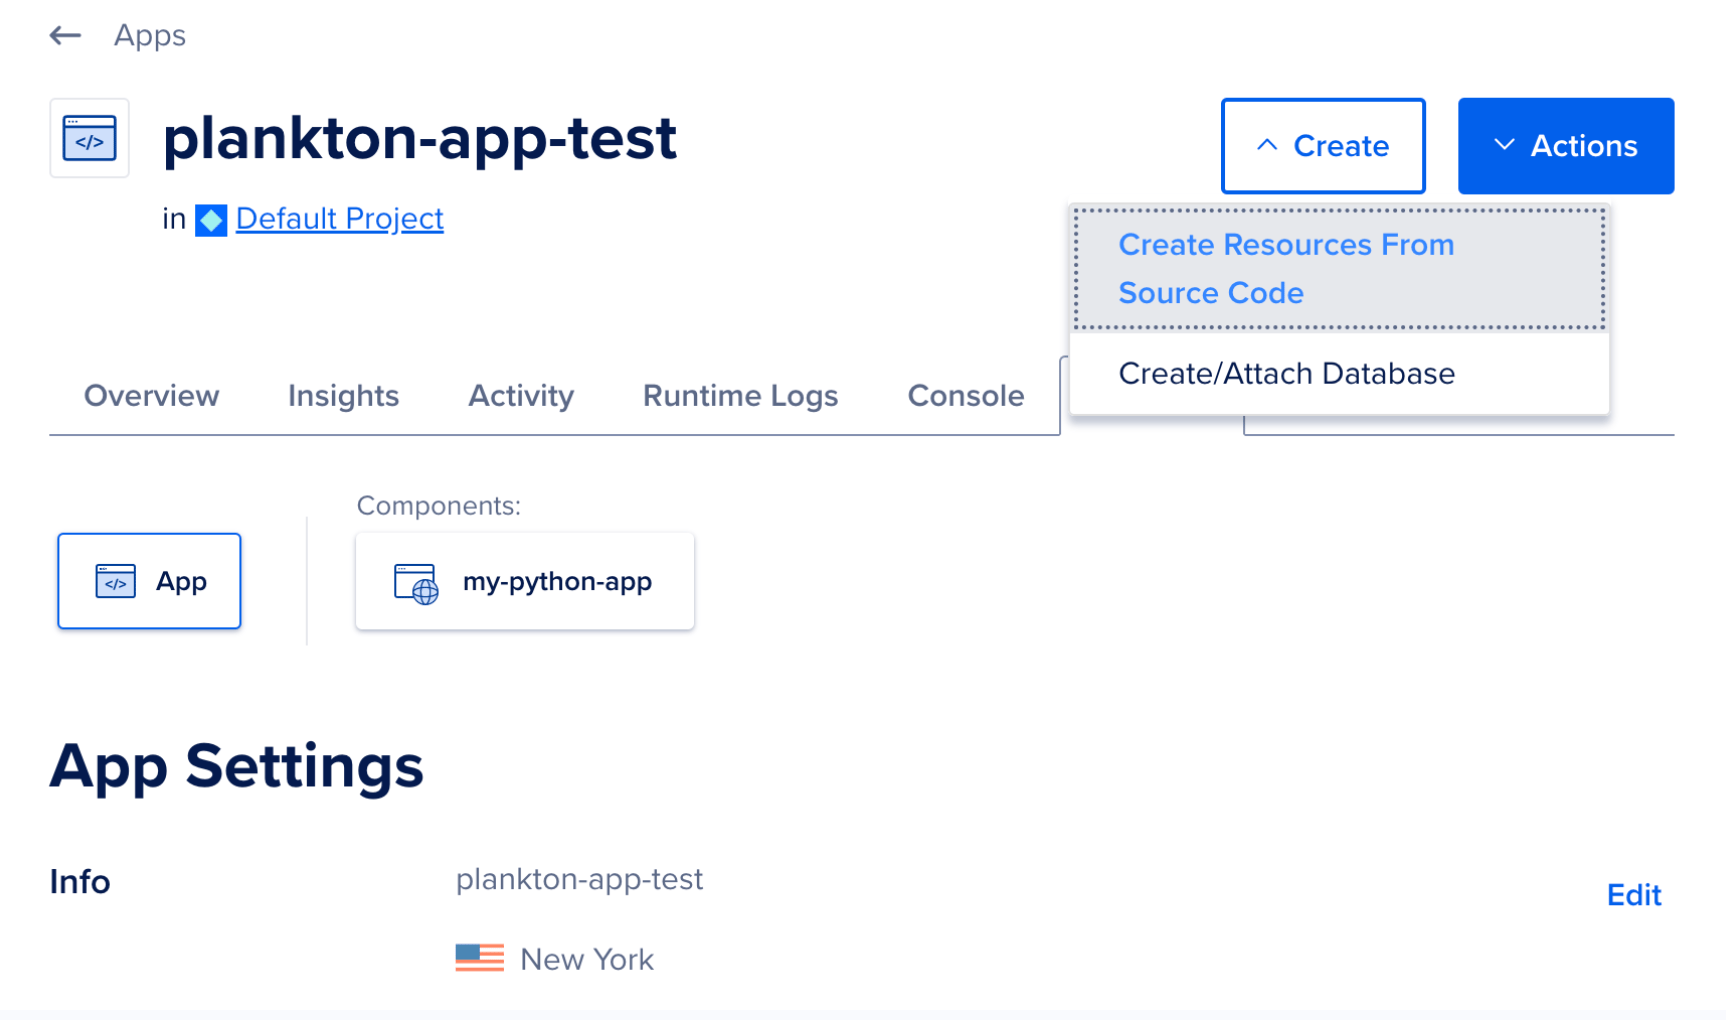
- On the Choose a deployment source screen, select the code repository service your app resides on. If you have not previously created an app on App Platform, the repository service prompts you to provide DigitalOcean with read permissions to your account.
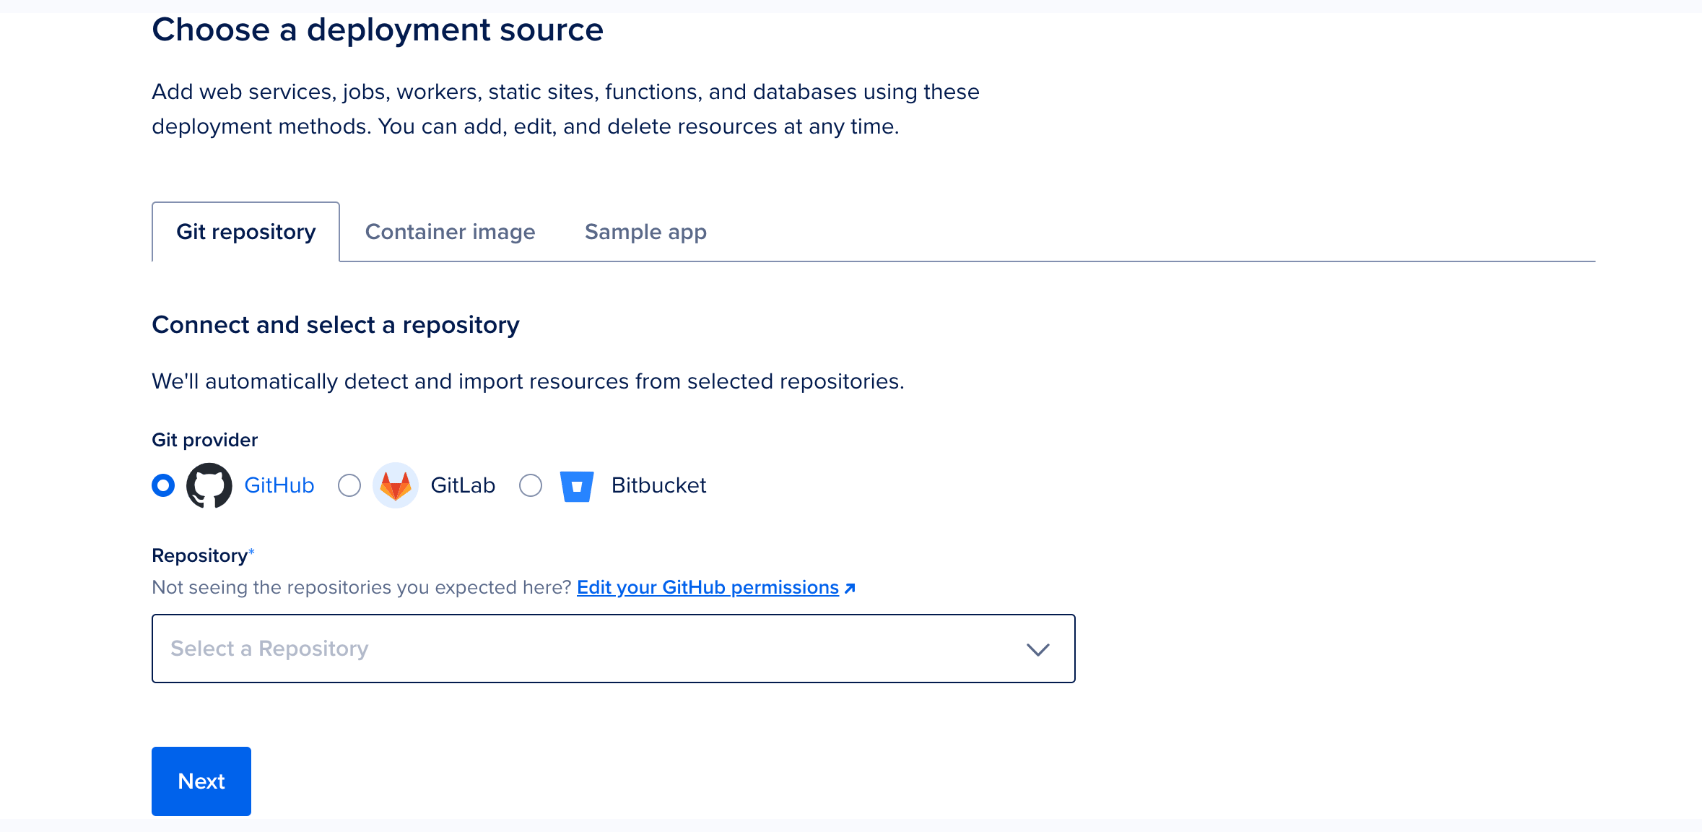
Select the app’s repo from the Repository drop-down and then select the branch to deploy from in the Branch drop-down menu.
- Once you have selected the app’s repo and branch, click Next. App Platform retrieves your app’s code. App Platform inspects the code and app resources, and selects an appropriate runtime environment (such as Node, or Ruby). If you need to override this, upload a Dockerfile to your branch and restart the app creation process.
See our How to guide for more detailed instructions.
Note that App Platform enforces a minimum execution frequency of every 15 minutes (*/15 * * * *) to ensure optimal platform performance. You’re only billed for the time that the job runs.
Get started today
Whether you need to run a script once a day or four times an hour, CronJobs makes it simple.
Clone this template to get started with a real-life backup CronJob example; or, log-in to App Platform to start automating your application’s maintenance and background tasks today.
Looking to dive deeper into configuration, view job invocations, or explore examples? Check out our full documentation.
Week of September 23rd
Product Update Deploy Lovable.dev Apps to Production with App Platform
DigitalOcean App Platform now supports a new, streamlined workflow for deploying applications built on Lovable.dev directly to DigitalOcean App Platform. This integration bridges the gap between building an application with natural language and launching it in a secure, production-grade environment, allowing you to move from idea to live application in minutes without complex configuration.
What’s new
-
Direct Lovable.dev Integration: Now you can seamlessly deploy applications built on Lovable.dev to DigitalOcean App Platform. App Platform supports the common Lovable.dev technology stack of Vite/React for the frontend and Supabase for the backend.
-
Automated Deployment Pipeline: By connecting your Lovable project’s GitHub repository to App Platform, you create a fully automated deployment pipeline. Every code change or feature addition made in Lovable is synchronized with GitHub and can be set to auto-deploy on our platform with zero downtime.
Benefits
-
Go from AI to Production Instantly: Bridge the crucial gap between an AI-generated application and a live, scalable website. You can focus on building features in Lovable, knowing a clear deployment path is waiting for you.
-
Experience Zero-Configuration Deployment: App Platform’s built-in Node.js buildpack automatically detects and builds your Vite/React application without requiring you to write any Dockerfiles or YAML configuration files.
-
Access Production-Grade Features: Your Lovable app benefits from App Platform’s robust, managed infrastructure. This includes built-in HTTPS, a global CDN, health checks, and zero-downtime deploys right out of the box, making production-level features accessible even to non-coders and first-time users.
How to get started
Step 1: Build Your App on Lovable.dev
- Create and refine your application using Lovable’s natural language interface. Lovable automatically handles version control by synchronizing your code with a GitHub repository.
Step 2: Prepare Your Application for Deployment
- Before deploying, ensure your application’s secrets, like Supabase credentials, are not hardcoded in your source code. Your application should be configured to use the environment variables VITE_SUPABASE_URL and VITE_SUPABASE_ANON_KEY.
Step 3: Deploy to DigitalOcean App Platform
-
Navigate to the DigitalOcean App Platform page and click “Create App”.
-
Select your Lovable project’s repository from GitHub.
-
App Platform will automatically detect your project as a Node.js application. You can deploy it as a Web Service or, if it’s a frontend-only app, change the component type to Static Site.
-
In the configuration settings, add your environment variables: VITE_SUPABASE_URL and VITE_SUPABASE_ANON_KEY with the corresponding values from your Supabase project.
-
Click deploy. App Platform will handle the build process and launch your application.
For a complete, step-by-step tutorial, check out our video guide covering the entire process from building an application in Lovable to deploying it on App Platform.
 Resources
Week of September 15th
Product Update Outbound VPC for App Platform is now Generally Available
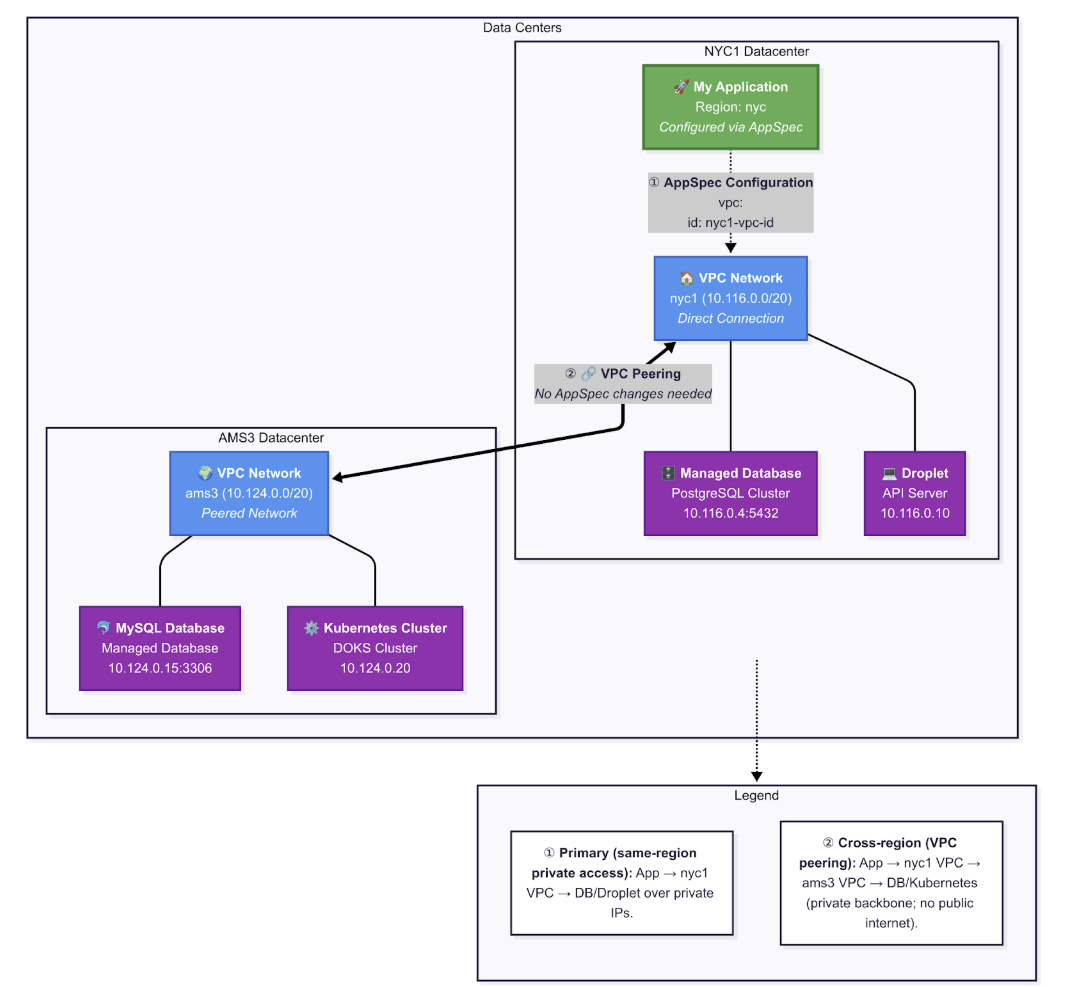
DigitalOcean App Platform now supports outbound VPC integration, enabling your apps to connect privately to databases, Droplets, and other resources across any region through VPC-to-VPC peering. This eliminates the need for public internet connectivity and creates secure, performant private network architectures at scale. Now, you can deploy multi-tier applications with confidence, knowing that your data layer remains completely isolated from external networks while maintaining the simplicity and scalability that makes App Platform powerful. This capability is transformative for digital-native enterprise (DNE) workloads, microservices architectures, and any application requiring enhanced security controls.
What’s new
-
Outbound VPC connectivity for apps – Attach an App Platform app to a VPC in its region so your code talks to private services (Droplets, Managed Databases, DOKS nodes) over private IPs.
-
Cross-region private access with VPC peering – Peer your app’s regional VPC to VPCs in other regions and keep traffic private end-to-end, even when the resource lives elsewhere.
-
Simple, spec-first configuration – Add a vpc.id to your app spec by following the steps below and redeploy.
-
General availability – Available today for all regions except ATL for outbound integration only - this means that the App can talk to resources in any region, but not vice versa (droplet to app via VPC).
-
Built for real developer needs – This feature directly addresses long-standing requests to connect apps to Droplets and Managed Database over a private network.
Benefits
-
Security by design: Your app reaches internal services (droplets, databases, DOKS) over private IPs, reducing public exposure and simplifying controls with existing VPC rules.
-
Lower latency: When your app and database run in the same datacenter (e.g., NYC1) on the same VPC, traffic stays on private east-west paths with no internet/NAT hops—reducing round-trip time and smoothing tail latency.
-
Multi-region flexibility: Keep an app in one region and a database in another, and still connect privately using VPC peering. This is especially helpful for regional data residency and gradual migrations.**
How to get started
- Confirm access and region – Outbound VPC for App Platform is now generally available in all regions except ATL.
- Find your VPC ID – List your VPCs and copy the UUID of the one you want the app to use:
doctl vpcs list
- Attach the app to a VPC – Add the VPC to your app spec (replace your-id with the VPC UUID):
vpc:

  id: your-id
Save and redeploy. From your app’s Console, you can verify private reachability (for example, by curling a private IP on your VPC).
- (Optional) – Reach resources in another region with VPC peering If your target resource (say, a database) lives in a different region, peer your app’s VPC to the remote VPC:
# Example: create a peering between two VPCs

doctl vpcs peerings create my-app-peering \

  --vpc-ids <VPC_ID_IN_APP_REGION>,<REMOTE_VPC_ID>
VPC peering is available across all regions (with limited exceptions noted in docs) and lets resources communicate over private IPs as if they were on the same network.
Note: Region/datacenter mapping: You create Apps in regions (eg. NYC, SFO). Your app is deployed in the first datacenter in that region (NYC1, SFO1). Apps connect directly to VPCs in the corresponding datacenter for their region:
fra → fra1, nyc → nyc1, tor → tor1. Use peering to reach other regions privately.
Resources
- How to Enable App Platform VPC (docs) – configuration steps & app spec snippet.
Week of September 8th
Product Update Build and deploy your MCP server on App Platform
What’s new
DigitalOcean App Platform now supports seamless deployment of remote MCP (Model Context Protocol) servers with essential AI infrastructure features like HTTP response streaming and subdomain routing—enabling developers to build centralized, cost-effective tool providers for AI applications.
-
Remote MCP Server Deployment – Deploy centralized tool providers that AI assistants can access via HTTP with OAuth 2.1 authentication
-
HTTP Response Streaming (SSE) – Enable real-time, responsive AI chatbot experiences with server-sent events support
-
Subdomain Routing – Build sophisticated multi-tenant applications with precise service organization using custom subdomains
How to get started
- Clone the MCP Server Template Start with our community template that includes best practices and deployment configuration:
git clone https://github.com/do-community/do-remote-mcp-server-template.git

cd do-remote-mcp-server-template
- Configure Your App Spec Enable streaming and cost optimization features in your app.yaml:
name: my-mcp-server

services:

- name: mcp-api

  source_dir: /

  github:

    repo: your-username/your-mcp-server

    branch: main

  run_command: python app.py

  environment_slug: python

  instance_count: 1

  instance_size_slug: basic-xxs

  http_port: 8080

  routes:

  - path: /

  **disable_edge_cache:** **true**  **#** **Enable** **HTTP** **Response** **Streaming**

  **inactivity_sleep:** **true**    **#** **Enable** **Scale-to-Zero** **(contact** **support** **first)**
- Deploy to App Platform:
doctl apps create --spec app.yaml


Or,


Use App Platform Console and Deploy from Git
Check out our comprehensive video tutorial that walks through the entire deployment process, from template setup to production configuration.
Resources
-
App Platform Subdomain Routing Documentation – Advanced routing configuration guide
-
HTTP Response Streaming Setup – Enable real-time streaming responses
Week of September 1st
Product Update App Platform Now Supports Integration with AI-coding Assistants using MCP
What’s new
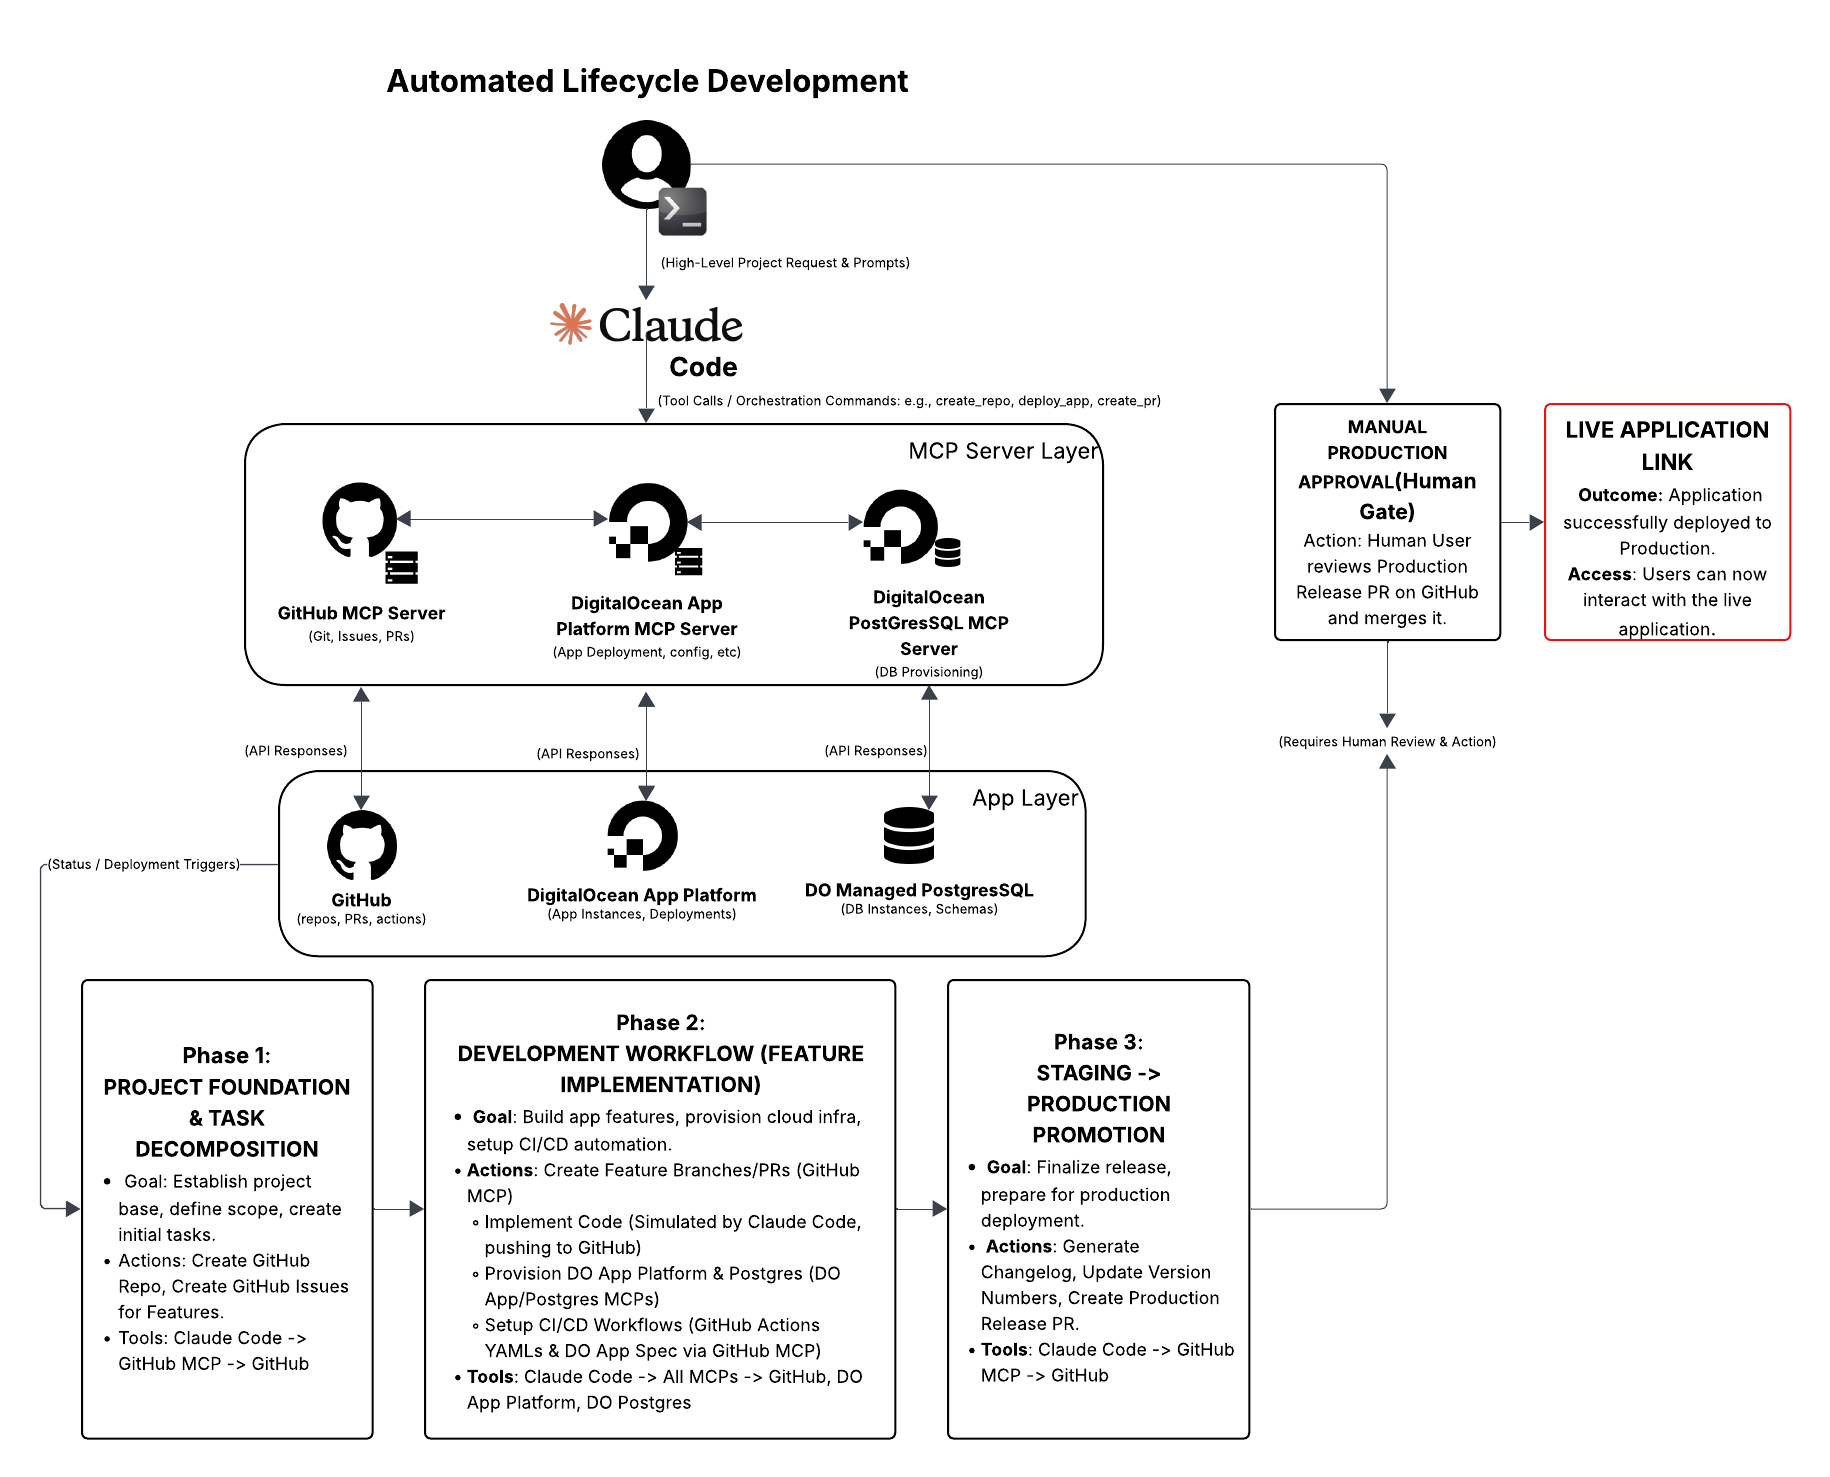
Now you can integrate AI-powered coding assistants – including Claude Code, Cursor, and VS Code MCP plugins – directly with DigitalOcean App Platform using the new DigitalOcean MCP Server. This means that your AI assistant can deploy applications, spin up databases, manage Spaces, check billing, and more – without leaving your coding environment. Go from AI-generated code to production in just a few prompts with our MCP Server Setup Tutorial, Video Walkthrough, and DigitalOcean MCP Server GitHub.
How to get started
The AI development revolution shouldn’t stop at your IDE. Whether you’re building your first AI-powered app or deploying your hundredth, App Platform + MCP integration takes you from code to production faster than ever. We’ve built a working tutorial to take you from idea to production using only prompts. It uses MCP, DigitalOcean MCP Server, GitHub MCP, and Claude Code so you can go from building the app → committing to GitHub → staging with preview deployments → all the way to merging in production.
Check out our Claude Code Tutorial and GitHub repo.
About the author
Related Articles
Run Codex in the cloud – DigitalOcean for Codex is now available
- June 25, 2026
- 3 min read

Server-Side Tools Are Now Available for DigitalOcean Inference Engine
- June 17, 2026
- 3 min read
Model Evaluations: Prove Your Routing Policy Actually Works
Sathish Jothikumar
- June 4, 2026
- 7 min read