Tutorial
How To Configure vsftpd to Use SSL/TLS on a CentOS VPS

Introduction
Warning: FTP is insecure! Consider using SFTP instead of FTP.
FTP, or file transfer protocol, is a way to transfer files between local and remote servers. Although very popular and ubiquitous, the use of this method of file transfer has fallen out of favor due to the lack of security inherent in its design.
A very capable alternative is SFTP, as mentioned above. This protocol implements file sharing over SSH. If you must use FTP, you should at least secure the connection with SSL/TLS certificates.
In this guide, we will configure vsftpd to use TLS/SSL certificates on a CentOS 6.4 VPS.
Install vsftpd
The vsftpd server is available in CentOS’s default repositories. We can install it by typing:
sudo yum install vsftpd
The vsftpd server is now installed on our VPS. We can configure some connections options in the next section.
Configure Basic Settings for vsftpd
The main configuration file for vsftpd on CentOS is kept in the /etc/vsftpd/ directory. It is called vsftpd.conf.
Open this file in your editor with root privileges:
sudo nano /etc/vsftpd/vsftpd.conf
We need to adjust some basic parameters in this file to increase security and establish our connection options.
The first thing we will do is disable anonymous users. While this option may make sense for a large, public facing file dump (like public software repositories), for a personal FTP server, this is almost never a good idea.
anonymous_enable=NO
Since we are disabling anonymous users, we need to provide a way for our system to authenticate our users. We will allow local users, meaning that vsftpd will use our Linux system users and authentication to determine who can sign in.
To enable this, make sure that this option is set:
local_enable=YES
We will also allow them write access, so that they can upload material and modify content:
write_enable=YES
We also want to confine our users to their respective home directories. The option for that is:
chroot_local_user=YES
This is enough for a basic (non-SSL) FTP configuration. We will add the SSL functionality later.
Save and close the file.
Create an FTP User
We have selected to use local users and to confine them to their home directories with a chroot environment.
Create a new user with this command:
sudo adduser ftpuser
Assign a password to the new user by typing:
sudo passwd ftpuser
The version of vsftpd in CentOS 6.4 is older, so this portion of the setup is easier than some newer versions.
Configure SSL with vsftpd
The first step towards getting vsftpd to operate with SSL is to create our SSL certificate. We will actually be using TLS, which is a protocol that is a successor to SSL and more secure.
We will create a subdirectory within the SSL directory to store our files:
sudo mkdir /etc/ssl/private
To create the certificate and the key in a single file, we can use this command:
openssl req -x509 -nodes -days 365 -newkey rsa:1024 -keyout /etc/ssl/private/vsftpd.pem -out /etc/ssl/private/vsftpd.pem
Fill out the questions that it asks. The most important being the “Common Name” of your server, which will be the IP address or domain name that you will use to connect.
Add the SSL Details to the vsftpd Configuration File
Now, we need to alter our configuration to point to the new keys and configure the secure connection.
Open the vsftpd configuration file as root again:
sudo nano /etc/vsftpd/vsftpd.conf
Scroll to the bottom of the file. We will add our SSL/TLS information here.
We need to specify the location of our certificate and key files. We actually combined both pieces of information into a single file, so we will point both options to the same file:
rsa_cert_file=/etc/ssl/private/vsftpd.pem
rsa_private_key_file=/etc/ssl/private/vsftpd.pem
Next, we need enable the use of these files and disable anonymous users. We should also force the use of SSL for both data transfer and login routines. This will make the security mandatory:
ssl_enable=YES
allow_anon_ssl=NO
force_local_data_ssl=YES
force_local_logins_ssl=YES
Next, we will restrict the type of connection to TLS, which is more secure than SSL. We will do this by explicitly allowing TLS and denying the use of SSL:
ssl_tlsv1=YES
ssl_sslv2=NO
ssl_sslv3=NO
We’ll add a few more configuration options before finishing:
require_ssl_reuse=NO
ssl_ciphers=HIGH
Save and close the file.
We need to restart vsftpd to enable our changes:
sudo /etc/init.d/vsftpd restart
We will also configure it to start automatically with every reboot:
sudo chkconfig vsftpd on
How To Connect to the vsftpd Server with FileZilla
SSL and TLS connections are possible with most modern FTP clients. We will show you how to set up FileZilla to use secured connections due to its cross-platform compatibility. We will assume that you have already installed the client using whatever the appropriate installation procedures are for your computer.
Open the FileZilla program. In the interface, you can click on an icon to open “Site Manager”. It should look like the icon on the far left in this picture:

In the new interface that pops up, you should click on the “New Site” button in the lower left corner. Name the server connection so that you can easily identify it later

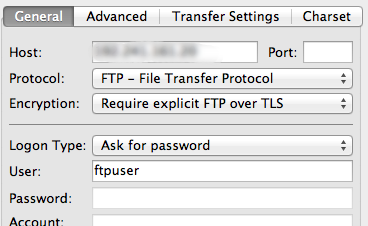
Fill in the IP address in the “Host” field and select “FTP - File Transfer Protocol” from the Protocol drop-down menu. For the Encryption drop-down, choose “Require explicit FTP over TLS”.
Select “Ask for password” from the Login Type menu. Fill in the FTP user we created for the “User” field:

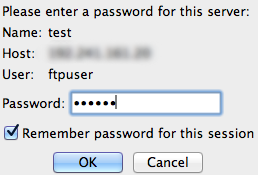
Now, you can click “Connect” at the bottom of the panel. You will be prompted to enter the password for your FTP user:

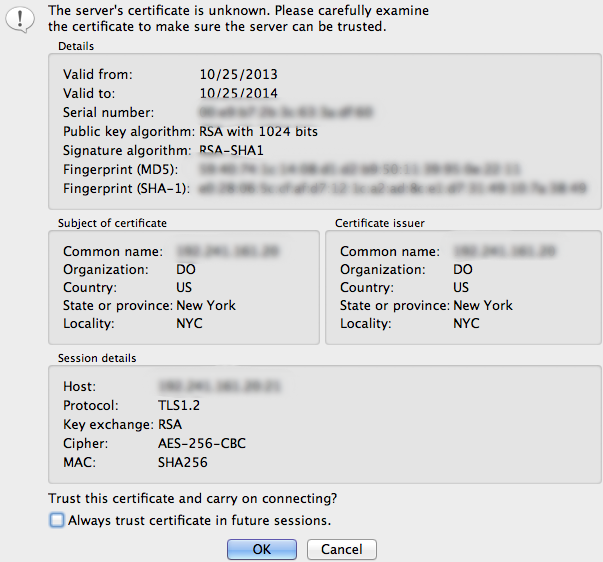
The next step is the first sign that we are connecting with TLS to our remote server. We will be asked to accept the certificate that is being used.

You should be able to see the information you filled out when you created the certificate in order to verify that you’re actually connecting to the correct place.
Accept the certificate to establish the connection.
Conclusion
While this configuration is a step in the right direction, it still suffers from security problems prior to establishing the connection. It should be avoided in most setups that are open to the internet due to these concerns. SFTP is a great alternative if you want the ability to use some of the same tools you are familiar with, but with security you can trust.
<div class=“author”>By Justin Ellingwood</div>
Thanks for learning with the DigitalOcean Community. Check out our offerings for compute, storage, networking, and managed databases.
This textbox defaults to using Markdown to format your answer.
You can type !ref in this text area to quickly search our full set of tutorials, documentation & marketplace offerings and insert the link!
For those getting SSL: cannot load RSA certificate, try:
change rsa from 1024 to 2048
Thanks for the write up. Centos.org has very good guide (link below) which configures server with TLS support and virtual users out of the box. Moreover, various user management scripts are provided.
https://wiki.centos.org/HowTos/Chroot_Vsftpd_with_non-system_users
Hi DO gurus!! Thanks for this wonderful service and this awesome tutorial. Your tutorials are the best in the industry!! That said, I have a minor issue. I have installed WordPress using your other awesome tutorial entitled “How To Install WordPress on CentOS 7” located at: https://www.digitalocean.com/community/tutorials/how-to-install-wordpress-on-centos-7 and I want to install a theme using the “theme browser feature”. Upon attempting this feature (which I know is not your issue and which I know can be done manually by visiting the theme maker’s site), WordPress prompts me to enable FTP access or “FTPS”. I am aware that this tutorial is for VSFTP and that you have another tutorial for SFTP for CentOS 7 but I have found that there is a difference between SFTP and FTPS (SSL) which is what the WP theme install calls for. I was wondering if there will be a tutorial on how to enable this on CentOS 7 in the near future that could be added to the bottom of the “How To Install WordPress on CentOS 7” tutorial “suggested other tutorials” section? If I can offer any help on any other issue I would be glad to offer. Thank you for your time!! -Adam
I was able to fix error: “Starting vsftpd for vsftpd: 500 OOPS: SSL: cannot load RSA certificate”,
I’m using centos and I changed selinux property fron enforced to: SELINUX=permissive
I can make the insecure connection successful. But I got error when I try the explicit mode.
Be really good to mention enabling passive mode - it’s the only way I could get this to work with FileZilla (enabling passive mode in both FileZilla and the vsftpd.conf)
Wow absolutely beautiful - worked on the first try. Made my day!
I configured Sftp on server as per this tutorial. but this command failed sudo /etc/init.d/vsftpd restart Output sudo: /etc/init.d/vsftpd: command not found
Please help.
hello! I’m new on this
I’m stucked at adding the SSL details to the vsftpd configuration file, but when I try to restart vsftpd I got this error:
Shutting down vsftpd: [FAILED] Starting vsftpd for vsftpd: 500 OOPS: unrecognised variable in config file: require_ssl_reuse [FAILED]
Can anyone help me? thanks!
I am getting the below error :(
Disconnected from server Status: Connecting to 172.29.10.140:21… Status: Connection established, waiting for welcome message… Status: Initializing TLS… Status: Verifying certificate… Status: TLS connection established. Status: Connected Status: Retrieving directory listing… Command: PWD Response: 257 “/home/ehsan” Command: TYPE I Response: 200 Switching to Binary mode. Command: PASV Response: 227 Entering Passive Mode (172,29,10,140,110,59). Command: LIST Error: Connection timed out after 20 seconds of inactivity Error: Failed to retrieve directory listing
What to do ???