- Log in to:
- Community
- DigitalOcean
- Sign up for:
- Community
- DigitalOcean

Introduction
Many people rightfully have concerns about their personal information and privacy being at the liberty of large companies. While there are many different projects whose goals are to allow users to reclaim ownership of their data, there are still some areas of normal computing that have been difficult for users to break free from business-controlled products.
Search engines are one area that many privacy-conscious people complain about. YaCy is a project meant to fix the problem of search engine providers using your data for purposes you did not intend. YaCy is a peer-to-peer search engine, meaning that there is no centralized authority or server where your information is stored. It works by connecting to a network of people also running YaCy instances and crawling the web to create a distributed index of sites.
In this guide, we will discuss how to get started with YaCy on an Ubuntu 12.04 VPS instance. You can then use this to either contribute to the global network of search peers, or to create search indexes for your own pages and projects.
Download the Components
YaCy has very few dependencies outside of the package. Pretty much the only thing required on a modern Linux distribution should be the open Java development kit version 6.
We can get this from the default Ubuntu repositories by typing:
sudo apt-get update
sudo apt-get install openjdk-6-jdk
This will take awhile to download all of the necessary components.
Once that is complete, you can get the latest version of YaCy from the project’s website. On the right-hand side, right-click or control click the link for GNU/Linux and select copy link location:
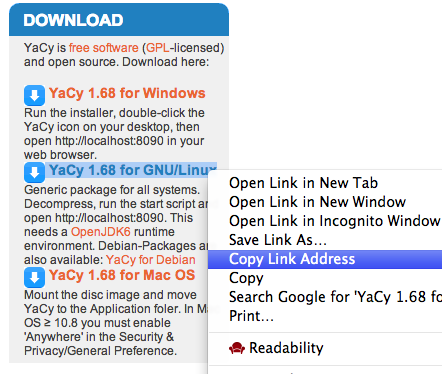
Back on your VPS, change to your user’s home directory and download the program using wget:
cd ~
wget http://yacy.net/release/yacy_v1.68_20140209_9000.tar.gz
Once this has finished downloading, you can extract the files into its own directory:
tar xzvf yacy*
We now have all of the components necessary to run our own search engine.
Start the YaCy Search Engine
We are almost ready to start utilizing the YaCy search engine. Before we begin, we need to adjust one parameter.
Change into the YaCy directory. From here, we will be able to make the necessary changes and then start the service:
cd ~/yacy
We need to add an administrator username and password combination to a file so that we can explore the entire interface. With your text editor, open the YaCy default initialization file:
nano defaults/yacy.init
This is a very long configuration file that is well commented. The parameter that we are looking for is called adminAccount.
Search for the adminAccount parameter. You will see that it is unset currently:
adminAccount=
adminAccountBase64MD5=
adminAccountUserName=admin
You need to set an admin account and password the following format:
<pre> adminAccount=admin:<span class=“highlight”>your_password</span> adminAccountBase64MD5= adminAccountUserName=admin </pre>
This will allow you to sign into the administrative sections of the web interface once you start the service.
Save and close the file.
When you are ready, start the service by typing:
./startYACY.sh
This will start up the YaCy search engine.
Access the YaCy Web Interface
We now can access our search engine by navigating to this page with your web browser:
<pre> http://<span class=“highlight”>server_ip</span>:8090 </pre>
You should be presented with the main YaCy search page:

As you can see, this is a pretty conventional search engine page. You can search using the provided search bar without any additional configuration, if you wish.
We will be exploring the administration interface though, because that provides us with a lot more flexibility. Click on the “Administration” link in the upper-left corner of the page:

You will be taken to the basic configuration page:
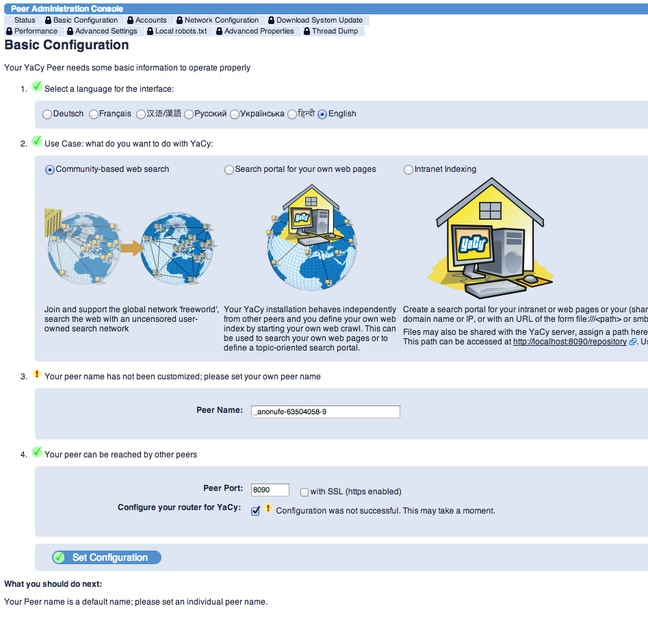
This will go over some common options that you may wish to set up right away.
First, it asks about the language preferences. Change this if one of the other languages listed is more appropriate for your uses.
The second question decides how you want to use this YaCy instance. The default configuration is to use your computer to join the global search network that crawls and indexes the web. This is how peer-based searching operates to replace traditional search engines.
This will help allow you to join peers in providing a great search resource, and will allow you to leverage the work that others have already started.
If you don’t want to use YaCy as a traditional search engine, you can instead choose to create a search portal for a single site by selecting the second option, or use it to index the local network by selecting the third option.
For now, we will select the first option.
The third setting is to create a unique peer name for this computer. If you have multiple servers running YaCy, this becomes increasingly important if you want to peer with them exclusively. Either way, select a unique name here.
For the fourth section, deselect “Configure your router for YaCy” since our search engine is installed on a VPS that is not behind a traditional router.
Click on “Set Configuration” when you are finished.
Crawl Sites to Contribute to the Global Index
You can now search using the indexes kept on your YaCy peers. The search results will become more and more accurate the more people participate in the system.
We can contribute by crawling sites on our instance of YaCy so that other peers can find the pages we crawled.
To start this process, click on the “Crawler / Harvester” link on the left-hand side under the “Index Production” section.

If you’ve attempted to search for something and did not get the results you were looking for, consider starting to index the pages on a site with your instance. It will make your search more accurate for yourself and your peers.
Type in the URL that you want to index in the “Start URL” section:
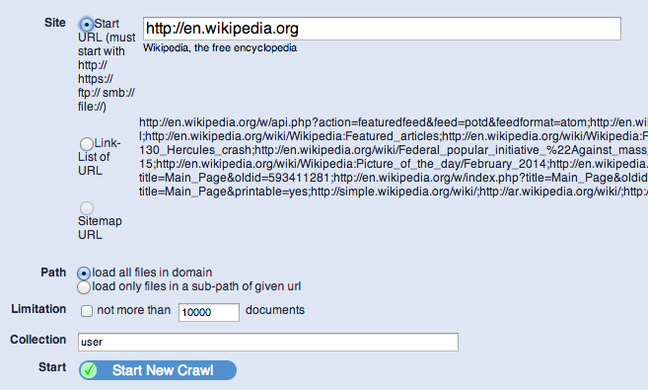
This should populate a list of links that YaCy found on the URL in question. You can select either the original URL that you inputted, or choose to use the link list from the page you typed.
Furthermore, you can select whether you would like to index any links within the domain, or whether you would only like to index those that are a sub-path of the given URL.
The difference is that if you typed in http://example.com/about, the first option would index http://example.com/sites, while the second option would only index pages located below the inputted path (http://example.com/about/me).
You can limit the number of documents that your crawl will index. Click “Start New Crawl” when you are finished to begin crawling the selected site.
Click on the “Creation Monitor” link on the left-hand side to see the progress of the indexing. You should see something like this:

Your server will crawl the URL specified at the rate of 2 requests per second until it has either run out of links chained together or reached the limit you set.
If you then search for a page related to your crawl, the results you indexed should contribute to the results.
Using YaCy for your Web Site
One thing that YaCy can be used for is to provide search functionality for your website. You can configure your site index to operate as a search engine restricted to your domain.
First, select “Admin Console” under the “Peer Control” section in the left-hand side. In the admin console, go back to the “Basic Configuration” page.
This time, for the second question, choose “Search portal for your own web pages”:

Click “Set Configuration” on the bottom.
Next, you need to crawl your domain to generate the content that will be available through your search tool. Again, click on the “Crawler / Harvester” link under the “Index Production” section on the left-hand side.
Enter your URL in the “Start URL” field. Click “Start New Crawl” when you have selected your options:

Next, click on the “Search Integration into External Sites” link under the “Search Design” section on the left-hand side.
There are two separate ways to configure YaCy searching. We will be using the second one, called “Remote access through selected YaCy Peer”.
You will see that YaCy automatically generates the code that you will need to embed within a web page on your site:
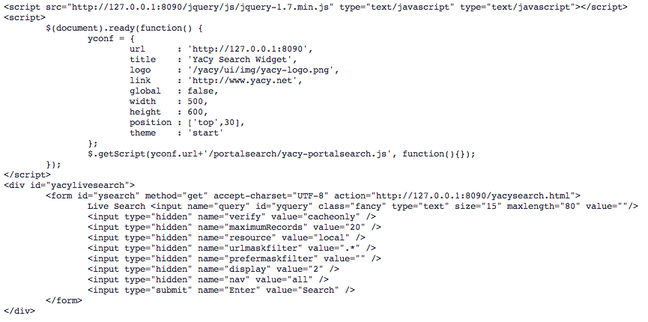
On your site, you need to create a page that has this code inside. You may have to adjust the IP address and port to match the configuration of the server with YaCy installed.
For my site, I created a search.html page in the document root of my server. I made a simple html page, and included the code generated by YaCy:
<pre> <html> <head> <title>Test</title> </head> <body> <h1>Search page</h1> <p>Here we go…</p> <span class=“highlight”><script src=“http://111.111.111.111:8090/jquery/js/jquery-1.7.min.js” type=“text/javascript” type=“text/javascript”></script></span> <span class=“highlight”><script></span> <span class=“highlight”> $(document).ready(function() {</span> <span class=“highlight”> yconf = {</span> <span class=“highlight”> url : ‘http://111.111.111.111:8090’,</span> <span class=“highlight”> title : ‘YaCy Search Widget’,</span> <span class=“highlight”> logo : ‘/yacy/ui/img/yacy-logo.png’,</span> <span class=“highlight”> link : ‘http://www.yacy.net’,</span> <span class=“highlight”> global : false,</span> <span class=“highlight”> width : 500,</span> <span class=“highlight”> height : 600,</span> <span class=“highlight”> position : [‘top’,30],</span> <span class=“highlight”> theme : ‘start’</span> <span class=“highlight”> };</span> <span class=“highlight”> $.getScript(yconf.url+‘/portalsearch/yacy-portalsearch.js’, function(){});</span> <span class=“highlight”> });</span> <span class=“highlight”></script></span> <span class=“highlight”><div id=“yacylivesearch”></span> <span class=“highlight”> <form id=“ysearch” method=“get” accept-charset=“UTF-8” action=“http://111.111.111.111:8090/yacysearch.html”></span> <span class=“highlight”> Live Search <input name=“query” id=“yquery” class=“fancy” type=“text” size=“15” maxlength=“80” value=“”/></span> <span class=“highlight”> <input type=“hidden” name=“verify” value=“cacheonly” /></span> <span class=“highlight”> <input type=“hidden” name=“maximumRecords” value=“20” /></span> <span class=“highlight”> <input type=“hidden” name=“resource” value=“local” /></span> <span class=“highlight”> <input type=“hidden” name=“urlmaskfilter” value=“.*” /></span> <span class=“highlight”> <input type=“hidden” name=“prefermaskfilter” value=“” /></span> <span class=“highlight”> <input type=“hidden” name=“display” value=“2” /></span> <span class=“highlight”> <input type=“hidden” name=“nav” value=“all” /></span> <span class=“highlight”> <input type=“submit” name=“Enter” value=“Search” /></span> <span class=“highlight”> </form></span> <span class=“highlight”></div></span> </body> </html> </pre>
You can then save the file and access it from your web browser by going to:
<pre> http://<span class=“highlight”>your_web_domain</span>/search.html </pre>
My page looks like this:

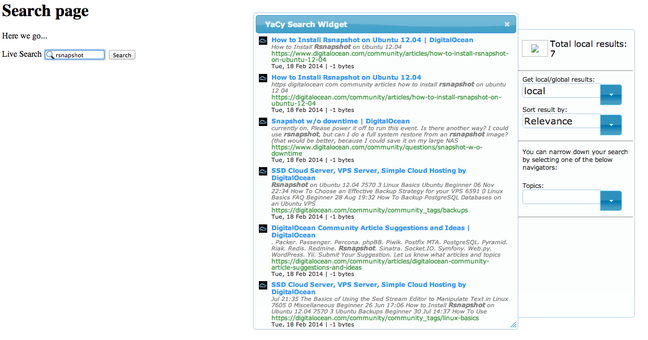
As you type in terms, you should see pages within your domain that are relevant to the query:
Conclusion
You can use YaCy in a great number of ways. If you wish to contribute to the global index in order to create a viable alternative to search engines maintained by corporations, you can easily crawl sites and allow your server to be a peer for other users.
If you need a great search engine for your site, YaCy provides that option as well. YaCy is very flexible and is an interesting solution to the problem of privacy concerns.
<div class=“author”>By Justin Ellingwood</div>
Thanks for learning with the DigitalOcean Community. Check out our offerings for compute, storage, networking, and managed databases.
About the author
Former Senior Technical Writer at DigitalOcean, specializing in DevOps topics across multiple Linux distributions, including Ubuntu 18.04, 20.04, 22.04, as well as Debian 10 and 11.
Still looking for an answer?
This textbox defaults to using Markdown to format your answer.
You can type !ref in this text area to quickly search our full set of tutorials, documentation & marketplace offerings and insert the link!
When clicking on “Administration” in the top left corner of the search screen, the admin password I set does not work. Stays “Unauthorized”. Think this may be an .htpasswd kind of thing but don’t quite know where to start.
Fixed.
In /yacy/, enter ./killYACY.sh then ./reconfigureYACY.sh to create a new password. Follow the prompts. Then restart yacy with ./startYACY.sh
In the instructions when I first configured yacy I had missed the “admin:” part as below. adminAccount=admin:your_password
I had simply entered “your_password” instead of “admin:your_password”. Later when trying to correct the defaults/yacy.init with nano, it wouldn’t work, you need to run “reconfigure” as described above so the password is regenerated properly. Hope that makes sense.
Refused connections: Am getting the following messages.
Connection to XXX.XXX.XX.XX Failed (X’s are my digital ocean server IP address) (61) Connection refused
Not sure what this means.
@mike: Make sure yacy is running: <pre>sudo netstat -plutn #look for the port that yacy should be listening on sudo ps wwaux | grep yacy #searches for “yacy” in the list of running processes</pre>
Kamal,
I started up yacy and it is running, although “0.0.0.0:8090” is listed as “/java” not yacy.
Yacy is listed in running processes as “net.yacy.yacy” and as “lib/yacycore.jar”.
I can see/watch the network access grid with many connections to and from the server.
Now after perhaps 10 minutes it just quit. And when I run the commands you posted, yacy is nowhere to be found. Same “connection refused” message as usual.
Is there a way to contact the writer of this tutorial Justin Ellingwood? I have a question.
How much memory is needed to run YaCy on Digital Ocean?
mike: It depends on your configuration settings. By default, YaCy assumes that you are running it on a computer that is doing other things, so it is not very aggressive. According to their site, they allocate 96MB for the database cache by default.
This is a page that might assist you on tuning the memory settings of your YaCy instance: http://www.yacy-websuche.de/wiki/index.php/En:Performance
jellingwood,
Much appreciated. Link was very helpful.
Yacy keeps crashing every few minutes so I guess I’ll keep adjusting settings and see what happens.
I setup YaCy as documented above on a Ubuntu 14.04 and 16.04 host, but the website isn’t loading on port 8090 or 8443. These are existing hosts already running Apache and Nginx for other purposes.
Where should I be looking to resolve this?
And while I’m at it: the index of many websites rapidly becomes outdated. I suppose I can create a cronjob to reindex the website every few day. But will it reindex everything or incrementally index? I notice on a local install how big indexes can get (20GB for nine websites of varying sizes). If the index incrementally changes, this shouldn’t be an issue, but a rapidly growing index can hog up a droplet in no time. So, how is this behaviour?
Some update: I have installed YaCy on a Ubuntu Server 22.04.2 LTS.
- Java version openjdk-6-jdk is out of date now. For me Version openjdk-11-jre-headless works fine. First, I do not need the developer environment JDK. The runtime environment JRE is just fine. Second, version 11 is currently up to date and third, on my headless server (no GUI) the headless version of the Java runtime environment works just fine.
- YaCy version Currently, the newest YaCy version is 1.924 Therefore I have used wget http://yacy.net/release/yacy_v1.924_20210209_10069.tar.gz for download and tar xzvf yacy_v1.924_20210209_10069.tar.gz to unpack it.
- Table of contents
- Download the Components
- Start the YaCy Search Engine
- Access the YaCy Web Interface
- Crawl Sites to Contribute to the Global Index
- Using YaCy for your Web Site
- Conclusion
Deploy on DigitalOcean
Click below to sign up for DigitalOcean's virtual machines, Databases, and AIML products.
Become a contributor for community
Get paid to write technical tutorials and select a tech-focused charity to receive a matching donation.
DigitalOcean Documentation
Full documentation for every DigitalOcean product.
Resources for startups and SMBs
The Wave has everything you need to know about building a business, from raising funding to marketing your product.
Get our newsletter
Stay up to date by signing up for DigitalOcean’s Infrastructure as a Newsletter.
New accounts only. By submitting your email you agree to our Privacy Policy
The developer cloud
Scale up as you grow — whether you're running one virtual machine or ten thousand.
Get started for free
Sign up and get $200 in credit for your first 60 days with DigitalOcean.*
*This promotional offer applies to new accounts only.
