Not using Ubuntu 22.04?
Choose a different version or distribution.
Introduction
Docker simplifies managing application processes in containers—resource-isolated environments that are more portable and resource-efficient than virtual machines.
For a detailed introduction to the different components of a Docker container, check out The Docker Ecosystem: An Introduction to Common Components.
This tutorial covers installing Docker Community Edition (CE) on Ubuntu, working with containers and images, pushing images to Docker Hub, and managing container lifecycles. It also includes GPU support installation, troubleshooting common errors, and security best practices.
Simplify deploying applications with DigitalOcean App Platform. Deploy directly from GitHub in minutes.
Key Takeaways
- Install Docker from the official repository by adding Docker’s GPG key and repository, then install
docker-ceusingaptto get the latest version. - You can run Docker without sudo by adding your user to the
dockergroup withsudo usermod -aG docker ${USER}and then logging out and back in. - Manage containers and images using commands like
docker run,docker ps,docker stop,docker rm, anddocker imagesto create, list, stop, and remove containers, and view images. - Commit changes made in a container to a new image with
docker commitand push them to Docker Hub usingdocker pushfor use on other systems. - Enable GPU support by installing
nvidia-container-toolkitand use the--gpusflag when running containers needing GPU access.
Prerequisites
To follow this tutorial, you will need the following:
- One Ubuntu server set up by following the Ubuntu initial server setup guide (compatible with Ubuntu 20.04 and later versions), including a
sudonon-root user and a firewall. - An account on Docker Hub if you wish to create your own images and push them to Docker Hub, as shown in Steps 7 and 8.
Step 1 — Installing Docker
The Docker installation package available in the official Ubuntu repository may not be the latest version. To ensure we get the latest version, we’ll install Docker from the official Docker repository. To do that, we’ll add a new package source, add the GPG key from Docker to ensure the downloads are valid, and then install the package.
First, update your existing list of packages:
sudo apt update
Next, install a few prerequisite packages which let apt use packages over HTTPS:
sudo apt install ca-certificates curl gnupg
Then add the GPG key for the official Docker repository to your system:
sudo install -m 0755 -d /etc/apt/keyrings
curl -fsSL https://download.docker.com/linux/ubuntu/gpg | sudo gpg --dearmor -o /etc/apt/keyrings/docker.gpg
sudo chmod a+r /etc/apt/keyrings/docker.gpg
Add the Docker repository to APT sources:
echo "deb [arch=$(dpkg --print-architecture) signed-by=/etc/apt/keyrings/docker.gpg] https://download.docker.com/linux/ubuntu $(lsb_release -cs) stable" | sudo tee /etc/apt/sources.list.d/docker.list > /dev/null
Update your existing list of packages again for the addition to be recognized:
sudo apt update
Make sure you are about to install from the Docker repo instead of the default Ubuntu repo:
apt-cache policy docker-ce
You’ll see output like this, although the version number for Docker may be different:
docker-ce:
  Installed: (none)
  Candidate: 5:20.10.14~3-0~ubuntu-jammy
  Version table:
     5:20.10.14~3-0~ubuntu-jammy 500
        500 https://download.docker.com/linux/ubuntu jammy/stable amd64 Packages
     5:20.10.13~3-0~ubuntu-jammy 500
        500 https://download.docker.com/linux/ubuntu jammy/stable amd64 Packages
Notice that docker-ce is not installed, but the candidate for installation is from the Docker repository for Ubuntu.
Finally, install Docker:
sudo apt install docker-ce
Docker should now be installed, the daemon started, and the process enabled to start on boot. Check that it’s running:
sudo systemctl status docker
The output should be similar to the following, showing that the service is active and running:
● docker.service - Docker Application Container Engine
     Loaded: loaded (/lib/systemd/system/docker.service; enabled; vendor preset: enabled)
     Active: active (running) since Fri 2022-04-01 21:30:25 UTC; 22s ago
TriggeredBy: ● docker.socket
       Docs: https://docs.docker.com
   Main PID: 7854 (dockerd)
      Tasks: 7
     Memory: 38.3M
        CPU: 340ms
     CGroup: /system.slice/docker.service
             └─7854 /usr/bin/dockerd -H fd:// --containerd=/run/containerd/containerd.sock
Installing Docker now gives you not just the Docker service (daemon) but also the docker command line utility, or the Docker client. We’ll explore how to use the docker command later in this tutorial.
Step 2 — Executing the Docker Command Without Sudo (Optional)
By default, the docker command can only be run by the root user or by a user in the docker group, which is automatically created during Docker’s installation process. If you attempt to run the docker command without prefixing it with sudo or without being in the docker group, you’ll get an output like this:
docker: Cannot connect to the Docker daemon. Is the docker daemon running on this host?.
See 'docker run --help'.
If you want to avoid typing sudo whenever you run the docker command, add your username to the docker group:
sudo usermod -aG docker ${USER}
To apply the new group membership, log out of the server and back in, or type the following:
su - ${USER}
You will be prompted to enter your user’s password to continue.
Confirm that your user is now added to the docker group by typing:
groups
sammy sudo docker
If you need to add a user to the docker group that you’re not logged in as, declare that username explicitly using:
sudo usermod -aG docker username
The rest of this article assumes you are running the docker command as a user in the docker group. If you choose not to, please prepend the commands with sudo.
Let’s explore the docker command next.
Step 3 — Using the Docker Command
Using docker consists of passing it a chain of options and commands followed by arguments. The syntax takes this form:
docker [option] [command] [arguments]
To view all available subcommands, type:
docker
The complete list of available Docker subcommands includes:
  attach      Attach local standard input, output, and error streams to a running container
  build       Build an image from a Dockerfile
  commit      Create a new image from a container's changes
  cp          Copy files/folders between a container and the local filesystem
  create      Create a new container
  diff        Inspect changes to files or directories on a container's filesystem
  events      Get real time events from the server
  exec        Run a command in a running container
  export      Export a container's filesystem as a tar archive
  history     Show the history of an image
  images      List images
  import      Import the contents from a tarball to create a filesystem image
  info        Display system-wide information
  inspect     Return low-level information on Docker objects
  kill        Kill one or more running containers
  load        Load an image from a tar archive or STDIN
  login       Log in to a Docker registry
  logout      Log out from a Docker registry
  logs        Fetch the logs of a container
  pause       Pause all processes within one or more containers
  port        List port mappings or a specific mapping for the container
  ps          List containers
  pull        Pull an image or a repository from a registry
  push        Push an image or a repository to a registry
  rename      Rename a container
  restart     Restart one or more containers
  rm          Remove one or more containers
  rmi         Remove one or more images
  run         Run a command in a new container
  save        Save one or more images to a tar archive (streamed to STDOUT by default)
  search      Search the Docker Hub for images
  start       Start one or more stopped containers
  stats       Display a live stream of container(s) resource usage statistics
  stop        Stop one or more running containers
  tag         Create a tag TARGET_IMAGE that refers to SOURCE_IMAGE
  top         Display the running processes of a container
  unpause     Unpause all processes within one or more containers
  update      Update configuration of one or more containers
  version     Show the Docker version information
  wait        Block until one or more containers stop, then print their exit codes
To view the options available to a specific command, type:
docker docker-subcommand --help
To view system-wide information about Docker, use:
docker info
Let’s explore some of these commands. We’ll start by working with images.
Step 4 — Working with Docker Images
Docker containers are built from Docker images. By default, Docker pulls these images from Docker Hub, a Docker registry managed by Docker, the company behind the Docker project. Anyone can host their Docker images on Docker Hub, so most applications and Linux distributions you’ll need will have images hosted there.
To check whether you can access and download images from Docker Hub, type:
docker run hello-world
The output will indicate that Docker is working correctly:
Unable to find image 'hello-world:latest' locally
latest: Pulling from library/hello-world
2db29710123e: Pull complete
Digest: sha256:bfea6278a0a267fad2634554f4f0c6f31981eea41c553fdf5a83e95a41d40c38
Status: Downloaded newer image for hello-world:latest

Hello from Docker!
This message shows that your installation appears to be working correctly.

...
Docker was initially unable to find the hello-world image locally, so it downloaded the image from Docker Hub, which is the default repository. Once the image downloaded, Docker created a container from the image and the application within the container executed, displaying the message.
You can search for images available on Docker Hub by using the docker command with the search subcommand. For example, to search for the Ubuntu image, type:
docker search ubuntu
The command will search Docker Hub and return a listing of all images whose name matches the search string. In this case, the output will be similar to this:
NAME                             DESCRIPTION                                     STARS     OFFICIAL   AUTOMATED
ubuntu                           Ubuntu is a Debian-based Linux operating sys…   14048     [OK]
websphere-liberty                WebSphere Liberty multi-architecture images …   283       [OK]
ubuntu-upstart                   DEPRECATED, as is Upstart (find other proces…   112       [OK]
neurodebian                      NeuroDebian provides neuroscience research s…   88        [OK]
open-liberty                     Open Liberty multi-architecture images based…   51        [OK]
...
In the OFFICIAL column, OK indicates an image built and supported by the company behind the project. Once you’ve identified the image that you would like to use, you can download it to your computer using the pull subcommand.
Execute the following command to download the official ubuntu image to your computer:
docker pull ubuntu
You’ll see the following output:
Using default tag: latest
latest: Pulling from library/ubuntu
e0b25ef51634: Pull complete
Digest: sha256:9101220a875cee98b016668342c489ff0674f247f6ca20dfc91b91c0f28581ae
Status: Downloaded newer image for ubuntu:latest
docker.io/library/ubuntu:latest
After an image has been downloaded, you can then run a container using the downloaded image with the run subcommand. As you saw with the hello-world example, if an image has not been downloaded when docker is executed with the run subcommand, the Docker client will first download the image, then run a container using it.
To see the images that have been downloaded to your computer, type:
docker images
The output will look similar to the following:
REPOSITORY          TAG                 IMAGE ID            CREATED             SIZE
ubuntu              latest              1d622ef86b13        3 weeks ago         73.9MB
hello-world         latest              bf756fb1ae65        4 months ago        13.3kB
As you’ll see later in this tutorial, images that you use to run containers can be modified and used to generate new images, which may then be uploaded (pushed is the technical term) to Docker Hub or other Docker registries.
Let’s look at how to run containers in more detail.
Step 5 — Running a Docker Container
The hello-world container you ran in the previous step is an example of a container that runs and exits after emitting a test message. Containers can be much more useful than that, and they can be interactive. After all, they are similar to virtual machines, only more resource-friendly.
As an example, let’s run a container using the latest image of Ubuntu. The combination of the -i and -t switches gives you interactive shell access into the container:
docker run -it ubuntu
Your command prompt should change to reflect the fact that you’re now working inside the container and should take this form:
root@d9b100f2f636:/#
Note the container id in the command prompt. In this example, it is d9b100f2f636. You’ll need that container ID later to identify the container when you want to remove it.
Now you can run any command inside the container. For example, let’s update the package database inside the container. You don’t need to prefix any command with sudo, because you’re operating inside the container as the root user:
apt update
Then install any application in it. Let’s install Node.js:
apt install nodejs
This installs Node.js in the container from the official Ubuntu repository. When the installation finishes, verify that Node.js is installed:
node -v
You’ll see the version number displayed in your terminal:
v12.22.9
Any changes you make inside the container only apply to that container.
To exit the container, type exit at the prompt.
Let’s look at managing the containers on our system next.
Step 6 — Managing Docker Containers
After using Docker for a while, you’ll have many active (running) and inactive containers on your computer. To view the active ones, use:
docker ps
You will see output similar to the following:
CONTAINER ID IMAGE COMMAND CREATED STATUS PORTS NAMES
In this tutorial, you started two containers; one from the hello-world image and another from the ubuntu image. Both containers are no longer running, but they still exist on your system.
To view all containers — active and inactive, run docker ps with the -a switch:
docker ps -a
You’ll see output similar to this:
CONTAINER ID   IMAGE         COMMAND   CREATED         STATUS                     PORTS     NAMES
1c08a7a0d0e4   ubuntu        "bash"     About a minute ago   Exited (0) 7 seconds ago             dazzling_taussig
587000e49d53   hello-world   "/hello"   5 minutes ago        Exited (0) 5 minutes ago             adoring_kowalevski
To view the latest container you created, pass it the -l switch:
docker ps -l
CONTAINER ID   IMAGE     COMMAND   CREATED         STATUS                     PORTS     NAMES
1c08a7a0d0e4   ubuntu    "bash"    3 minutes ago   Exited (0) 2 minutes ago             dazzling_taussig
To start a stopped container, use docker start, followed by the container ID or the container’s name. Let’s start the Ubuntu-based container with the ID of 1c08a7a0d0e4:
docker start 1c08a7a0d0e4
The container will start, and you can use docker ps to see its status:
CONTAINER ID   IMAGE     COMMAND   CREATED         STATUS         PORTS     NAMES
1c08a7a0d0e4   ubuntu    "bash"    6 minutes ago   Up 8 seconds             dazzling_taussig
To stop a running container, use docker stop, followed by the container ID or name. This time, we’ll use the name that Docker assigned the container, which is dazzling_taussig:
docker stop dazzling_taussig
Once you’ve decided you no longer need a container, remove it with the docker rm command, again using either the container ID or the name. Use the docker ps -a command to find the container ID or name for the container associated with the hello-world image and remove it.
docker rm adoring_kowalevski
You can start a new container and give it a name using the --name switch. You can also use the --rm switch to create a container that removes itself when it’s stopped. See the docker run --help command for more information on these options and others.
Containers can be turned into images which you can use to build new containers. Let’s look at how that works.
Step 7 — Committing Changes in a Container to a Docker Image
When you start up a Docker image, you can create, modify, and delete files just like you can with a virtual machine. The changes that you make will only apply to that container. You can start and stop it, but once you destroy it with the docker rm command, the changes will be lost for good.
This section shows you how to save the state of a container as a new Docker image.
After installing Node.js inside the Ubuntu container, you now have a container running off an image, but the container is different from the image you used to create it. But you might want to reuse this Node.js container as the basis for new images later.
Then commit the changes to a new Docker image instance using the following command.
docker commit -m "What you did to the image" -a "Author Name" container_id repository/new_image_name
The -m switch is for the commit message that helps you and others know what changes you made, while -a is used to specify the author. The container_id is the one you noted earlier in the tutorial when you started the interactive Docker session. Unless you created additional repositories on Docker Hub, the repository is usually your Docker Hub username.
For example, for the user sammy, with the container ID of d9b100f2f636, the command would be:
docker commit -m "added Node.js" -a "sammy" d9b100f2f636 sammy/ubuntu-nodejs
When you commit an image, the new image is saved locally on your computer. Later in this tutorial, you’ll learn how to push an image to a Docker registry like Docker Hub so others can access it.
Listing the Docker images again will show the new image, as well as the old one that it was derived from:
docker images
You’ll see output like this:
REPOSITORY               TAG                 IMAGE ID            CREATED             SIZE
sammy/ubuntu-nodejs   latest              7c1f35226ca6        7 seconds ago       179MB
...
In this example, ubuntu-nodejs is the new image, which was derived from the existing ubuntu image from Docker Hub. The size difference reflects the changes that were made. And in this example, the change was that NodeJS was installed. So next time you need to run a container using Ubuntu with NodeJS pre-installed, you can just use the new image.
You can also build images from a Dockerfile, which lets you automate the installation of software in a new image. For more information, see the official Docker documentation on Dockerfile reference.
Now let’s share the new image with others so they can create containers from it.
Step 8 — Pushing Docker Images to a Docker Repository
After creating a new image, you can share it by pushing it to Docker Hub or another Docker registry. You must have an account on the registry to push images.
To push your image, first log into Docker Hub.
docker login -u docker-registry-username
You’ll be prompted to authenticate using your Docker Hub password. If you specified the correct password, authentication should succeed.
Note: If your Docker registry username is different from the local username you used to create the image, you will have to tag your image with your registry username. For the example given in the last step, you would type:
docker tag sammy/ubuntu-nodejs docker-registry-username/ubuntu-nodejs
Then you may push your own image using:
docker push docker-registry-username/docker-image-name
To push the ubuntu-nodejs image to the sammy repository, the command would be:
docker push sammy/ubuntu-nodejs
The process may take some time to complete as it uploads the images, but when completed, the output will look like this:
The push refers to a repository [docker.io/sammy/ubuntu-nodejs]
e3fbbfb44187: Pushed
5f70bf18a086: Pushed
a3b5c80a4eba: Pushed
7f18b442972b: Pushed
3ce512daaf78: Pushed
7aae4540b42d: Pushed

...
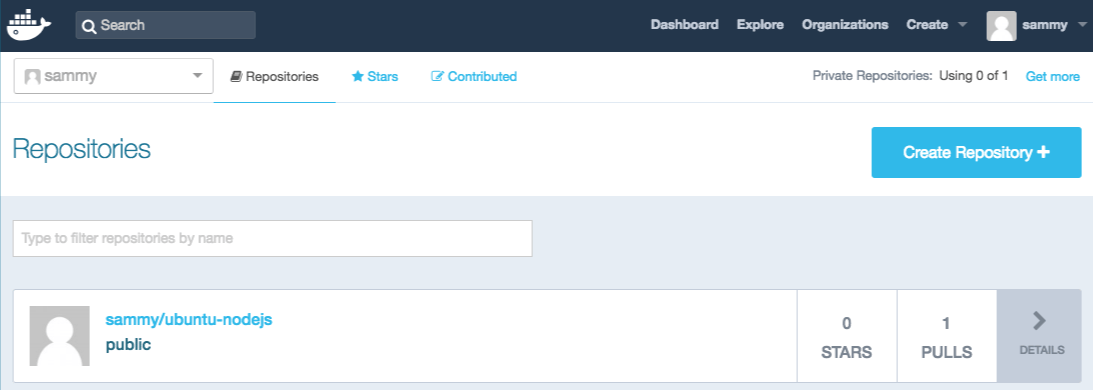
After pushing an image to a registry, it should be listed on your account’s dashboard, as shown in the image below.
If a push attempt results in an error of this sort, then you likely did not log in:
The push refers to a repository [docker.io/sammy/ubuntu-nodejs]
e3fbbfb44187: Preparing
5f70bf18a086: Preparing
a3b5c80a4eba: Preparing
7f18b442972b: Preparing
3ce512daaf78: Preparing
7aae4540b42d: Waiting
unauthorized: authentication required
Log in with docker login and repeat the push attempt. Then verify that it exists on your Docker Hub repository page.
You can now use docker pull sammy/ubuntu-nodejs to pull the image to a new machine and use it to run a new container.
Installing Docker with GPU Support
To install Docker with GPU support, you’ll need to follow a slightly different process than the standard Docker installation. This is because GPU support requires NVIDIA drivers installed on the host system and additional runtime configuration to enable Docker containers to access GPU resources. Here are the steps to help you install Docker with GPU support:
- Ensure your system has a compatible NVIDIA GPU.
- Install the NVIDIA driver for your GPU. You can find the installation instructions on the NVIDIA website.
- Install the
nvidia-container-toolkitpackage, which provides the necessary tools for Docker to interact with the NVIDIA GPU.
Installation Steps
- Add the NVIDIA Container Toolkit repository:
distribution=$(. /etc/os-release;echo $ID$VERSION_ID)
curl -fsSL https://nvidia.github.io/libnvidia-container/gpgkey | sudo gpg --dearmor -o /usr/share/keyrings/nvidia-container-toolkit-keyring.gpg
curl -s -L https://nvidia.github.io/libnvidia-container/stable/deb/nvidia-container-toolkit.list | sed 's#deb https://#deb [signed-by=/usr/share/keyrings/nvidia-container-toolkit-keyring.gpg] https://#g' | sudo tee /etc/apt/sources.list.d/nvidia-container-toolkit.list
- Update your package list and install the
nvidia-container-toolkitpackage:
sudo apt update && sudo apt install nvidia-container-toolkit
Configure the NVIDIA Container Toolkit runtime for Docker, then restart Docker:
sudo nvidia-ctk runtime configure --runtime=docker
sudo systemctl restart docker
- Verify that the NVIDIA runtime is available:
sudo docker info | grep Runtime
This should display output similar to:
 Runtimes: io.containerd.runc.v2 runc nvidia
 Default Runtime: runc
The presence of nvidia in the Runtimes list confirms GPU support is enabled.
Using GPU Support
To use GPU support with your Docker containers, you’ll need to specify the --gpus flag when running your container. For example:
docker run --gpus all nvidia/cuda:12.0.0-base-ubuntu22.04 nvidia-smi
If you see a “manifest unknown” error, choose a valid CUDA tag from the NVIDIA CUDA Images page and retry.
For more information on installing and using Docker with GPU support, refer to the following resources:
By following these steps and using the provided resources, you should be able to successfully install and use Docker with GPU support on your system.
Configuring Docker Security Best Practices
Docker Engine Security is crucial to ensure that your containers and the host system are protected from potential vulnerabilities. Here are some best practices to follow:
- Use the least privilege principle: Drop unnecessary Linux capabilities and avoid privileged containers (for example, prefer
--cap-drop=ALLand add back only what you need). - Run as a non-root user: Prefer images that define a non-root user, or set one explicitly with
--user. - Avoid exposing the Docker socket: Do not mount
/var/run/docker.sockinto containers unless you fully trust the workload. - Harden containers by default: Use options like
--read-only,--tmpfs /tmp, and--security-opt no-new-privilegeswhere compatible. - Keep Docker up to date: Regularly update Docker Engine and related plugins to pick up security fixes.
- Verify images and scan regularly: Prefer trusted sources, pin tags/digests for production, and scan images as part of CI/CD.
Using Docker Compose
Docker Compose lets you define and run multi-container applications with a single configuration file.
Install Docker Compose (Compose v2 plugin)
If you installed Docker from the official Docker repository in Step 1, you can install the Compose v2 plugin with apt:
sudo apt update
sudo apt install docker-compose-plugin
Verify the installation:
docker compose version
Create a minimal Compose file
Create a directory for a sample app and move into it:
mkdir compose-demo && cd compose-demo
Create a compose.yaml file:
services:
  web:
    image: nginx:alpine
    ports:
      - "8080:80"
Start the service in the background:
docker compose up -d
Confirm it is running:
docker compose ps
View logs:
docker compose logs --tail=50
Stop and remove the service:
docker compose down
Removing Docker Packages
Removing Docker packages may be necessary when upgrading Docker or cleaning up your system. Here are some steps to follow:
- List all installed Docker packages: Use the command
dpkg -l | grep dockerto list all installed Docker packages. - Remove the Docker package: Use the command
sudo apt remove docker-ceto remove the Docker package. - Remove Docker dependencies: Use the command
sudo apt autoremoveto remove any dependencies that are no longer needed. - Update your package list: Use the command
sudo apt updateto update your package list after removing Docker packages.
Images, containers, volumes, or custom configuration files on your host aren’t automatically removed. Warning: The following commands will permanently delete all Docker images, containers, volumes, and data. Use with caution:
sudo rm -rf /var/lib/docker
sudo rm -rf /var/lib/containerd
Remove source list and keyrings:
sudo rm /etc/apt/sources.list.d/docker.list
sudo rm /etc/apt/keyrings/docker.gpg
Common Errors and Debugging
Docker Daemon Not Starting
If the Docker daemon fails to start, it can be due to various reasons such as configuration issues, conflicts with other services, or system resource constraints. To troubleshoot this issue, you may observe error messages like:
Failed to start Docker Application Container Engine.
or
docker.service: Main process exited, code=exited, status=1/FAILURE
To resolve this issue:
- Check the Docker service status:
sudo systemctl status docker - Review the Docker logs for errors:
sudo journalctl -u docker - Ensure the Docker service is enabled to start on boot:
sudo systemctl enable docker - Restart the Docker service:
sudo systemctl restart docker
Permission Errors When Running Docker Commands
Permission errors occur when the user running Docker commands does not have sufficient privileges. To troubleshoot this issue, you may observe error messages like:
docker: Cannot connect to the Docker daemon. Is the docker daemon running on this host?.
See 'docker run --help'.
To resolve this issue:
- Ensure the user is part of the
dockergroup:sudo usermod -aG docker ${USER} - Log out and log back in to apply the group membership changes
- Alternatively, use
sudobefore running Docker commands:sudo docker <command>
By following these steps, you should be able to resolve common errors related to the Docker daemon not starting and permission errors when running Docker commands.
FAQs
How do I install Docker on Ubuntu?
To install Docker on Ubuntu (compatible with Ubuntu 20.04 and later versions), follow these steps:
- Update your package list:
sudo apt update - Install the necessary packages:
sudo apt install ca-certificates curl gnupg - Add the Docker GPG key:
sudo install -m 0755 -d /etc/apt/keyrings && curl -fsSL https://download.docker.com/linux/ubuntu/gpg | sudo gpg --dearmor -o /etc/apt/keyrings/docker.gpg && sudo chmod a+r /etc/apt/keyrings/docker.gpg - Add the Docker repository:
echo "deb [arch=$(dpkg --print-architecture) signed-by=/etc/apt/keyrings/docker.gpg] https://download.docker.com/linux/ubuntu $(lsb_release -cs) stable" | sudo tee /etc/apt/sources.list.d/docker.list > /dev/null - Update your package list again:
sudo apt update - Install Docker:
sudo apt install docker-ce
How do I verify that Docker is installed on Ubuntu?
To verify that Docker is installed on Ubuntu, run the following command: sudo systemctl status docker
This command will show you the status of the Docker service. If Docker is installed and running, you should see an output indicating that the service is active and running. Here’s an example of what you might see:
● docker.service - Docker Application Container Engine
     Loaded: loaded (/lib/systemd/system/docker.service; enabled; vendor preset: enabled)
     Active: active (running) since Fri 2025-04-08 21:30:25 UTC; 22s ago
TriggeredBy: ● docker.socket
       Docs: https://docs.docker.com
   Main PID: 7854 (dockerd)
      Tasks: 7
     Memory: 38.3M
        CPU: 340ms
     CGroup: /system.slice/docker.service
             └─7854 /usr/bin/dockerd -H fd:// --containerd=/run/containerd/containerd.sock
How do I run Docker without sudo?
To run Docker without using sudo, you need to add your user to the docker group. Here’s how:
- Add your user to the
dockergroup:sudo usermod -aG docker ${USER} - Log out and log back in to apply the changes
After adding your user to the docker group, you should be able to run Docker commands without using sudo.
How do I uninstall Docker from Ubuntu?
To uninstall Docker from Ubuntu, follow these steps:
- Stop the Docker service:
sudo systemctl stop docker - Remove Docker packages:
sudo apt purge docker-ce - Remove Docker dependencies:
sudo apt autoremove - Remove the Docker repository:
sudo rm /etc/apt/sources.list.d/docker.list
Conclusion
In this tutorial, you installed Docker, worked with images and containers, and pushed a modified image to Docker Hub. Now that you know the basics, explore the other Docker tutorials in the DigitalOcean Community. For more advanced Docker configurations, consider the following tutorials:
- Setting up a private Docker registry
- Running Nginx in a Docker container
- Using Ansible to install and set up Docker
- Installing a LAMP stack on Ubuntu
These tutorials will help you further expand your Docker knowledge and explore different use cases.
Thanks for learning with the DigitalOcean Community. Check out our offerings for compute, storage, networking, and managed databases.
Tutorial Series: Getting Started With Cloud Computing
This curriculum introduces open-source cloud computing to a general audience along with the skills necessary to deploy applications and websites securely to the cloud.
Browse Series: 39 tutorials
About the author(s)
Still looking for an answer?
This textbox defaults to using Markdown to format your answer.
You can type !ref in this text area to quickly search our full set of tutorials, documentation & marketplace offerings and insert the link!
Thank you so much
but I see some differences from the steps on https://docs.docker.com/engine/install/ubuntu/
can you explain why?
Appreciate your patience and support for us and thanks to the entire team who is helping thousands and lakhs of readers with the best articles/blogs on DEVOPS, AWS Architect and all such tools. Here in this current article there is a mistake observed without executing container how come root changes with the container id, pls observe and update. THe command docker exec itself didnt run here but you mentioned
Your command prompt should change to reflect the fact that you’re now working inside the container and should take this form:
Output root@d9b100f2f636:/#
Thanks for this great tutorial! So basically you can jump in and use an environment created by someone. How would you ensure that the environment you use is secured? For example for a PHP webapp using LAMP stack, you would depend on linux, apache, php and mysql. How would you know all these components installed are not compromised? In the old days, I used to compiled everything from source and that would take the whole day!
I am unable to start the docker when I use command sudo service docker start it outputs starting docker but when I use sudo service docker status it shows docker not running. I am using wls2 Ubuntu 22.04 lts.
or when I use sudo docker run hello-world I get output as docker: Cannot connect to the Docker daemon at unix:///var/run/docker.sock. Is the docker daemon running?. See 'docker run --help'. I have tried solutions at other forums but doesn’t work.
For those having problems getting the docker service to run:
¡Hi! At Step 6, help for Docker is docker run --help (double dash). Thanks for this tutorial, ¡very great! 👍🏽
I could not run the install part to the end, kept bumping into this error when running ‘sudo apt update’
W: GPG error: https://download.docker.com/linux/ubuntu jammy InRelease: The following signatures couldn’t be verified because the public key is not available: NO_PUBKEY 7EA0A9C3F273FCD8 E: The repository ‘https://download.docker.com/linux/ubuntu jammy InRelease’ is not signed.
I had to install Docker following the official instructions … any idea why this fails ?
I love this tutorial SO MUCH. AND i love Digital Ocean so much !!! The quality of tutorials is always the best. Thank you!!
if you use
sudo usermod -aG docker ${USER}
and want use docker from you default user, bit not loging to root, you need use this command:
sudo chmod 666 /var/run/docker.sock
Thank you for the article, very helpful. I used it to update docker on a machine where it was installed earlier from another source. However I think it misses the installation of docker-ce-cli because when I updated only docker-ce it left the Docker Client in the previous version.
 This work is licensed under a Creative Commons Attribution-NonCommercial- ShareAlike 4.0 International License.
Become a contributor for community
Get paid to write technical tutorials and select a tech-focused charity to receive a matching donation.

DigitalOcean Documentation
Full documentation for every DigitalOcean product.

Resources for startups and AI-native businesses
The Wave has everything you need to know about building a business, from raising funding to marketing your product.
The developer cloud
Scale up as you grow — whether you're running one virtual machine or ten thousand.

Start building today
From GPU-powered inference and Kubernetes to managed databases and storage, get everything you need to build, scale, and deploy intelligent applications.
