- Log in to:
- Community
- DigitalOcean
- Sign up for:
- Community
- DigitalOcean
By Andrew Andrade and Tammy Fox
Not using Ubuntu 16.04?
Choose a different version or distribution.
Introduction
IPython is an interactive command-line interface to Python. Jupyter Notebook offers an interactive web interface to many languages, including IPython.
This article will walk you through setting up a server to run Jupyter Notebook as well as teach you how to connect to and use the notebook. Jupyter notebooks (or simply notebooks) are documents produced by the Jupyter Notebook app which contain both computer code (e.g. Python) and rich text elements (paragraph, equations, figures, links, etc.) which aid in presenting reproducible research.
By the end of this guide, you will be able to run Python 2.7 code using Ipython and Jupyter Notebook running on a remote server. For the purposes of this tutorial, Python 2 (2.7.x) is used since many of the data science, scientific computing, and high-performance computing libraries support 2.7 and not 3.0+.
Prerequisites
To follow this tutorial, you will need the following:
- Ubuntu 16.04 Droplet
- Non-root user with sudo privileges (Initial Server Setup with Ubuntu 16.04 explains how to set this up.)
All the commands in this tutorial should be run as a non-root user. If root access is required for the command, it will be preceded by sudo. Initial Server Setup with Ubuntu 16.04 explains how to add users and give them sudo access.
Step 1 — Installing Python 2.7 and Pip
In this section we will install Python 2.7 and Pip.
First, update the system’s package index. This will ensure that old or outdated packages do not interfere with the installation.
- sudo apt-get update
Next, install Python 2.7, Python Pip, and Python Development:
- sudo apt-get -y install python2.7 python-pip python-dev
Installing python2.7 will update to the latest version of Python 2.7, and python-pip will install Pip which allows us to manage Python packages we would like to use. Some of Jupyter’s dependencies may require compilation, in which case you would need the ability to compile Python C-extensions, so we are installing python-dev as well.
To verify that you have python installed:
- python --version
This will output:
OutputPython 2.7.11+
Depending on the latest version of Python 2.7, the output might be different.
You can also check if pip is installed using the following command:
- pip --version
You should something similar to the following:
Outputpip 8.1.1 from /usr/lib/python2.7/dist-packages (python 2.7)
Similarly depending on your version of pip, the output might be slightly different.
Step 2 — Installing Ipython and Jupyter Notebook
In this section we will install Ipython and Jupyter Notebook.
First, install Ipython:
- sudo apt-get -y install ipython ipython-notebook
Now we can move on to installing Jupyter Notebook:
- sudo -H pip install jupyter
Depending on what version of pip is in the Ubuntu apt-get repository, you might get the following error when trying to install Jupyter:
OutputYou are using pip version 8.1.1, however version 8.1.2 is available.
You should consider upgrading via the 'pip install --upgrade pip' command.
If so, you can use pip to upgrade pip to the latest version:
- sudo -H pip install --upgrade pip
Upgrade pip, and then try installing Jupyter again:
- sudo -H pip install jupyter
Step 3 — Running Jupyter Notebook
You now have everything you need to run Jupyter Notebook! To run it, execute the following command:
- jupyter notebook
If you are running Jupyter on a system with JavaScript installed, it will still run, but it might give you an error stating that the Jupyter Notebook requires JavaScript:
OutputJupyter Notebook requires JavaScript.
Please enable it to proceed.
...
To ignore the error, you can press Q and then press Y to confirm.
A log of the activities of the Jupyter Notebook will be printed to the terminal. When you run Jupyter Notebook, it runs on a specific port number. The first notebook you are running will usually run on port 8888. To check the specific port number Jupyter Notebook is running on, refer to the output of the command used to start it:
Output[I NotebookApp] Serving notebooks from local directory: /home/sammy
[I NotebookApp] 0 active kernels
[I NotebookApp] The Jupyter Notebook is running at: http://localhost:8888/
[I NotebookApp] Use Control-C to stop this server and shut down all kernels (twice to skip confirmation).
If you are running Jupyter Notebook on a local Linux computer (not on a Droplet), you can simply navigate to localhost:8888 to connect to Jupyter Notebook. If you are running Jupyter Notebook on a Droplet, you will need to connect to the server using SSH tunneling as outlined in the next section.
At this point, you can keep the SSH connection open and keep Jupyter Notebook running or can exit the app and re-run it once you set up SSH tunneling. Let’s keep it simple and stop the Jupyter Notebook process. We will run it again once we have SSH tunneling working. To stop the Jupyter Notebook process, press CTRL+C, type Y, and hit ENTER to confirm. The following will be displayed:
Output[C 12:32:23.792 NotebookApp] Shutdown confirmed
[I 12:32:23.794 NotebookApp] Shutting down kernels
Step 4 — Connecting to the Server Using SSH Tunneling
In this section we will learn how to connect to the Jupyter Notebook web interface using SSH tunneling. Since Jupyter Notebook is running on a specific port on the Droplet (such as :8888, :8889 etc.), SSH tunneling enables you to connect to the Droplet’s port securely.
The next two subsections describe how to create an SSH tunnel from 1) a Mac or Linux and 2) Windows. Please refer to the subsection for your local computer.
SSH Tunneling with a Mac or Linux
If you are using a Mac or Linux, the steps for creating an SSH tunnel are similar to the How To Use SSH Keys with DigitalOcean Droplets using Linux or Mac guide except there are additional parameters added in the ssh command. This subsection will outline the additional parameters needed in the ssh command to tunnel successfully.
SSH tunneling can be done by running the following SSH command:
- ssh -L 8000:localhost:8888 your_server_username@your_server_ip
The ssh command opens an SSH connection, but -L specifies that the given port on the local (client) host is to be forwarded to the given host and port on the remote side (Droplet). This means that whatever is running on the second port number (i.e. 8888) on the Droplet will appear on the first port number (i.e. 8000) on your local computer. You should change 8888 to the port which Jupyter Notebook is running on. Optionally change port 8000 to one of your choosing (for example, if 8000 is used by another process). Use a port greater or equal to 8000 (ie 8001, 8002, etc.) to avoid using a port already in use by another process. server_username is your username (i.e. sammy) on the Droplet which you created and your_server_ip is the IP address of your Droplet. For example, for the username sammy and the server address 111.111.111.111, the command would be:
- ssh -L 8000:localhost:8888 sammy@111.111.111.111
If no error shows up after running the ssh -L command, you can run Jupyter Notebook:
- jupyter notebook
Now, from a web browser on your local machine, open the Jupyter Notebook web interface with http://localhost:8000 (or whatever port number you chose).
SSH Tunneling with Windows and Putty
If you are using Windows, you can also easily create an SSH tunnel using Putty as outlined in How To Use SSH Keys with PuTTY on DigitalOcean Droplets (Windows users).
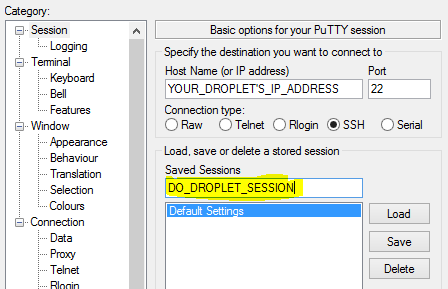
First, enter the server URL or IP address as the hostname as shown:
Next, click SSH on the bottom of the left pane to expand the menu, and then click Tunnels. Enter the local port number to use to access Jupyter on your local machine. Choose 8000 or greater (ie 8001, 8002, etc.) to avoid ports used by other services, and set the destination as localhost:8888 where :8888 is the number of the port that Jupyter Notebook is running on. Now click the Add button, and the ports should appear in the Forwarded ports list:
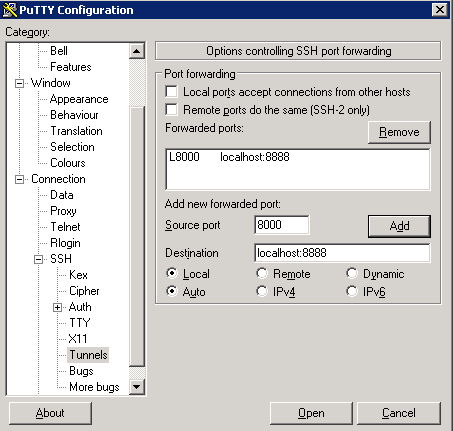
Finally, click the Open button to connect to the server via SSH and tunnel the desired ports. Navigate to http://localhost:8000 (or whatever port you chose) in a web browser to connect to Jupyter Notebook running on the server.
Step 5 — Using Jupyter Notebook
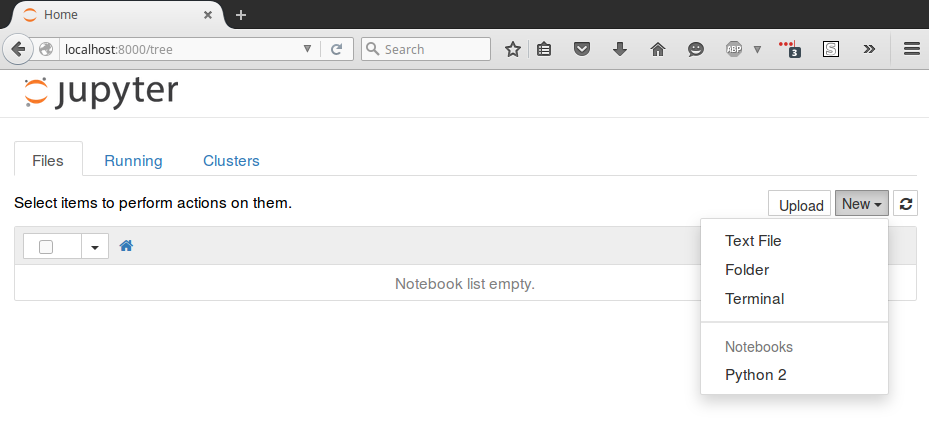
This section goes over the basics of using Jupyter Notebook. By this point you should have Jupyter Notebook running, and you should be connected to it using a web browser. Jupyter Notebook is very powerful and has many features. This section will outline a few of the basic features to get you started using the notebook. Automatically, Jupyter Notebook will show all of the files and folders in the directory it is run from.
To create a new notebook file, select New > Python 2 from the top right pull-down menu:
This will open a notebook. We can now run Python code in the cell or change the cell to markdown. For example, change the first cell to accept Markdown by clicking Cell > Cell Type > Markdown from the top navigation bar. We can now write notes using Markdown and even include equations written in LaTeX by putting them between the $$ symbols. For example, type the following into the cell after changing it to markdown:
# Simple Equation

Let us now implement the following equation:
$$ y = x^2$$

where $x = 2$
To turn the markdown into rich text, press CTRL+ENTER, and the following should be the results:
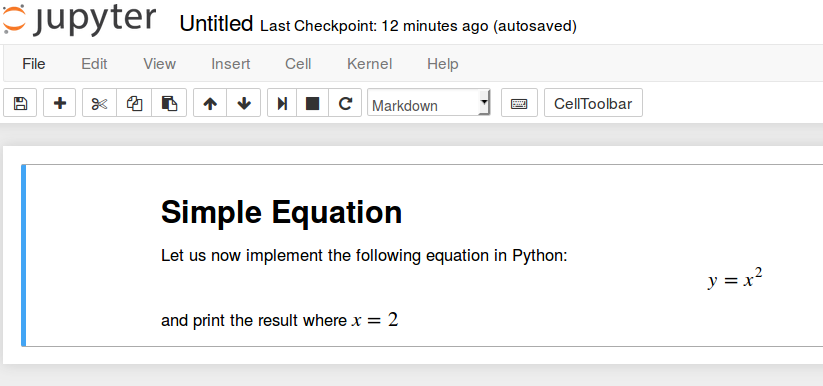
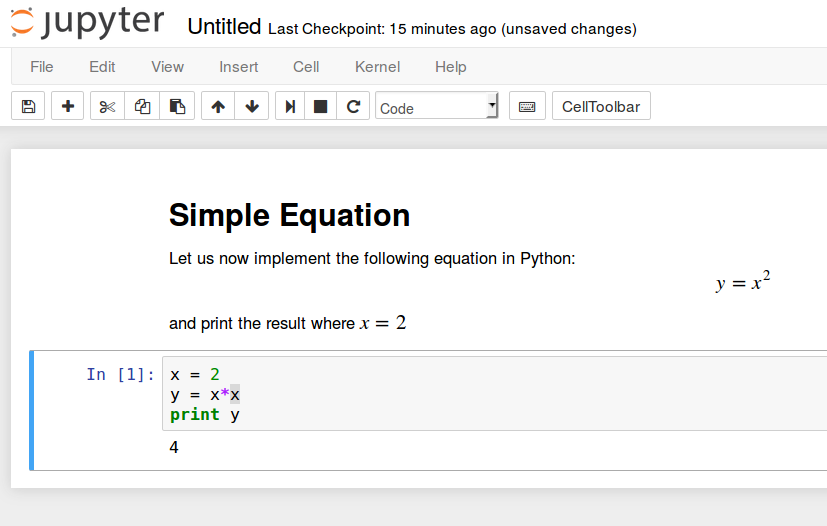
You can use the markdown cells to make notes and document your code. Let’s implement that simple equation and print the result. Select Insert > Insert Cell Below to insert and cell and enter the following code:
x = 2
y = x*x
print y
To run the code, press CTRL+ENTER. The following should be the results:
You now have the ability to include libraries and use the notebook as you would with any other Python development environment!
Conclusion
Congratulations! You should be now able to write reproducible Python code and notes using markdown using Jupyter notebook running on a Droplet. To get a quick tour of Jupyter notebook, select Help > User Interface Tour from the top navigation menu.
Thanks for learning with the DigitalOcean Community. Check out our offerings for compute, storage, networking, and managed databases.
About the author(s)
Just someone learning how to lead projects and solve problems with data. Founder of @PetroPredict. Past intern at @Facebook, @Suncor (@PetroCanada)
Technical Editor, DigitalOcean
Still looking for an answer?
This textbox defaults to using Markdown to format your answer.
You can type !ref in this text area to quickly search our full set of tutorials, documentation & marketplace offerings and insert the link!
Hi Andrew,
Thanks, it’s work. I’ve use conda package.
BTW is there any tips or tutorial how to access the jupyter notebook via domain or url ?
Andrew-
This works great. In my notebook I was reading some local csv files into a dataframe, but I’m having a little trouble figuring out how to configure the path when I’m running the notebook on my droplet but accessing it with a local browser. Do I need to include the http address or the port or something?
Thanks!
Hi,
I am unable to run the notebook. Terminal returns: No web browser found: could not locate runnable browser.
Executed all the instructions correctly, installed the needed packages as well as SSH tunnelling.
Please help!
Thanks Ed
Why does pip install ipython not work on ubuntu on do? Why does it need to be installed using apt-get instead of pip? Thanks.
On installing jupyter i got this error,
Command “/usr/bin/python -u -c “import setuptools, tokenize;file=‘/tmp/pip-build-1lNXre/scandir/setup.py’;f=getattr(tokenize, ‘open’, open)(file);code=f.read().replace(‘\r\n’, ‘\n’);f.close();exec(compile(code, file, ‘exec’))” install --record /tmp/pip-nMINfY-record/install-record.txt --single-version-externally-managed --compile” failed with error code 1 in /tmp/pip-build-1lNXre/scandir/
how to resolve it please tell me.
Hi,
Great tutorial so far! But i get an error.
I have done everything above, but when i try to create a SSH Tunnel, it returns with an error: “Permission denied (publickey).” I am pretty new to unix systems. I tried to create the tunnel first as my new user and afterwards as root user. Both get the same error.
I have followed all steps from this previous tutorial: https://www.digitalocean.com/community/tutorials/initial-server-setup-with-ubuntu-16-04
I have added public key authentication for my user also. I have no idea why it is not working.
This site can’t be reached 162.243.93.44 refused to connect.
On my local machine I type ** ssh -L 9000:162.243.93.44:8888 jschull@162.243.93.44 ** this connects happily to my remote machine: Last login: Wed May 3 04:38:37 2017 from 50.49.135.135
so I type
jupyter notebook --no-browser
Jupyter says **jschull@enable-upy:~$ jupyter notebook --no-browser [I 04:43:28.093 NotebookApp] Writing notebook server cookie secret to /run/user/1000/jupyter/notebook_cookie_secret [I 04:43:28.453 NotebookApp] Serving notebooks from local directory: /home/jschull [I 04:43:28.453 NotebookApp] 0 active kernels [I 04:43:28.453 NotebookApp] The Jupyter Notebook is running at: http://localhost:8888/?token=f1c6936414f78b7f26a817e00b582d16628cd5b34bd48f50 [I 04:43:28.454 NotebookApp] Use Control-C to stop this server and shut down all kernels (twice to skip confirmation). [C 04:43:28.454 NotebookApp]
Copy/paste this URL into your browser when you connect for the first time,
to login with a token:
    http://localhost:8888/?token=f1c6936414f78b7f26a817e00b582d16628cd5b34bd48f50**
So using chrome on my Mac, I go to http://162.243.93.44:9000/?token=d90621ffad0444d91baca05097f5c3096189a68fe99f90ef
Sadly the browser says **This site can’t be reached
162.243.93.44 refused to connect. **
This makes me sad too ;-/
`Hi ! Thanks for the tutorial. :)
I have the same issue as jonschull…
I have followed the explanation step by step.
I entered:
jupyter notebook --no-browser
On the terminal, everything seems to be working and I receive the following message:
Copy/paste this URL into your browser when you connect for the first time,
   to login with a token:
       http://localhost:8890/?token=...
I copy-pasted the link in my browser to access Jupyter Notebook… but I receive the following
“Firefox ne peut établir de connexion avec le serveur à l’adresse localhost:8890” (cannot establish connection)
Could someone explain to me what I am doing wrong?
Thanks,
Vincent
- Table of contents
- Prerequisites
- Step 1 — Installing Python 2.7 and Pip
- Step 2 — Installing Ipython and Jupyter Notebook
- Step 3 — Running Jupyter Notebook
- Step 4 — Connecting to the Server Using SSH Tunneling
- Step 5 — Using Jupyter Notebook
- Conclusion
Deploy on DigitalOcean
Click below to sign up for DigitalOcean's virtual machines, Databases, and AIML products.
Become a contributor for community
Get paid to write technical tutorials and select a tech-focused charity to receive a matching donation.
DigitalOcean Documentation
Full documentation for every DigitalOcean product.
Resources for startups and SMBs
The Wave has everything you need to know about building a business, from raising funding to marketing your product.
Get our newsletter
Stay up to date by signing up for DigitalOcean’s Infrastructure as a Newsletter.
New accounts only. By submitting your email you agree to our Privacy Policy
The developer cloud
Scale up as you grow — whether you're running one virtual machine or ten thousand.
Get started for free
Sign up and get $200 in credit for your first 60 days with DigitalOcean.*
*This promotional offer applies to new accounts only.
