Tutorial
How To Set Up Jupyter Notebook with Python 3 on Ubuntu 20.04

Not using Ubuntu 20.04?Choose a different version or distribution.
Introduction
Jupyter Notebook is an open-source web application that lets you create and share interactive code, visualizations, and more. This tool can be used with several programming languages, including Python, Julia, R, Haskell, and Ruby. It is often used for working with data, statistical modeling, and machine learning.
Jupyter Notebooks (or just “Notebooks”) are documents produced by the Jupyter Notebook app which contain both computer code and rich text elements (paragraph, equations, figures, links, etc.) which aid in presenting and sharing reproducible research. They can therefore be an excellent tool to use for data-driven or programming-based presentations, or as a teaching tool.
This tutorial will walk you through setting up Jupyter Notebook to run from an Ubuntu 20.04 server, as well as demonstrate how to connect to and use the notebook from a local machine via tunnelling. By the end of this guide, you will be able to run Python 3 code using Jupyter Notebook running on a remote server.
Prerequisites
In order to complete this guide, you should have a fresh Ubuntu 20.04 server instance with a basic firewall and a non-root user with sudo privileges configured. You can learn how to set this up by running through our initial server setup tutorial.
Step 1 — Set Up Python
To begin the process, we’ll install the dependencies we need for our Python programming environment from the Ubuntu repositories. Ubuntu 20.04 comes preinstalled with Python 3. We will use the Python package manager pip to install additional components a bit later.
We first need to update the local apt package index and then download and install the packages:
Next, install pip and the Python header files, which are used by some of Jupyter’s dependencies:
We can now move on to setting up a Python virtual environment into which we’ll install Jupyter.
Step 2 — Create a Python Virtual Environment for Jupyter
Now that we have Python 3, its header files, and pip ready to go, we can create a Python virtual environment to manage our projects. We will install Jupyter into this virtual environment.
To do this, we first need access to the virtualenv command which we can install with pip.
Upgrade pip and install the package by typing:
The -H flag ensures that the security policy sets the home environment variable to the home directory of the target user.
With virtualenv installed, we can start forming our environment. Create and move into a directory where we can keep our project files. We’ll call this my_project_dir, but you should use a name that is meaningful for you and what you’re working on.
Within the project directory, we’ll create a Python virtual environment. For the purpose of this tutorial, we’ll call it my_project_env but you should call it something that is relevant to your project.
This will create a directory called my_project_env within your my_project_dir directory. Inside, it will install a local version of Python and a local version of pip. We can use this to install and configure an isolated Python environment for Jupyter.
Before we install Jupyter, we need to activate the virtual environment. You can do that by typing:
Your prompt should change to indicate that you are now operating within a Python virtual environment. Your command prompt will now read something like this: (my_project_env)user@host:~/my_project_dir$.
At this point, you’re ready to install Jupyter into this virtual environment.
Step 3 — Install Jupyter
With your virtual environment active, install Jupyter with the local instance of pip.
Note: When the virtual environment is activated (when your prompt has (my_project_env) preceding it), use pip instead of pip3, even if you are using Python 3. The virtual environment’s copy of the tool is always named pip, regardless of the Python version.
At this point, you’ve successfully installed all the software needed to run Jupyter. We can now start the Notebook server.
Step 4 — Run Jupyter Notebook
You now have everything you need to run Jupyter Notebook! To run it, execute the following command:
A log of the activities of the Jupyter Notebook will be printed to the terminal. When you run Jupyter Notebook, it runs on a specific port number. The first Notebook you run will usually use port 8888. To check the specific port number Jupyter Notebook is running on, refer to the output of the command used to start it:
Output[I 21:23:21.198 NotebookApp] Writing notebook server cookie secret to /run/user/1001/jupyter/notebook_cookie_secret
[I 21:23:21.361 NotebookApp] Serving notebooks from local directory: /home/sammy/my_project_dir
[I 21:23:21.361 NotebookApp] The Jupyter Notebook is running at:
[I 21:23:21.361 NotebookApp] http://localhost:8888/?token=1fefa6ab49a498a3f37c959404f7baf16b9a2eda3eaa6d72
[I 21:23:21.361 NotebookApp] Use Control-C to stop this server and shut down all kernels (twice to skip confirmation).
[W 21:23:21.361 NotebookApp] No web browser found: could not locate runnable browser.
[C 21:23:21.361 NotebookApp]

    Copy/paste this URL into your browser when you connect for the first time,
    to login with a token:
        http://localhost:8888/?token=1fefa6ab49a498a3f37c959404f7baf16b9a2eda3eaa6d72
If you are running Jupyter Notebook on a local computer (not on a server), you can navigate to the displayed URL to connect to Jupyter Notebook. If you are running Jupyter Notebook on a server, you will need to connect to the server using SSH tunneling as outlined in the next section.
At this point, you can keep the SSH connection open and keep Jupyter Notebook running or you can exit the app and re-run it once you set up SSH tunneling. Let’s choose to stop the Jupyter Notebook process. We will run it again once we have SSH tunneling set up. To stop the Jupyter Notebook process, press CTRL+C, type Y, and then ENTER to confirm. The following output will be displayed:
Output[C 21:28:28.512 NotebookApp] Shutdown confirmed
[I 21:28:28.512 NotebookApp] Shutting down 0 kernels
We’ll now set up an SSH tunnel so that we can access the Notebook.
Step 5 — Connect to the Server Using SSH Tunneling
In this section we will demonstrate how to connect to the Jupyter Notebook web interface using SSH tunneling. Since Jupyter Notebook will run on a specific port on the server (such as :8888, :8889 etc.), SSH tunneling enables you to connect to the server’s port securely.
The next two subsections describe how to create an SSH tunnel from 1) a Mac or Linux, or 2) Windows. Please refer to the subsection for your local computer.
SSH Tunneling with a Mac or Linux
If you are using a Mac or Linux local computer, the steps for creating an SSH tunnel are similar to using SSH to log in to your remote server, except that there are additional parameters in the ssh command. This subsection will outline the additional parameters needed in the ssh command to tunnel successfully.
SSH tunneling can be done by running the following SSH command in a new local terminal window:
The ssh command opens an SSH connection, but -L specifies that the given port on the local (client) host is to be forwarded to the given host and port on the remote side (server). This means that whatever is running on the second port number (e.g. 8888) on the server will appear on the first port number (e.g. 8888) on your local computer.
Optionally change port 8888 to one of your choosing to avoid using a port already in use by another process.
server_username is your username (e.g. sammy) on the server which you created and your_server_ip is the IP address of your server.
For example, for the username sammy and the server address 203.0.113.0, the command would be:
If no error shows up after running the ssh -L command, you can move into your programming environment and run Jupyter Notebook:
You’ll receive output with a URL. From a web browser on your local machine, open the Jupyter Notebook web interface with the URL that starts with http://localhost:8888. Ensure that the token number is included, or enter the token number string when prompted at http://localhost:8888.
SSH Tunneling with Windows and Putty
If you are using Windows, you can create an SSH tunnel using Putty.
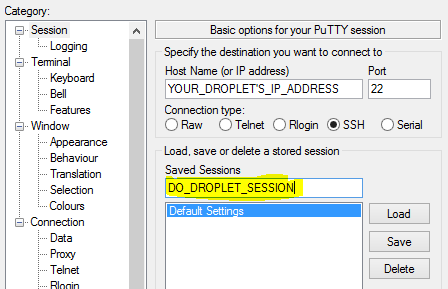
First, enter the server URL or IP address as the hostname as shown:

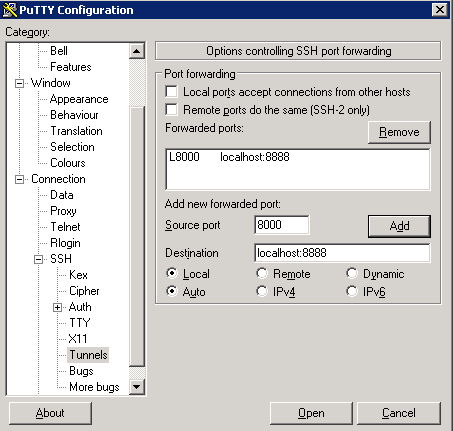
Next, click SSH on the bottom of the left pane to expand the menu, and then click Tunnels. Enter the local port number you want to use to access Jupyter on your local machine. Choose 8000 or greater to avoid ports used by other services, and set the destination as localhost:8888 where :8888 is the number of the port that Jupyter Notebook is running on.
Now click the Add button, and the ports should appear in the Forwarded ports list:

Finally, click the Open button to connect to the server via SSH and tunnel the desired ports. Navigate to http://localhost:8000 (or whatever port you chose) in a web browser to connect to Jupyter Notebook running on the server. Ensure that the token number is included, or enter the token number string when prompted at http://localhost:8000.
Step 6 — Using Jupyter Notebook
This section goes over the fundamentals of using Jupyter Notebook. If you don’t currently have Jupyter Notebook running, start it with the jupyter notebook command.
You should now be connected to it using a web browser. Jupyter Notebook is a very powerful tool with many features. This section will outline a few basic features to get you started using the Notebook. Jupyter Notebook will show all of the files and folders in the directory it is run from, so when you’re working on a project make sure to start it from the project directory.
To create a new Notebook file, select New > Python 3 from the top right pull-down menu:

This will open a Notebook. We can now run Python code in the cell or change the cell to markdown. For example, change the first cell to accept Markdown by clicking Cell > Cell Type > Markdown from the top navigation bar. We can now write notes using Markdown and even include equations written in LaTeX by putting them between the $$ symbols. For example, type the following into the cell after changing it to markdown:
# First Equation

Let us now implement the following equation:
$$ y = x^2$$

where $x = 2$
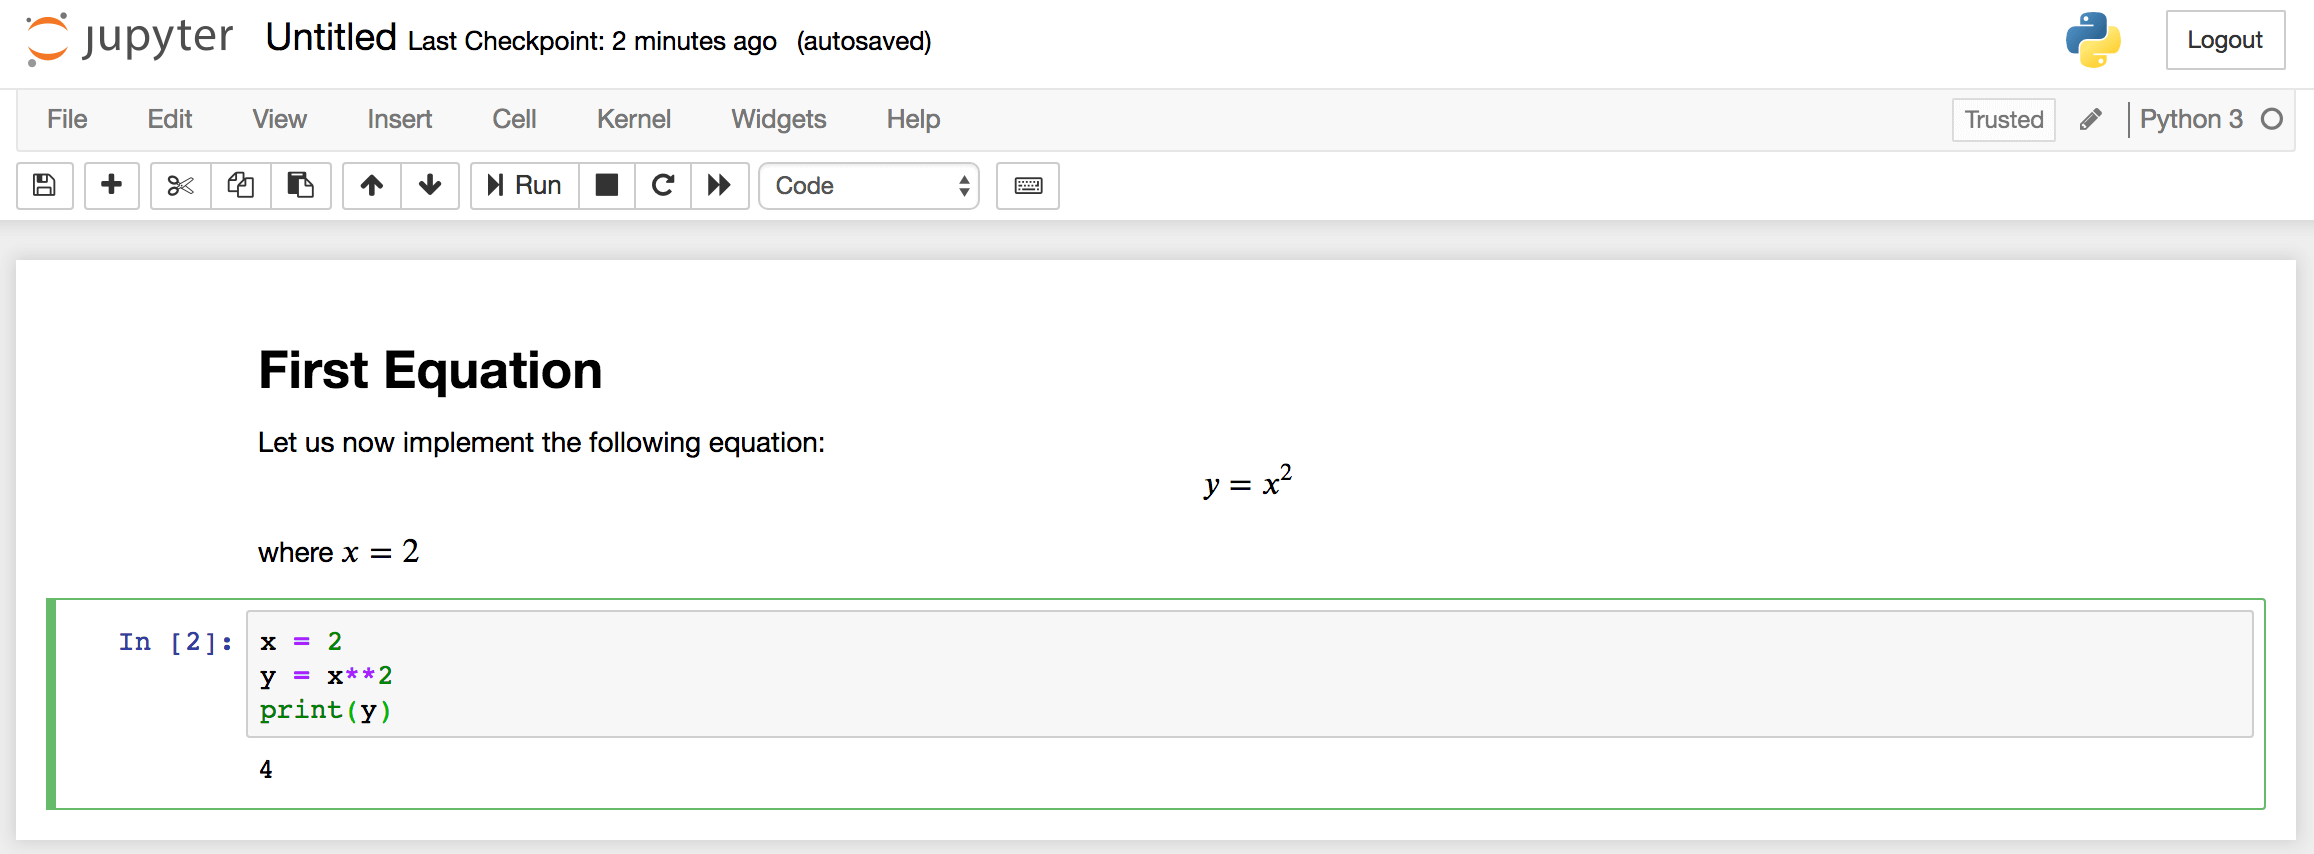
To turn the markdown into rich text, press the CTRL and ENTER keys. You should receive output similar to the following:

You can use the markdown cells to make notes and document your code. Let’s implement that equation and print the result. Click on the top cell, then press the ALT and ENTER keys together to add a cell below it. Enter the following code in the new cell.
To run the code, press CTRL+ENTER. You’ll receive the following results:

You now have the ability to import modules and use the Notebook as you would with any other Python development environment!
Conclusion
Congratulations! You should now be able to write reproducible Python code and notes in Markdown using Jupyter Notebook. To get a quick tour of Jupyter Notebook from within the interface, select Help > User Interface Tour from the top navigation menu to learn more.
From here, you can begin a data analysis and visualization project by reading Data Analysis and Visualization with pandas and Jupyter Notebook in Python 3.
Thanks for learning with the DigitalOcean Community. Check out our offerings for compute, storage, networking, and managed databases.
This textbox defaults to using Markdown to format your answer.
You can type !ref in this text area to quickly search our full set of tutorials, documentation & marketplace offerings and insert the link!
Excellent tutorial, got me up and running in a few minutes following the step by step procedure!
installed, thanks
Great tutorial, thanks for the guidance. I’m running into an issue now when trying to SSH into my droplet. I’m getting a Permission denied (publickey) message. I’ve already copied my SSH public key information to my DO account. Not sure where to go from here.
Hello Lisa,
thanks for the manual, works very well. Sorry for my maybe really noobish questions. I managed to install and run the notebook. But, just to get it right. When I close the terminal / browser. The next time I want to run the notebook, I have to:
there is no “download” programm and 1-click run it? Or what did I miss?