Tutorial
How To Set Up ProFTPD with a MySQL Backend on Ubuntu 12.10

Introduction
This article will guide you thorough setting up ProFTPD on Ubuntu with a MySQL backend for users and groups.
Warning: FTP is inherently insecure! Consider configuring ProFTPd to use SFTP, a secure alternative to FTP implemented under SSH.
PrerequisiteThis tutorial presumes you have already installed and configured MySQL and phpMyAdmin.
If you have not, you can follow How to Install and Secure phpMyAdmin on Ubuntu 12.04.
Install ProFTPD with MySQL support
sudo apt-get install proftpd-basic proftpd-mod-mysql
This will install all the required packages. If the installation asks, choose standalone mode.
Configure the database
Go to your phpMyAdmin installation and log in.
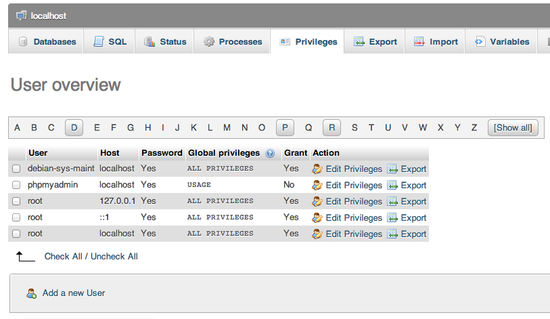
Select the "Privileges" tab and click "Add user".

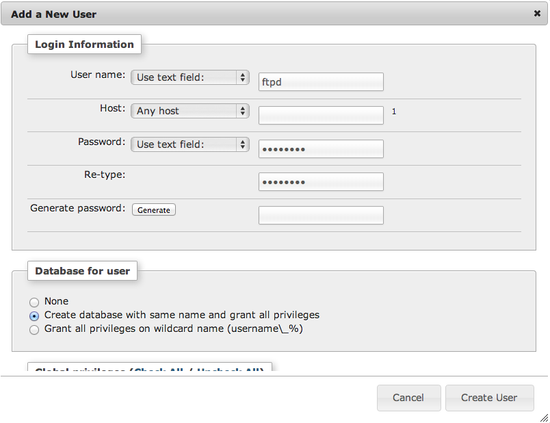
Now you will need to select the desired username, I suggest "ftpd" (without the quotes) and generate the password for the user. Store that information, we will need it later.
In the "Database for user" section, select "Create database with same name and grant all privileges".

This will create a user and a database that ProFTPD can use. Now we need to populate the database with some tables. On the left, you should now see a new database (that has the same name as the user, in our case "ftpd") - click on it.
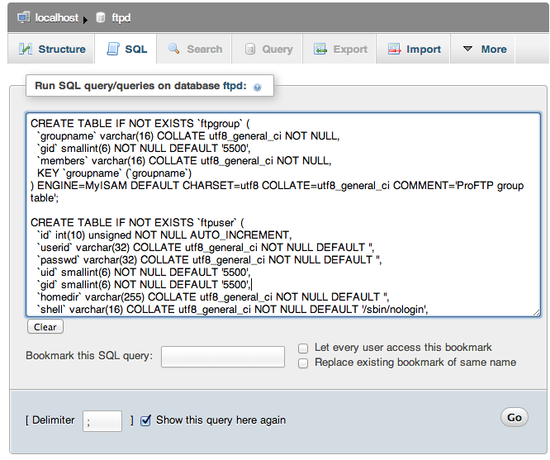
Now click the SQL tab, paste the following and click "Go":
CREATE TABLE IF NOT EXISTS `ftpgroup` (
  `groupname` varchar(16) COLLATE utf8_general_ci NOT NULL,
  `gid` smallint(6) NOT NULL DEFAULT '5500',
  `members` varchar(16) COLLATE utf8_general_ci NOT NULL,
  KEY `groupname` (`groupname`)
) ENGINE=MyISAM DEFAULT CHARSET=utf8 COLLATE=utf8_general_ci COMMENT='ProFTP group table';

CREATE TABLE IF NOT EXISTS `ftpuser` (
  `id` int(10) unsigned NOT NULL AUTO_INCREMENT,
  `userid` varchar(32) COLLATE utf8_general_ci NOT NULL DEFAULT '',
  `passwd` varchar(32) COLLATE utf8_general_ci NOT NULL DEFAULT '',
  `uid` smallint(6) NOT NULL DEFAULT '5500',
  `gid` smallint(6) NOT NULL DEFAULT '5500',
  `homedir` varchar(255) COLLATE utf8_general_ci NOT NULL DEFAULT '',
  `shell` varchar(16) COLLATE utf8_general_ci NOT NULL DEFAULT '/sbin/nologin',
  `count` int(11) NOT NULL DEFAULT '0',
  `accessed` datetime NOT NULL DEFAULT '0000-00-00 00:00:00',
  `modified` datetime NOT NULL DEFAULT '0000-00-00 00:00:00',
  PRIMARY KEY (`id`),
  UNIQUE KEY `userid` (`userid`)
) ENGINE=MyISAM  DEFAULT CHARSET=utf8 COLLATE=utf8_general_ci COMMENT='ProFTP user table';

This will create the tables we need.
Create Your User
Click on the "ftpuser" table in the left column and then on the "Insert" tab.
This allows you to insert a user. Populate the userid (which is the username a user will login to FTP) and homedir (the FTP user home - should be present on the system).
Password in the passwd field should be encrypted, to do so you can use this snippet (on your server shell) to generate the password string you can paste into the passwd field:
/bin/echo "{md5}"`/bin/echo -n "password" | openssl dgst -binary -md5 | openssl enc -base64`
Of course replace "password" with your/users desired password.
Here you can see some other field that are self explanatory and are usually used later (login count, last logged in...).
There, you have the correct database, now we just need to configure ProFTPD to use it.
Configure ProFTPD
First edit the ProFTPD configuration file:
sudo nano /etc/proftpd/proftpd.conf
Change the ServerName directive to your desired server name.
If you wish to jail your users to their home directories (so that they can only see their home directories) add:
DefaultRoot ~
To add the SQL configuration and turn off shell validation add on the bottom of the configuration:
Include /etc/proftpd/sql.conf

RequireValidShell         off
Now edit the sql configuration file:
sudo nano /etc/proftpd/sql.conf
So it'll look like this (I suggest you delete everything that is in the file now):
SQLBackend        mysql

#Passwords in MySQL are encrypted using CRYPT
SQLAuthTypes            OpenSSL Crypt
SQLAuthenticate         users groups


# used to connect to the database
# databasename@host database_user user_password
SQLConnectInfo  mysql_database@localhost mysql_user mysql_password


# Here we tell ProFTPd the names of the database columns in the "usertable"
# we want it to interact with. Match the names with those in the db
SQLUserInfo     ftpuser userid passwd uid gid homedir shell

# Here we tell ProFTPd the names of the database columns in the "grouptable"
# we want it to interact with. Again the names match with those in the db
SQLGroupInfo    ftpgroup groupname gid members

# set min UID and GID - otherwise these are 999 each
SQLMinID        500

# Update count every time user logs in
SQLLog PASS updatecount
SQLNamedQuery updatecount UPDATE "count=count+1, accessed=now() WHERE userid='%u'" ftpuser

# Update modified everytime user uploads or deletes a file
SQLLog  STOR,DELE modified
SQLNamedQuery modified UPDATE "modified=now() WHERE userid='%u'" ftpuser

SqlLogFile /var/log/proftpd/sql.log
Of course you need to replace "mysql_database", "mysql_user" and "mysql_password" with the correct values you choose/generated earlier in the tutorial. If you followed the suggested naming conventions, the line should look something like this:
SQLConnectInfo ftpd@localhost ftpd password
To enable the MySQL modules in ProFTPD edit:
sudo nano /etc/proftpd/modules.conf
And uncomment (or simply add) the two lines:
LoadModule mod_sql.c
LoadModule mod_sql_mysql.c
Now we need to restart ProFTPD:
sudo service proftpd restart
Test it
Now you can use your favourite FTP client (such as FileZilla) to connect to the server with the sample user you added before.
Common issues
- The user cannot log in - Always check that you pasted the generated user password line correctly
- The user cannot write to the home directory - You should set the correct permissions on the home directory:
- The permissions have to be set to the uid and guid fields you populated when you added the user
- For example, using default values:
sudo chown 5500:5500 /path/to/home/directory/
Troubleshooting
You can view the log files of ProFTPD itself:
tail -f /var/log/proftpd/proftpd.log
And the SQL part of ProFTPD:
tail -f /var/log/proftpd/sql.log
Thanks for learning with the DigitalOcean Community. Check out our offerings for compute, storage, networking, and managed databases.
This textbox defaults to using Markdown to format your answer.
You can type !ref in this text area to quickly search our full set of tutorials, documentation & marketplace offerings and insert the link!
Thanks for this howto, very usefull !
But you miss an important element to change in proftpd.conf :
service proftpd restartnot working SHOWING ERRORHey guys, im trying to connect to the FTP server, but theres always the 530 error:
KD9999 ist my user
2016-10-28 16:10:07,803 mod_sql/4.3[2633]: >>> cmd_auth 2016-10-28 16:10:07,803 mod_sql/4.3[2633]: entering mysql cmd_escapestring 2016-10-28 16:10:07,803 mod_sql/4.3[2633]: entering mysql cmd_open 2016-10-28 16:10:07,803 mod_sql/4.3[2633]: connection ‘default’ count is now 2 2016-10-28 16:10:07,803 mod_sql/4.3[2633]: exiting mysql cmd_open 2016-10-28 16:10:07,804 mod_sql/4.3[2633]: entering mysql cmd_close 2016-10-28 16:10:07,804 mod_sql/4.3[2633]: connection ‘default’ count is now 1 2016-10-28 16:10:07,804 mod_sql/4.3[2633]: exiting mysql cmd_close 2016-10-28 16:10:07,804 mod_sql/4.3[2633]: exiting mysql cmd_escapestring 2016-10-28 16:10:07,804 mod_sql/4.3[2633]: cache hit for user ‘KD9999’ 2016-10-28 16:10:07,804 mod_sql/4.3[2633]: >>> cmd_check 2016-10-28 16:10:07,804 mod_sql/4.3[2633]: checking password using SQLAuthType ‘OpenSSL’ 2016-10-28 16:10:07,804 mod_sql/4.3[2633]: ‘OpenSSL’ SQLAuthType handler reports success 2016-10-28 16:10:07,805 mod_sql/4.3[2633]: cache hit for user ‘KD9999’ 2016-10-28 16:10:07,805 mod_sql/4.3[2633]: <<< cmd_check 2016-10-28 16:10:07,805 mod_sql/4.3[2633]: <<< cmd_auth 2016-10-28 16:10:07,805 mod_sql/4.3[2633]: >>> cmd_getpwnam 2016-10-28 16:10:07,805 mod_sql/4.3[2633]: cache hit for user ‘KD9999’ 2016-10-28 16:10:07,805 mod_sql/4.3[2633]: <<< cmd_getpwnam 2016-10-28 16:10:07,805 mod_sql/4.3[2633]: >>> cmd_getpwnam 2016-10-28 16:10:07,806 mod_sql/4.3[2633]: cache hit for user ‘KD9999’ 2016-10-28 16:10:07,806 mod_sql/4.3[2633]: <<< cmd_getpwnam 2016-10-28 16:10:07,806 mod_sql/4.3[2633]: entering mysql cmd_exit 2016-10-28 16:10:07,806 mod_sql/4.3[2633]: entering mysql cmd_close 2016-10-28 16:10:07,807 mod_sql/4.3[2633]: connection ‘default’ closed 2016-10-28 16:10:07,807 mod_sql/4.3[2633]: connection ‘default’ count is now 0 2016-10-28 16:10:07,807 mod_sql/4.3[2633]: exiting mysql cmd_close 2016-10-28 16:10:07,807 mod_sql/4.3[2633]: exiting mysql cmd_exit
2016-10-28 16:11:52,668 server proftpd[2634] xxx.servers.xxx.net (aftr-95-222-30-14.unity-media.net[IP]): FTP session opened. 2016-10-28 16:11:55,028 server proftpd[2634] xxx.servers.xxx.net (aftr-95-222-30-14.unity-media.net[IP]): USER KD9999 (Login failed): No such user found 2016-10-28 16:11:55,076 server proftpd[2634] xxx.servers.xxx.net (aftr-95-222-30-14.unity-media.net[IP]): FTP session closed.
Do you know why it fails ?
probably shouldn’t use MD5, though? sha1 hash instead. /bin/echo “{sha1}”
/bin/echo -n "password" | openssl dgst -binary -sha1 | openssl enc -base64Also, don’t forget to add a logrotate entry for the sql.log file (or disable the log when you’re sure about your setup) :
/etc/logrotate.d/proftp-basic
Add the third line.
If you cannot connect after following the guide, you might need to change proftpd.conf, there is a line missing in the /etc/proftpd/proftpd.conf that you need to change for the mysql auth to work :
Include /etc/proftpd/sql.conf (remove the #)
The line is commented in the default conf.
Hmm… I am having trouble with this. I am running ubuntu 14.04. I installed everything as you said, but the user I created in MySQL cannot seem to login via FileZilla.
This is the output of the connection status (where mydomain is my actual domain instead):
I am able to login to MySQL using the ftpd user fine.
Also, I seem to be able to login over sftp using my root SSH account, which I thought was disabled in one of the config files along the way. I’ve tried restarting SSH, proFTP, and Apache but nothing helps!
@joseantonioreyna: Yes, they have to be numeric. You can find a user’s uid or a group’s gid by running <pre>id USERNAME_OR_GROUP</pre>
Can this be used without having the password encrypted?
do the uid and gid need to be numeric? how can i set for example the uid root and gid root there?