By Amit Jotwani and Anish Singh Walia

Introduction
As a developer working with Large Language Models (LLMs), I’ve been playing around with Model Context Protocol (MCP) Servers for the last few weeks. Despite the buzz, I initially found it challenging to grasp the concept, build a server, or understand how it could enhance my workflow. This experience is likely familiar to many developers who struggle to integrate LLMs with external tools and data sources, hindering their ability to perform tasks beyond text generation.
After investing hours in reading documentation, watching videos, and engaging in trial and error, I successfully created a handful of custom servers. These servers now enable tasks such as querying databases, sending emails and SMS, and even deploying applications to DigitalOcean - all seamlessly integrated within Cursor and Claude Desktop. This integration solves the problem of LLMs being limited to text generation by providing a standardized way to connect them with external tools and data sources, ultimately making them more capable and useful.
Note: For a broader overview, see DigitalOcean’s MCP 101: An Introduction to Model Context Protocol guide.*

What You’ll Learn
- Why MCP matters.
- How to spin up a Python MCP server.
- How to plug it into Cursor and Claude Desktop.
- How to write a simple SQLite query tool.
- How to test everything end-to-end.
Prerequisites
Before we jump in, make sure you have:
- Python 3.7+ installed on your system.
- SQLite (with a
community.dbfile). - Cursor Pro and Claude Desktop.
- A terminal (macOS/Linux) or PowerShell/CMD (Windows).
What Is MCP and Why Do We Need It?
Large Language Models (LLMs) like GPT or Claude are amazing at generating text, but at their core, they’re just predicting the next token in a sequence. On their own, they can’t fetch your files, query a database, or trigger real-world actions on their own. They need a bridge to the outside world.
The Model Context Protocol (MCP) is an open protocol that standardizes how applications provide context to LLMs. Think of it like a USB-C port for AI applications: just as USB-C offers a universal way to connect your devices to a range of peripherals, MCP offers a standardized connection for LLMs to tap into data sources and external tools. In short, MCP gives your LLMs the ability to not just chat, but also actually do things, and interact with the world outside.
How the Pieces Fit
Imagine you’re chatting with an LLM inside an application like Cursor or Claude Desktop - that application is your host. It’s the interface you see and interact with.
Under the hood, each host includes an MCP client, a piece of software that speaks the MCP protocol and knows how to forward requests to MCP servers.
Note: In many cases “host” and “client” blur together because the host already bundles the client. But you can also write your own MCP client - see the MCP Quickstart for Client Developers.
But here’s where it gets interesting - while the LLM (whether it’s Claude, GPT, or another model) is great at generating text, it can’t on its own query a SQLite database, send an email, or call an SMS API. That’s where the MCP server comes in.
Here’s how it works step by step:
-
You send a request to the LLM in your host application (e.g., “List the top chatters.”).
-
The LLM (client) processes your text and checks whether an MCP tool is available for that request.
-
If a relevant tool is configured, the MCP client forwards the request over the MCP protocol to an MCP server.
-
The MCP server performs the requested task:
- It may query a local data source, like your SQLite database.
- Or it may call remote services, such as an email or SMS API.
-
The server returns the results to the MCP client, which hands them back to the LLM.
-
The LLM then formats those results and presents them to you in the host application.
In short, the host provides the user interface, the client routes requests, and the server does the heavy lifting—bridging your AI’s language capabilities to real‑world data and actions.
Below is a simplified diagram that shows how these components interact:

Everything in the diagram is running on your computer. Your host app (Cursor or Claude Desktop) simply points to the MCP Server you’re running locally. That server can talk to your SQLite database or call out to email/SMS APIs.
Note: MCP also supports a Remote mode using Server‑Sent Events (SSE). You could host your server anywhere and connect to it over the internet. For this tutorial, we’ll run our MCP Server locally and hook it up to Cursor and Claude Desktop.
Building Your First MCP Server
Let’s create a local MCP Server in Python that queries a SQLite database for the top chatters in a community. You’ll chat with your LLM in Cursor or Claude Desktop, and the server will handle the database work.
Step 1 - Set Up Your Environment
- Create a Virtual Environment:
python -m venv mcp-env
source mcp-env/bin/activate  # For Windows: mcp-env\Scripts\activate
- Install the MCP Python SDK:
pip install mcp
Step 2 - Grab the Sample Database
Download community.db (it has a chatters table with sample data).
Step 3: Write Your MCP Server
Create a file named sqlite-server.py and insert the following code:
# sqlite-server.py
from mcp.server.fastmcp import FastMCP
import sqlite3

# Initialize the MCP server with a friendly name
mcp = FastMCP("Community Chatters")

# Define a tool to fetch the top chatters from the SQLite database
@mcp.tool()
def get_top_chatters():
    """Retrieve the top chatters sorted by number of messages."""
    # Connect to the SQLite database
    conn = sqlite3.connect('community.db')
    cursor = conn.cursor()

    # Execute the query to fetch chatters sorted by messages
    cursor.execute("SELECT name, messages FROM chatters ORDER BY messages DESC")
    results = cursor.fetchall()
    conn.close()

    # Format the results as a list of dictionaries
    chatters = [{"name": name, "messages": messages} for name, messages in results]
    return chatters

# Run the MCP server locally
if __name__ == '__main__':
    mcp.run()
This simple server defines one tool, get_top_chatters, which connects to your SQLite database, retrieves the sorted data, and returns it in an easy-to-read format.
Adding Your MCP Server to Cursor
Once your MCP Server is set up, the next step is to add it to your Cursor client. Here’s how:
-
Open Cursor → Settings → MCP (requires Cursor Pro).
-
Click “Add a New Global MCP Server” to open This action will open the MCP server configuration file located at
~/.cursor/mcp.json.
-
Update the file with the details for your server. This configuration tells Cursor to run your local MCP Server whenever it needs to fetch information about chatters.
{
  "mcpServers": {
    "sqlite-server": {
      "command": "/path/to/your/project/venv/bin/python",
      "args": [
        "/path/to/your/project/sqlite-server.py"
      ],
      "description": "A simple MCP server to query top chatters from a community database"
    }
  }
}

- Save and return to MCP Settings.
- Verify that your server and its tool are listed. You should see a green dot next to the server.

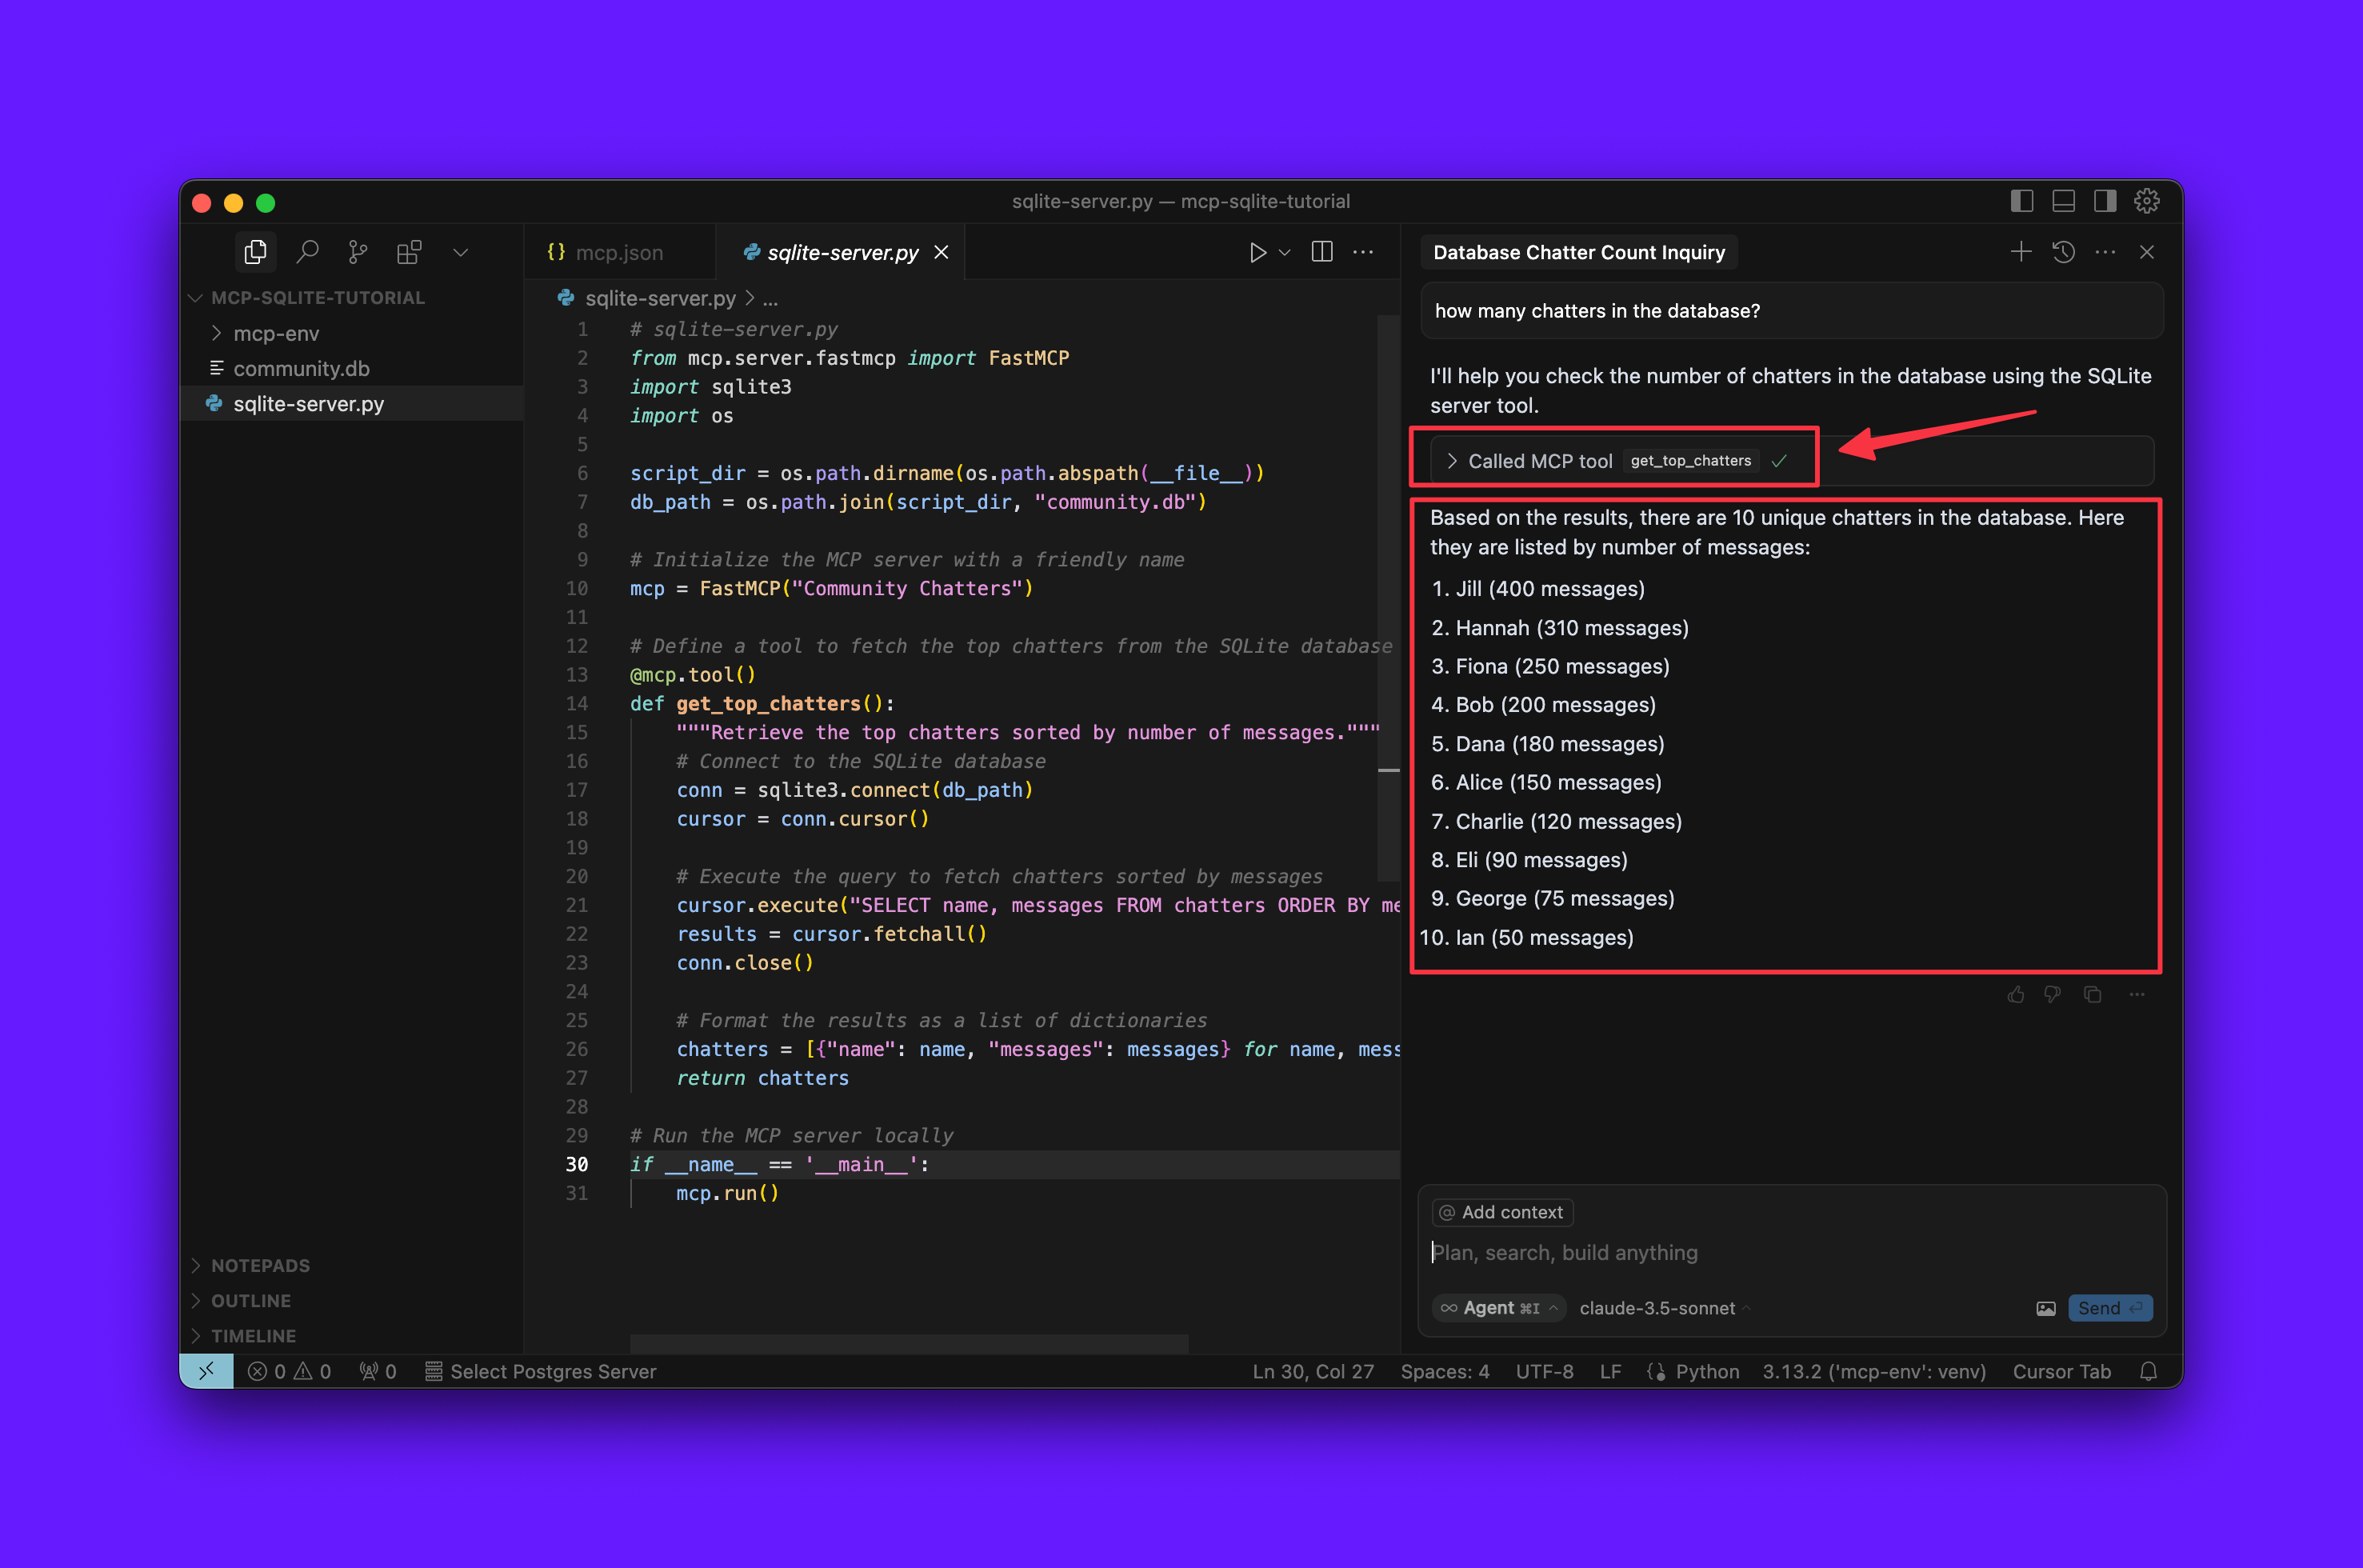
Testing Your MCP Server in Cursor
With your server added to Cursor, it’s time to test it out:
-
Open a chat in Cursor, and ask a question, such as: “How many chatters are in the database?”

-
The LLM will detect that it needs to perform a task it can’t handle on its own.
-
A prompt will appear asking for your permission to run the tool. Approve the request.
-
The MCP Server will query the SQLite database, retrieve the data, and send it back. The AI will then present the information in the chat.
If everything is set up correctly, you should see the number of chatters displayed along with the names and message counts, confirming that the tool is working as expected.
Adding Your MCP Server to Claude Desktop
You can also integrate your MCP Server with Claude Desktop. Here’s how:
- Open Claude Desktop → Settings → Developer → Edit Config.
- Add the same server block to
claude_desktop_config.json - Save, close, and reopen Claude Desktop. This refresh ensures the new configuration is picked up.
{
  "servers": [
    {
      "name": "Community Chatters Server",
      "command": "python",
      "args": ["server.py"],
      "description": "A simple MCP server to query top chatters from a community database"
    }
  ]
}
-
Verify in Claude Desktop’s settings that the MCP Server is listed, and check that you see a tool icon in the chat window indicating external tools are connected. Clicking this icon should reveal more details.

Testing Your MCP Server in Claude Desktop
Now that your server is added to Claude Desktop, let’s test it:
-
Open a chat in Claude Desktop, and ask a question like, “Show me the list of top chatters.” Claude Desktop will recognize that the query requires an external tool.

-
A prompt will appear asking for your permission to run the MCP tool. Approve the prompt.
-
Review the output: The MCP Server will process the request, query the SQLite database, and return the data, which Claude Desktop will then display.

This shows that your MCP Server is accessible from two different host applications - Cursor and Claude Desktop, allowing both GPT and Claude to leverage external data for their responses.
FAQs
What is the purpose of the MCP Server in this tutorial?
The MCP Server is designed to query the SQLite database and provide the number of chatters, their names, and message counts to the client application, such as Cursor or Claude Desktop. This allows the client application to display the top chatters in the community, enhancing the user experience and providing valuable insights. For more information on the capabilities of the MCP Server, refer to the MCP Server Documentation.
How do I integrate my MCP Server with Claude Desktop?
To integrate your MCP Server with Claude Desktop, you need to add the server block to claude_desktop_config.json, save, close, and reopen Claude Desktop. This ensures the new configuration is picked up. For a step-by-step guide on integrating your MCP Server with Claude Desktop, refer to the Claude Desktop Integration Guide.
What is the significance of the MCP ecosystem?
The MCP ecosystem bridges the gap between Large Language Models (LLMs) and external data sources, enabling the integration of external data into AI responses. This integration allows for more accurate and informative responses from AI models, making them more effective in various applications. For a deeper understanding of the MCP ecosystem and its significance, refer to the MCP Ecosystem Overview.
Can I use this tutorial as a starting point for more advanced MCP applications?
Yes, this tutorial provides a foundation for building more advanced MCP applications, such as sending emails and SMS notifications, deploying MCP servers to cloud platforms, and more. The skills and knowledge gained from this tutorial can be applied to a wide range of MCP applications, making it an excellent starting point for further exploration. For inspiration and guidance on building advanced MCP applications, refer to the MCP Application Examples.
Conclusion
In this comprehensive tutorial, we learned about MCP, a standardized interface that bridges the gap between Large Language Models (LLMs) and external data sources. We also learned about the significance of MCP, its ecosystem, and the process of building a basic MCP Server using Python and SQLite.
Through this tutorial, you’ve gained hands-on experience in setting up a virtual environment, utilizing a pre-existing database, crafting a minimal MCP server, and integrating it with a client application like Cursor. This accomplishment marks the beginning of your MCP development journey.
As we look ahead, the possibilities are endless. You can build advanced MCP applications, such as sending emails and SMS notifications, deploying MCP servers to cloud platforms like DigitalOcean, and more. The MCP ecosystem is vast, and the opportunities for innovation are limitless.
We hope this tutorial has inspired you to continue learning about MCP and its applications. Happy coding!
Thanks for learning with the DigitalOcean Community. Check out our offerings for compute, storage, networking, and managed databases.
About the author(s)
Amit is a Developer Advocate at DigitalOcean 🐳, where he helps developers build and ship better apps on the cloud. Compulsive Seinfeld quoter. LEGO nerd. 🧱 AMA.
I help Businesses scale with AI x SEO x (authentic) Content that revives traffic and keeps leads flowing | 3,000,000+ Average monthly readers on Medium | Sr Technical Writer(Team Lead) @ DigitalOcean | Ex-Cloud Consultant @ AMEX | Ex-Site Reliability Engineer(DevOps)@Nutanix
Still looking for an answer?
This textbox defaults to using Markdown to format your answer.
You can type !ref in this text area to quickly search our full set of tutorials, documentation & marketplace offerings and insert the link!
The code didn’t work for me until I changed the file path to: db_path = os.path.join(os.path.dirname(file), ‘community.db’)
Also after every change you have to go into the cursor settings and refresh the MCP server by clicking the circular arrow next to the pencil on the right. Otherwise it doesn’t update any changes made to sqlite-server.py.
 This work is licensed under a Creative Commons Attribution-NonCommercial- ShareAlike 4.0 International License.
Become a contributor for community
Get paid to write technical tutorials and select a tech-focused charity to receive a matching donation.

DigitalOcean Documentation
Full documentation for every DigitalOcean product.

Resources for startups and AI-native businesses
The Wave has everything you need to know about building a business, from raising funding to marketing your product.
The developer cloud
Scale up as you grow — whether you're running one virtual machine or ten thousand.

Get started for free
Sign up and get $200 in credit for your first 60 days with DigitalOcean.*

*This promotional offer applies to new accounts only.