Sr Technical Content Strategist and Team Lead

Introduction
JAMstack (JavaScript, APIs, and Markup) is a modern architecture for building fast and scalable web applications. It offers numerous benefits, including improved performance, enhanced security, and simplified maintenance.
This architecture is best suited for developers and organizations seeking to create dynamic, data-driven applications with a focus on user experience. Some common use cases for JAMstack include e-commerce platforms, blogs, and single-page applications.
In this tutorial, you’ll learn how to deploy a full-stack JAMstack application using:
- Netlify for hosting the app.
- DigitalOcean Managed MongoDB for the database.
- DigitalOcean Netlify Extension to manage database connections seamlessly.
By the end of this guide, you’ll have a working JAMstack app deployed on Netlify with a connected MongoDB database on DigitalOcean and by using the Netlify Extensions.
Prerequisites
Before you begin, ensure you have:
- A DigitalOcean cloud account to deploy Managed MongoDB database.
- A Netlify account.
- Node.js and npm installed locally.
- Git installed locally.
- A basic understanding of JavaScript and React.
Step 1 - Set Up DigitalOcean Managed MongoDB
First, you will create a Managed MongoDB cluster deployed on DigitalOcean. You can easily create production-ready MongoDB databases on DigitalOcean. For a step-by-step guide, watch this video:
 Steps to create a Managed MongoDB cluster on DigitalOcean
You can also refer to this tutorial on How to Manage Data with MongoDB.
The steps are simple:
- Log in to your DigitalOcean account.
- Navigate to Databases → Create Database Cluster.
- Select MongoDB as the database engine.
- Once created, copy the connection string by going to Overview → Connection Details(with credentials included) and store it to a notepad file locally(You will need it later in the tutorial while adding DigitalOcean as a Netlify extension).
Step 2 - Enable Netlify Extension for DigitalOcean MongoDB
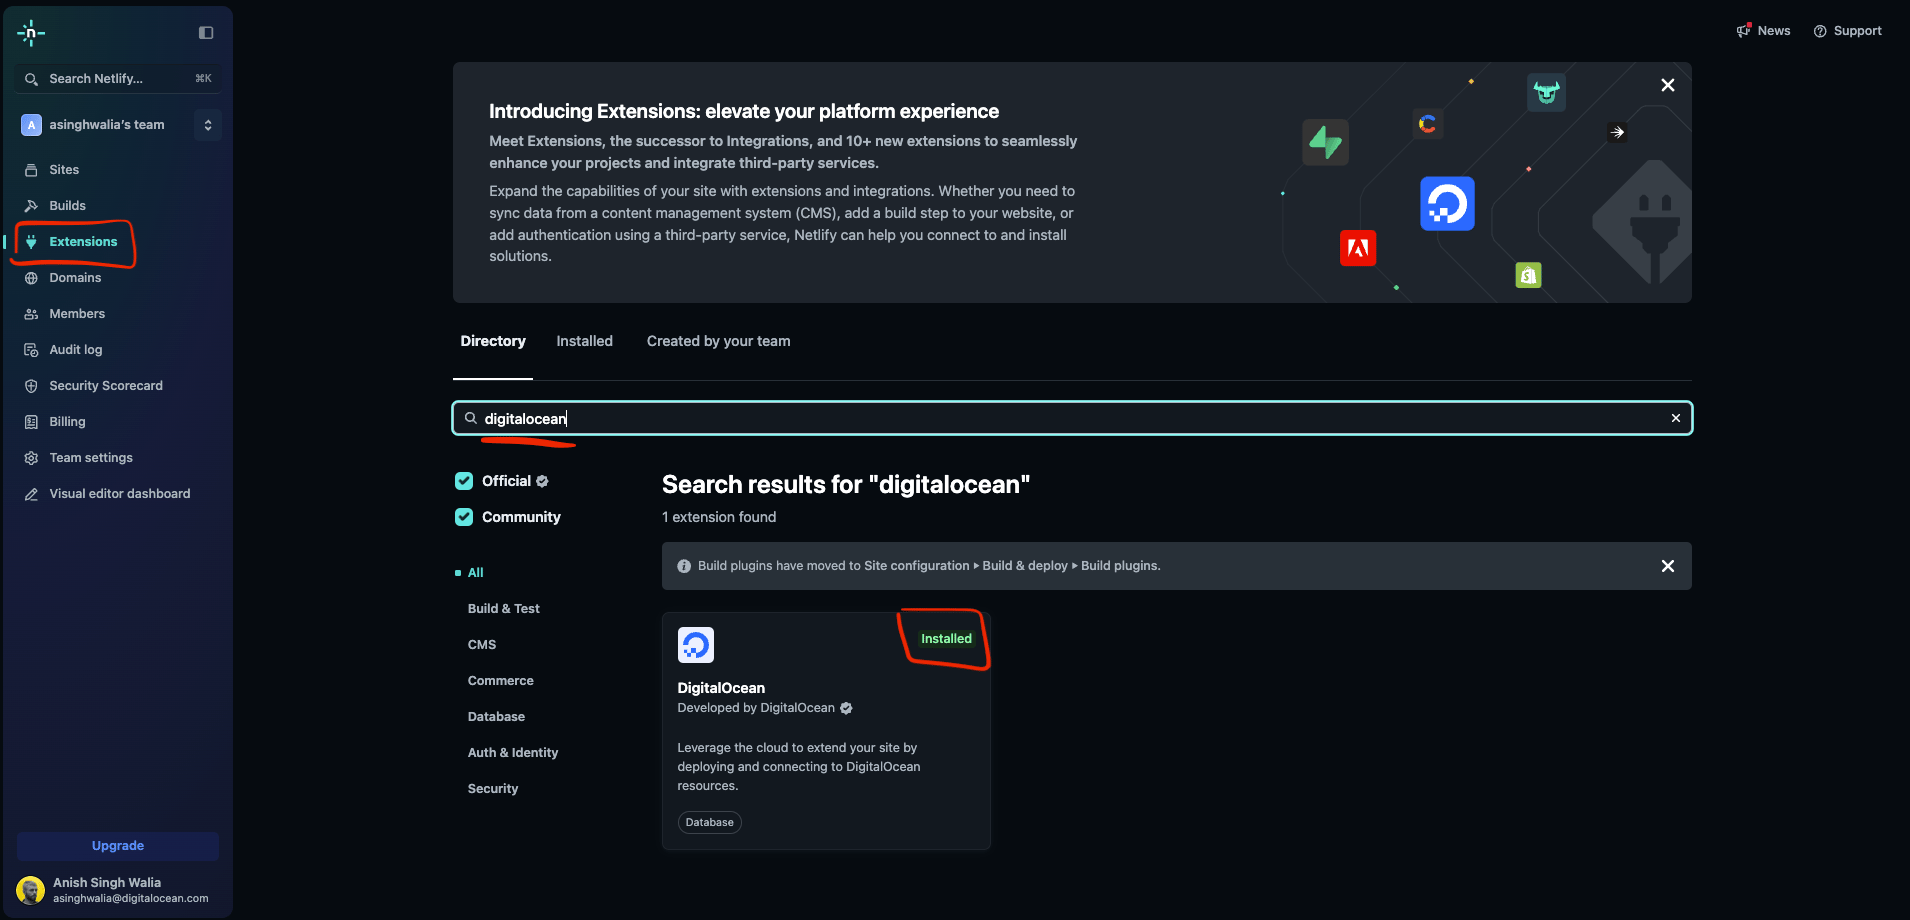
In this step you will install the DigitalOcean Netlify extension. You will use this extension to connect to your DigitalOcean account and start deploying and connecting cloud resources to your Netlify sites.
You need to login to your Netlify account. Sign up and go to Extensions tab from the sidebar.
Step 3 - Create a Full-Stack JAMstack App
Let’s start creating a full-stack JAMstack App.
You will use a React and Vite frontend template to interact with MongoDB.
Go to your terminal and use the below commands to setup an application template:
npx create-vite my-jamstack-app --template react
cd my-jamstack-app
npm install
npm install mongodb
Note: If you don’t have Node.js and npm installed, then you can refer the documentation on Installing Node.js and npm.
The above command should setup a basic application template.
Now go inside src directory, create a file Api.js to fetch data from the serverless function:
import { useState, useEffect } from "react";

// Function to handle the state of items and new item input
function App() {
  // Initialize state for items and new item input
  const [items, setItems] = useState([]);
  const [newItem, setNewItem] = useState("");

  // UseEffect hook to fetch items from MongoDB on component mount
  useEffect(() => {
    // Fetch data from the serverless function
    fetch("/.netlify/functions/connectMongo")
      .then((res) => res.json())
      .then((data) => setItems(data));
  }, []);

  // Function to add a new item to MongoDB
  const addItem = () => {
    // POST request to the serverless function to add a new item
    fetch("/.netlify/functions/connectMongo", {
      method: "POST",
      headers: { "Content-Type": "application/json" },
      body: JSON.stringify({ name: newItem })
    }).then(() => {
      // Reload the window to reflect the changes
      window.location.reload();
    });
  };

  // JSX to render the items list, input for new item, and an add button
  return (
    <div>
      <h1>MongoDB Items</h1>
      <ul>{items.map((item) => (<li key={item._id}>{item.name}</li>))}</ul>
      <input value={newItem} onChange={(e) => setNewItem(e.target.value)} />
      <button onClick={addItem}>Add Item</button>
    </div>
  );
}
export default App;
Build the API with Netlify Serverless Functions
Let’s create a functions directory inside the root directory of this project. You can read more about Netlify Functions.
mkdir functions
cd functions/
Next, inside the functions directory let’s create a file connectMongo.js.
// Importing the MongoClient class from the mongodb package
const { MongoClient } = require("mongodb");

// Defining the serverless function
exports.handler = async function (event) {
  // Creating a new MongoClient instance with the MongoDB URL from the environment variables
  const client = new MongoClient(process.env.MONGODB_URL);
  try {
    // Connecting to the MongoDB server
    await client.connect();
    // Accessing the "mydatabase" database
    const db = client.db("mydatabase");
    // Accessing the "items" collection
    const collection = db.collection("items");

    // Handling GET requests
    if (event.httpMethod === "GET") {
      // Fetching all items from the collection and converting the result to an array
      const data = await collection.find({}).toArray();
      // Returning a 200 status code and the fetched data
      return {
        statusCode: 200,
        body: JSON.stringify(data)
      };
    }

    // Handling POST requests
    if (event.httpMethod === "POST") {
      // Parsing the request body to get the new item
      const newItem = JSON.parse(event.body);
      // Inserting the new item into the collection
      await collection.insertOne(newItem);
      // Returning a 201 status code and a success message
      return {
        statusCode: 201,
        body: JSON.stringify({ message: "Item added successfully" })
      };
    }

    // Handling other HTTP methods
    return {
      statusCode: 405,
      body: JSON.stringify({ error: "Method Not Allowed" })
    };
  } catch (error) {
    // Handling any errors that occur during the execution of the function
    return {
      statusCode: 500,
      body: JSON.stringify({ error: error.message })
    };
  } finally {
    // Closing the MongoDB client connection
    await client.close();
  }
};
Create a Git Repository and Push Code to GitHub
Initialize a Git repository in your project directory i.e., inside my-jamstack-app:
git init
Add all project files to Git:
git add .
Commit the changes:
git commit -m "Initial commit"
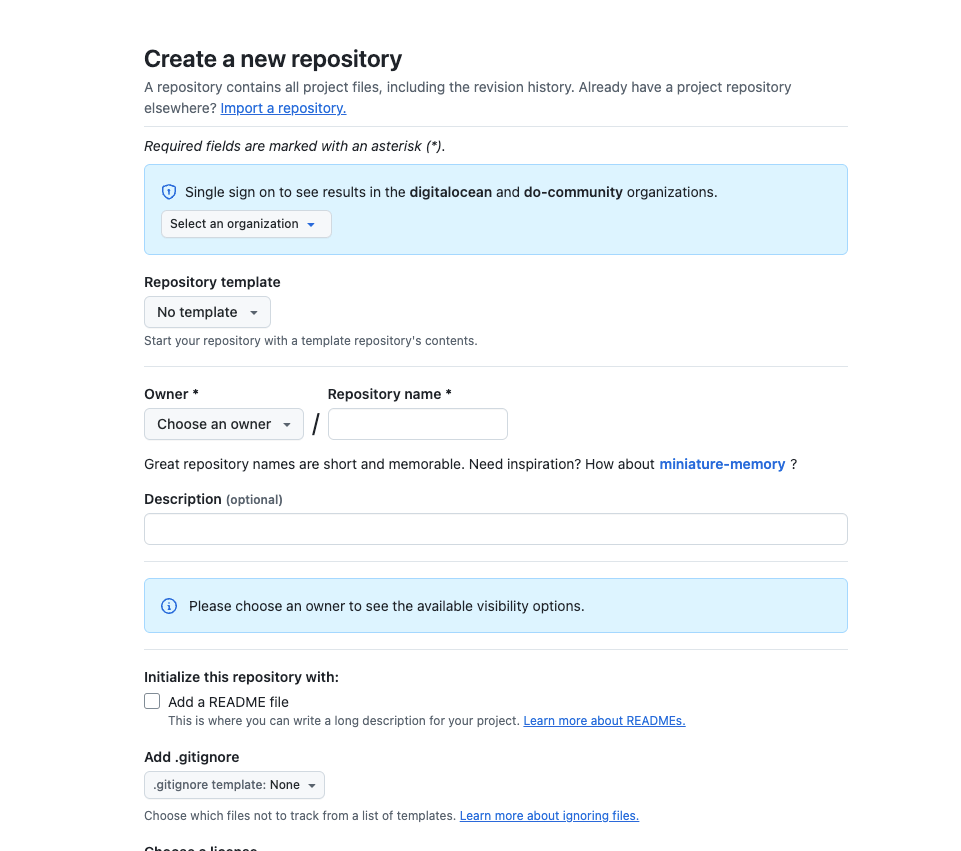
Now, go to your GitHub account and create a new repository.
Next, add the remote origin:
git remote add origin https://github.com/your-username/your-repo.git
Push your code to GitHub:
git push -u origin main
Step 4 - Build and Deploy Backend with Netlify Functions
You will use the Netlify ClI to create a new “Site” and do a mannual deploy from command line.
Using Netlify CLI you configure continuous deployment straight from the command line. You can use Netlify CLI to run a local development server that you can share with others, run a local build and plugins, and deploy your site.
Let’s install the Netlify CLI:
npm install -g netlify-cli
Manually Build & Deploy from cmdline
Use the following command to deploy the site manually from command line.
netlify deploy
Follow the on-sreen instructions to create a new site and other settings.
OutputThis folder isn't linked to a site yet
? What would you like to do? +  Create & configure a new site
? Team: asinghwalia’s team
? Site name (leave blank for a random name; you can change it later): netlify-digitalocean-app

Site Created

Admin URL: https://app.netlify.com/sites/netlify-digitalocean-app
URL:       https://netlify-digitalocean-app.netlify.app
Site ID:   985f40e7-8892-4b9d-9e36-5ea74c494874


Adding local .netlify folder to .gitignore file...
Linked to netlify-digitalocean-app
Please provide a publish directory (e.g. "public" or "dist" or "."):
? Publish directory /my-jamstack-app
Deploy path: /my-jamstack-app
Deploying to draft URL...
⠋ Uploading blobs to deploy store...

Netlify Build
────────────────────────────────────────────────────────────────

❯ Version
  @netlify/build 29.58.8

❯ Flags
  deployId: 679dc88c9705fce5ffd42051
  open: false
  prod: false
  prodIfUnlocked: false
  skipFunctionsCache: false

❯ Current directory
  /my-jamstack-app

❯ Config file
  No config file was defined: using default values.

❯ Context
✔ Finished uploading blobs to deploy store
✔ No cached functions were found
✔ Finished hashing
✔ CDN requesting 4 files
✔ Finished uploading 4 assets
✔ Deploy is live!

Build logs:         https://app.netlify.com/sites/netlify-digitalocean-app/deploys/679dc88c9705fce5ffd42051
Function logs:      https://app.netlify.com/sites/netlify-digitalocean-app/logs/functions?scope=deploy:679dc88c9705fce5ffd42051
Edge function Logs: https://app.netlify.com/sites/netlify-digitalocean-app/logs/edge-functions?scope=deployid:679dc88c9705fce5ffd42051
Website draft URL:  https://679dc88c9705fce5ffd42051--netlify-digitalocean-app.netlify.app

If everything looks good on your draft URL, deploy it to your main site URL with the --prod flag.
netlify deploy --prod
Now if you go to Netlify Sites, you should see a new Site created.
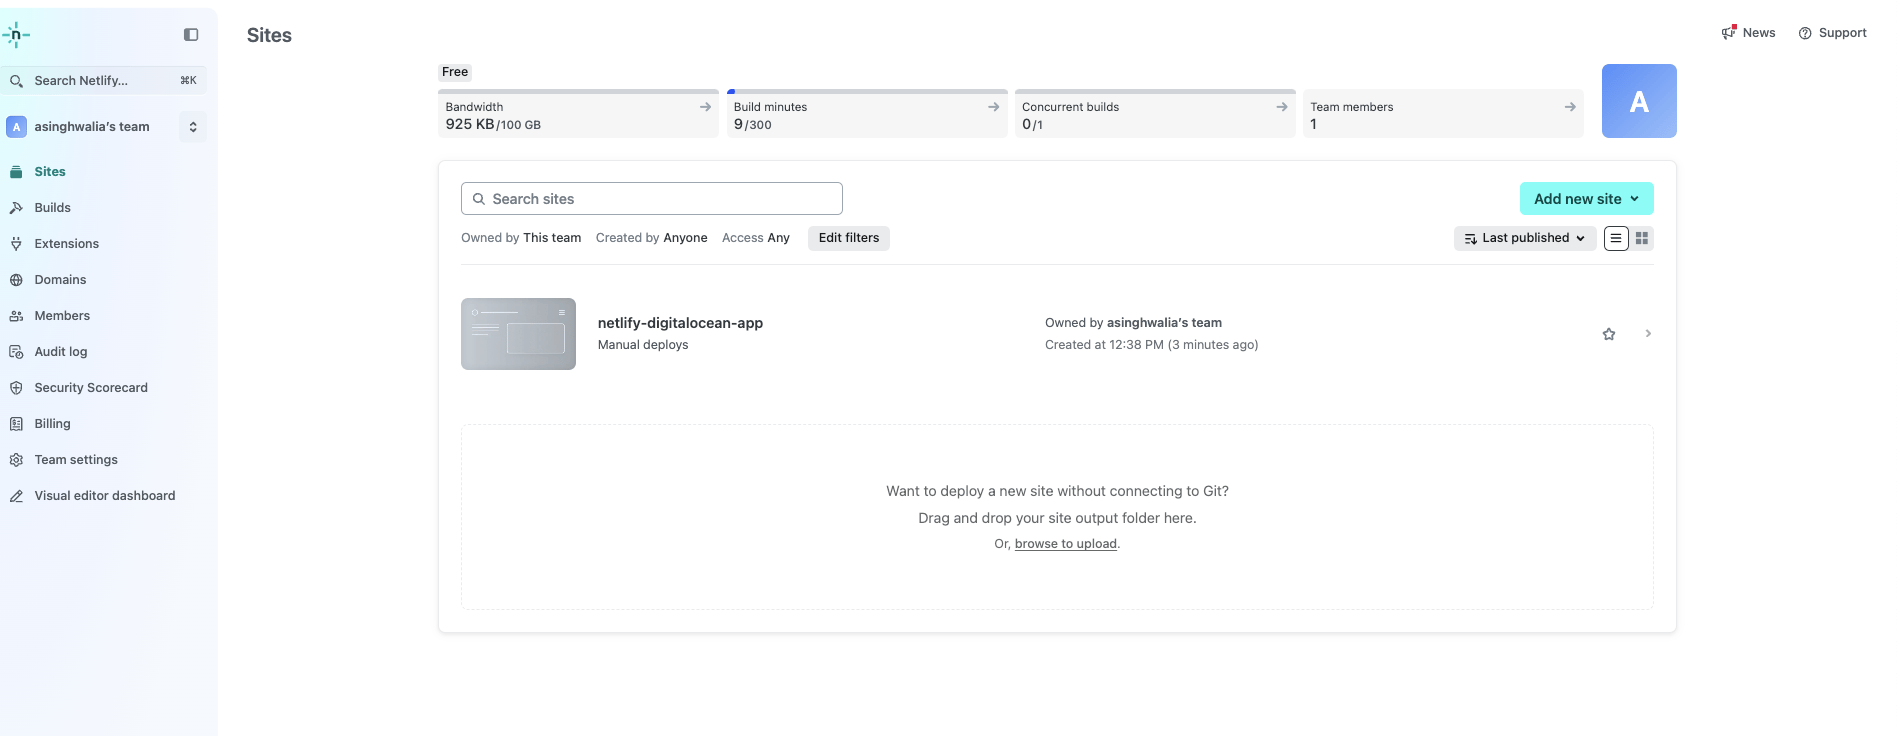
Now you will need to link the Git repository, created in the last step.
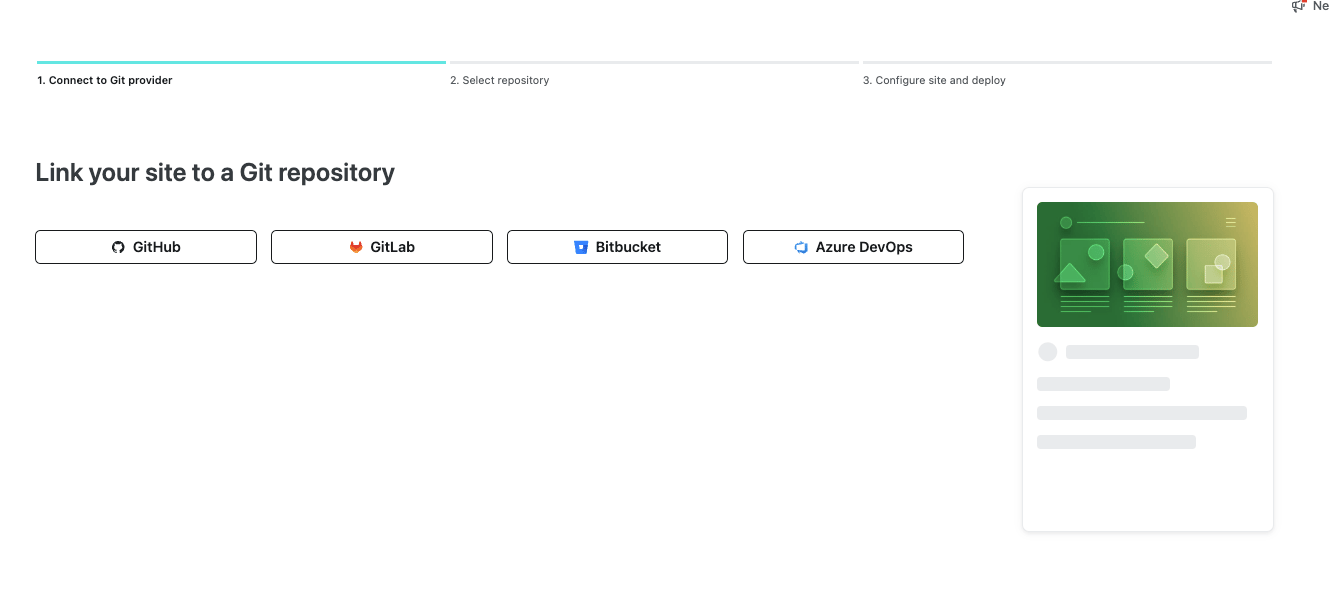
Go to Site Configuration from the left side panel and click “Build & deploy” and “Link repository”.
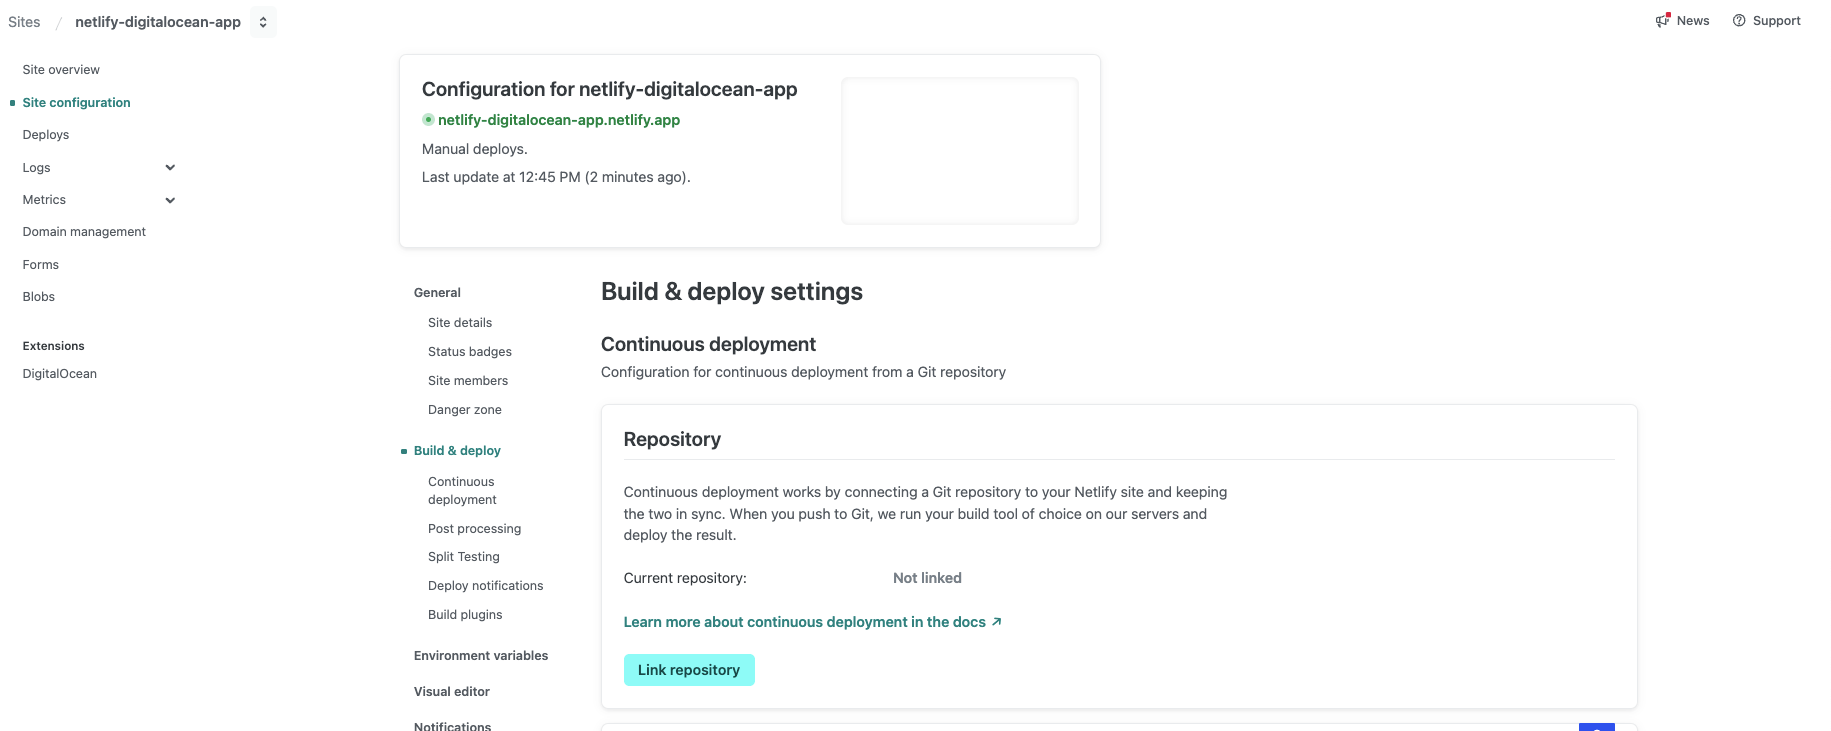
Select “Github” and add your repository and configure the build settings.
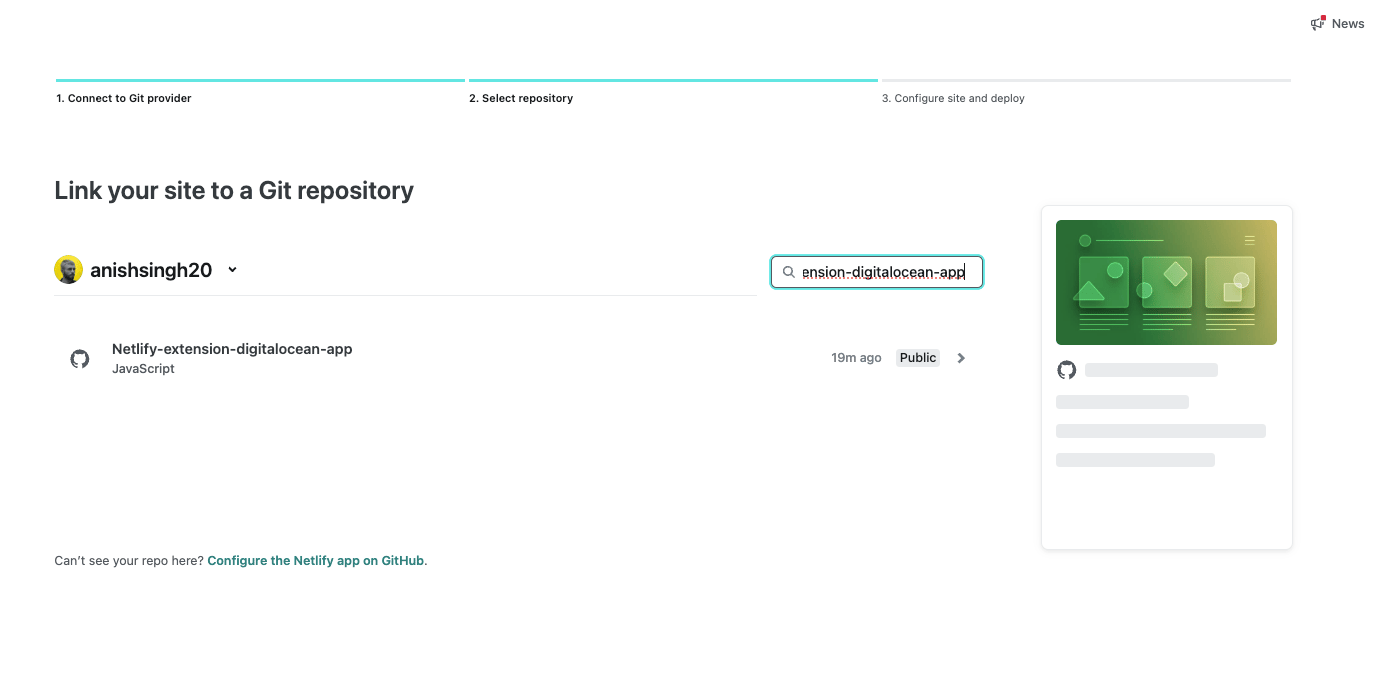
Now, select your Github repository:
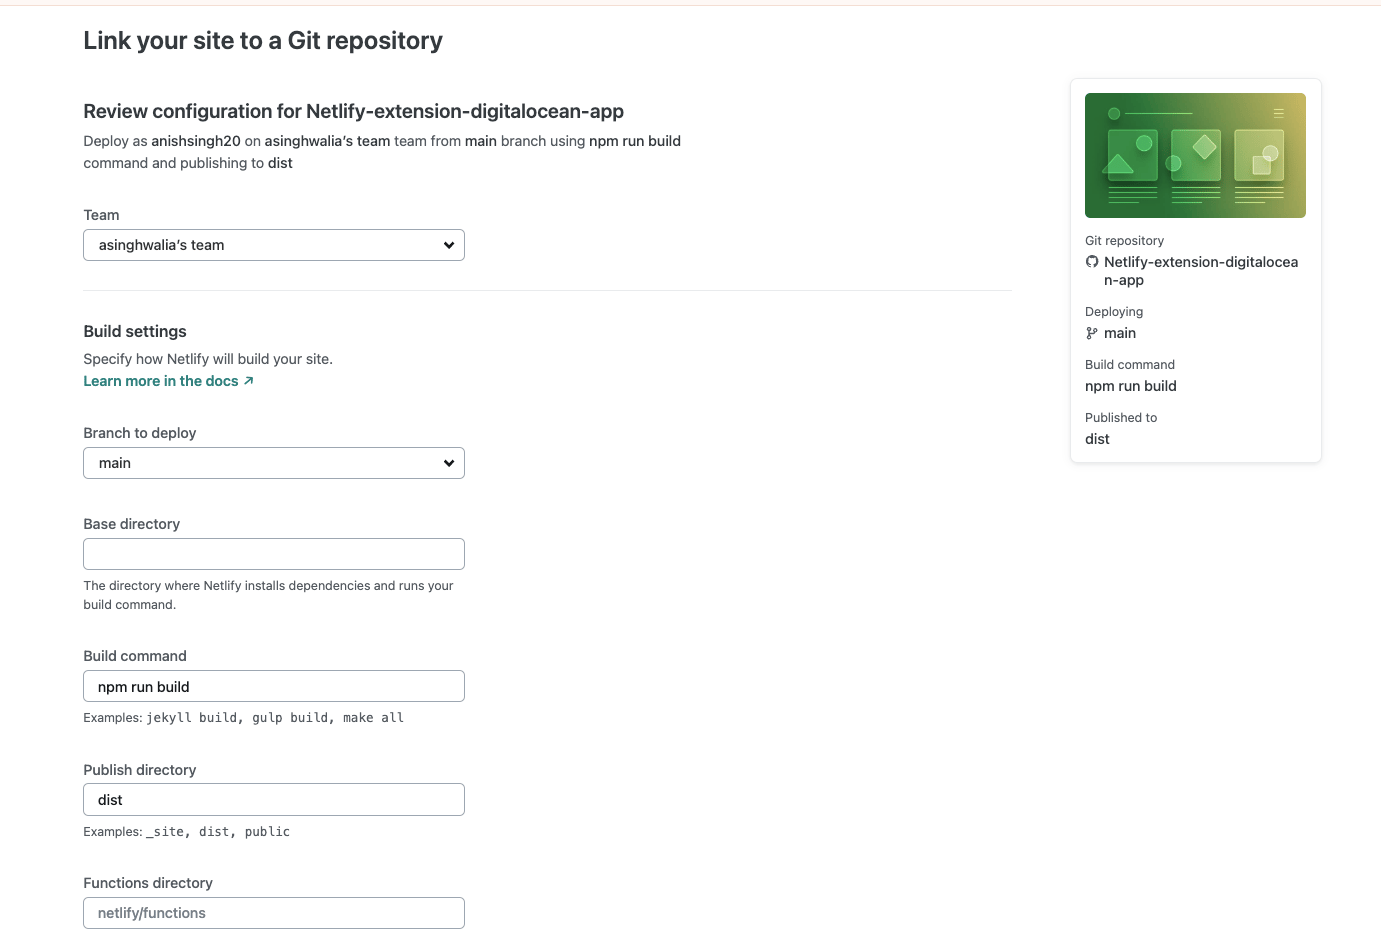
Now configure and add build settings and then deploy the site.
Note: Make sure to set the “Functions Directory” to “/functions” which we created in this tutorial. You can leave the remaining build settings as default.
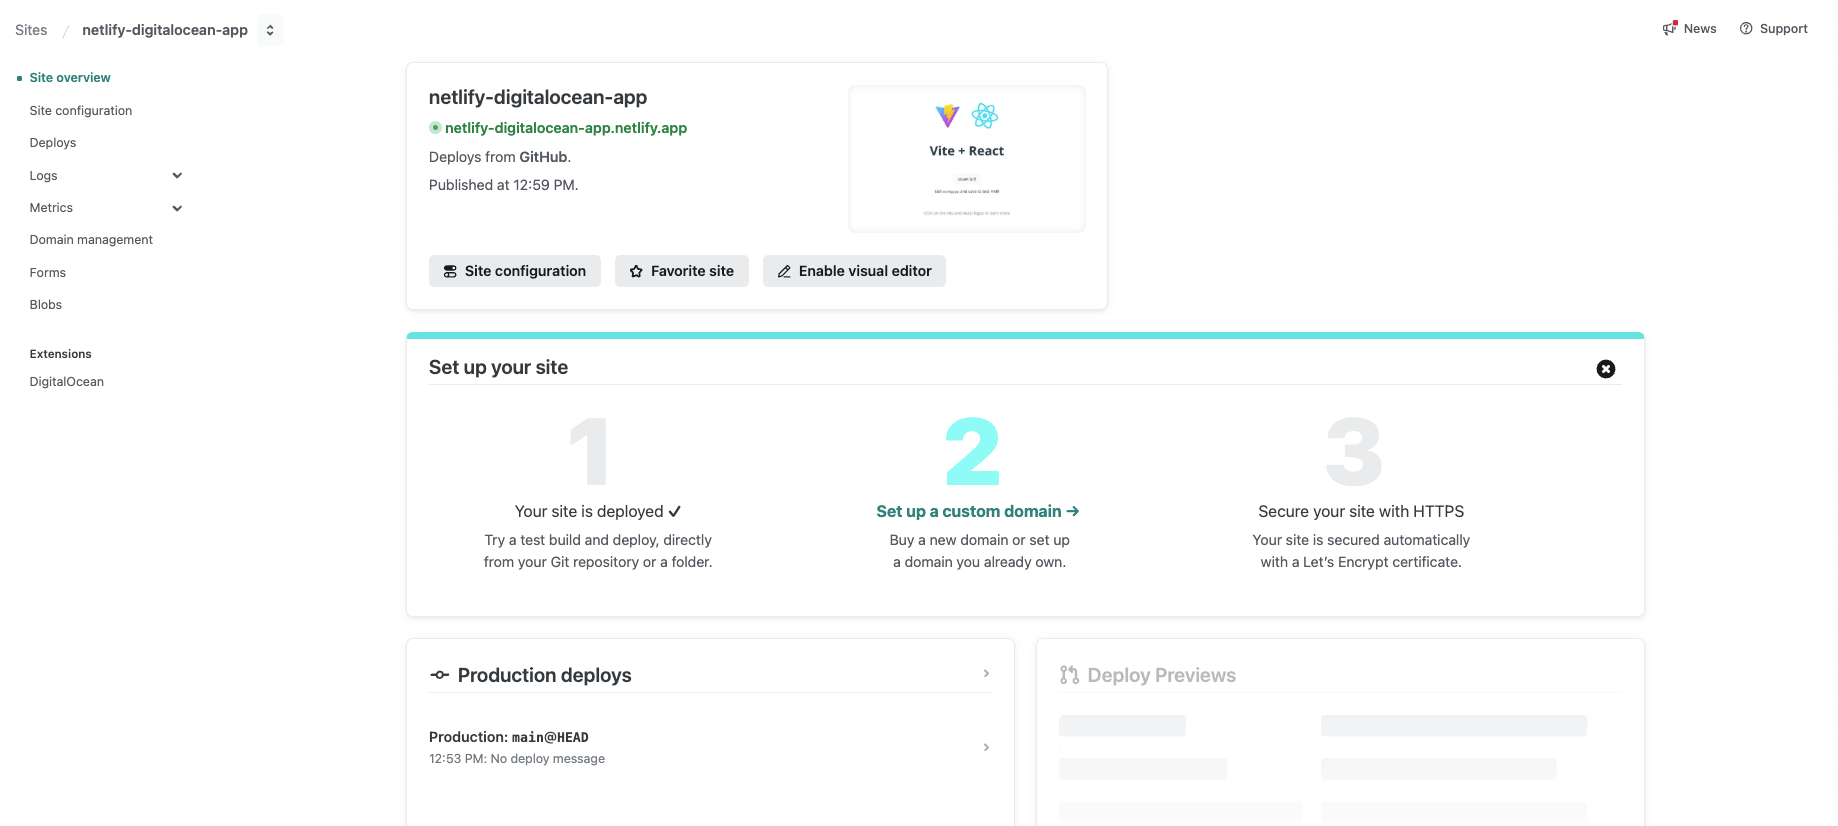
You can go to “Site Overview” to check the deployment status:
Add the DigitalOcean Extension
Now head over to “Extensions” and add the MongoDB connection String saved earlier in this tutorial.
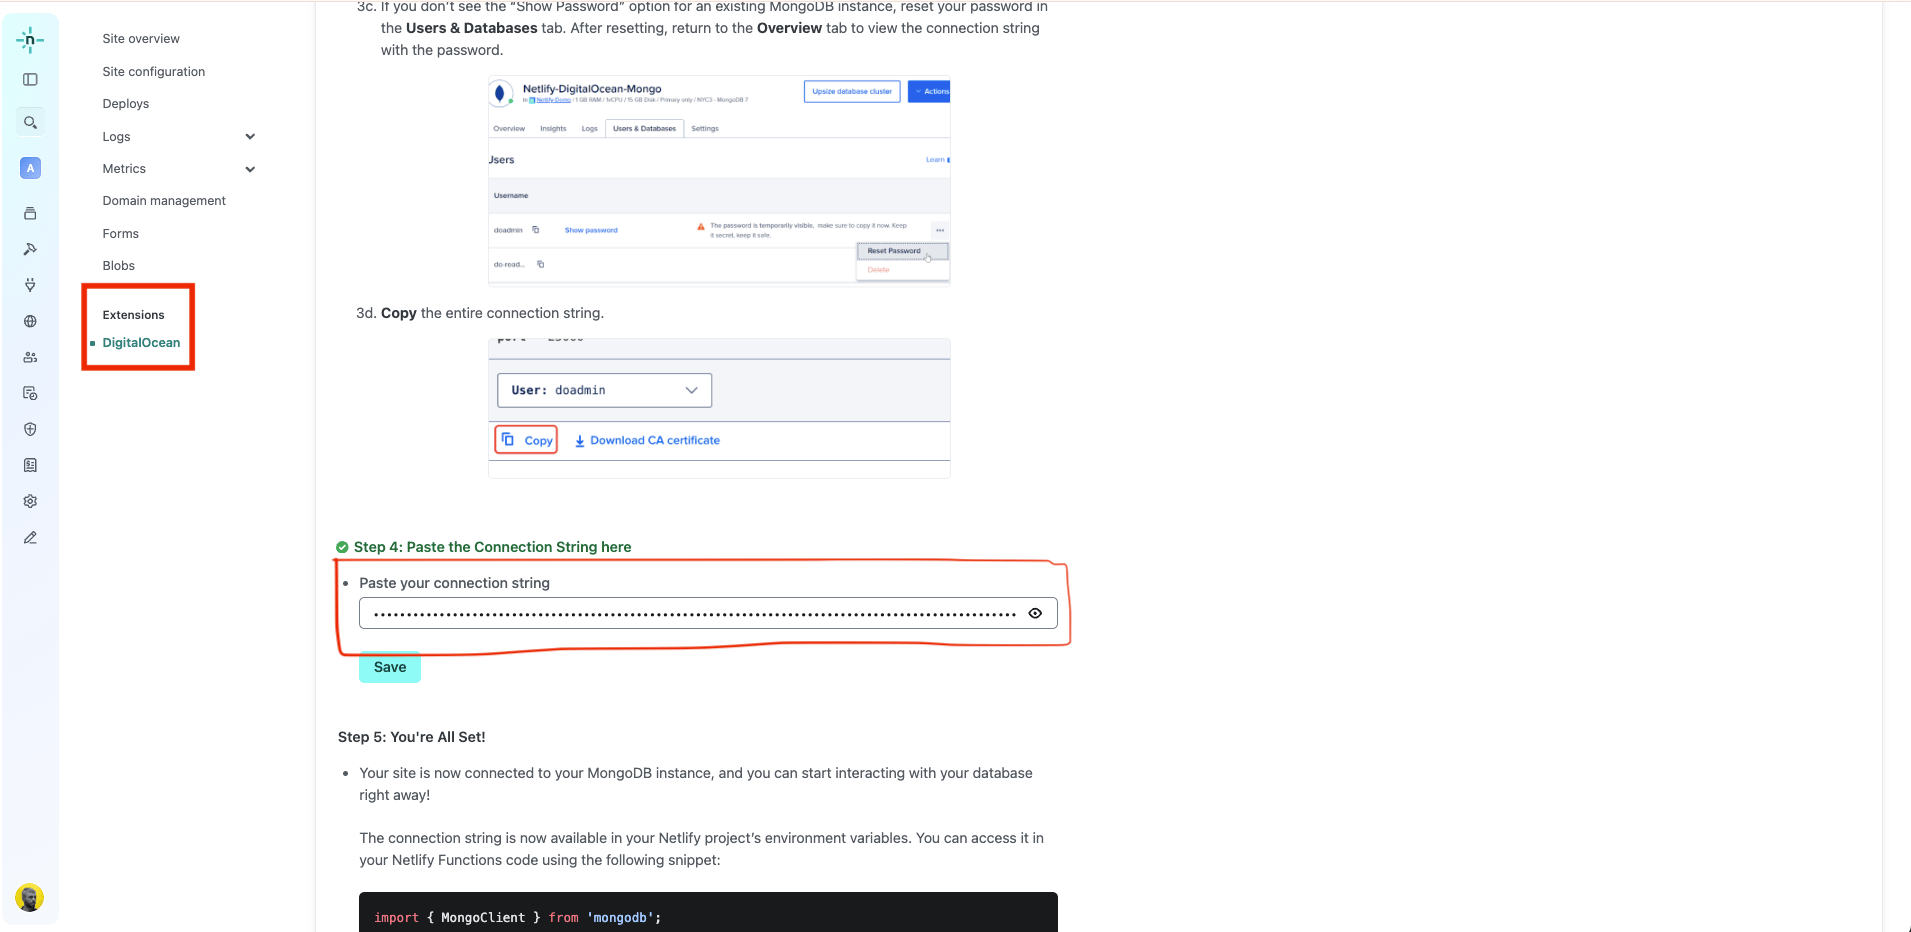
The connection string will now be available in your Netlify project’s environment variables. It can now be accessed by your Netlify Functions.
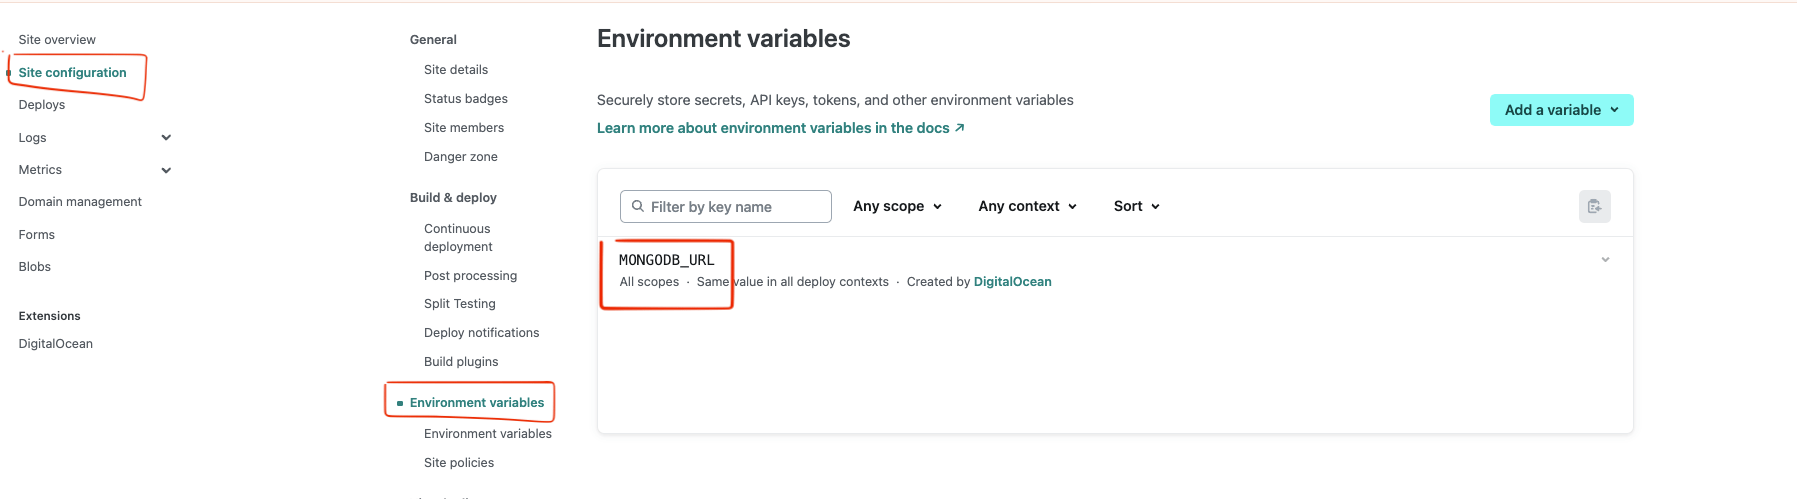
You can also go to “Site Configuration” -> “Environment variables” and check the automatically added MongoDB environment variable by using the DigitalOcean extension.
Test the Database with cURL
Now let’s check the netlify function endpoint and perform some database operations.
You can find the function endpoint by going to Sites -> Logs -> Functions.

Use the below curl command to store some data to the MongoDB database.
curl -X POST https://netlify-digitalocean-app.netlify.app/.netlify/functions/connectMongo \
     -H "Content-Type: application/json" \
     -d '{"Item 1": "New Item 1"}'
You should see the following output:
Output{"message":"Item added successfully"}
Let’s execute a GET request to retrive the data:
curl -X GET https://netlify-digitalocean-app.netlify.app/.netlify/functions/connectMongo
Output[{"_id":"679dcdd3d9dc4d82c9de1ddd","name":"New Item"},{"_id":"679dcdebd9dc4d82c9de1dde","Item 2":"New Item 2"},{"_id":"679dd3ab2849e603f9d5813b","Item 3":"New Item 3"}]%
You can also verify the POST operation’s success by going to the function endpoint in your browser.

FAQs
1. What features does DigitalOcean’s Managed MongoDB offer?
DigitalOcean’s Managed MongoDB provides several features that make it a powerful and convenient choice for developers:
- Automated Backups: Daily backups with point-in-time recovery options.
- High Availability: Managed replica sets ensure uptime and data redundancy.
- Scalability: Easily scale storage and compute resources as your app grows.
- Integrated Monitoring: Built-in performance monitoring and alerting.
- Security & Encryption: TLS encryption, firewall protection, and private networking for secure access.
2. How do I install the DigitalOcean Netlify Extension?
To install the DigitalOcean Netlify Extension:
- Log in to your Netlify account.
- Go to Extensions tab from the sidebar.
- Search for DigitalOcean.
- Click Install, and then add this extension to you Netlify Site.
- Configure your connection by providing your MongoDB URI and authentication details.
3. What benefits does this integration provide for developers?
This integration simplifies the deployment and database management process for developers:
- Seamless Connectivity: Connect Netlify serverless functions to DigitalOcean MongoDB with minimal configuration.
- Fully Managed Database: Offload database management, including scaling and backups, to DigitalOcean.
- Serverless Architecture: Use Netlify’s serverless functions to interact with MongoDB without setting up a backend server.
- Enhanced Performance: Netlify’s global CDN speeds up frontend performance, while DigitalOcean ensures optimized database performance.
- Secure Data Handling: Store database credentials securely in Netlify environment variables.
4. Is MongoDB the only database option available?
No, DigitalOcean provides a range of managed databases, including:
5. How does this integration handle security?
Security is a key focus of this integration, and it is handled through multiple layers:
- Environment Variables: Netlify securely stores sensitive credentials (e.g., MONGO_URI) to prevent exposure in code.
- TLS Encryption: DigitalOcean ensures all MongoDB connections are encrypted using TLS for secure data transmission.
- Private Networking: If you deploy on DigitalOcean, you can enable VPC (Virtual Private Cloud) to isolate database access from the public internet.
- Role-Based Access Control (RBAC): DigitalOcean allows you to assign granular permissions to different users and services.
- Firewall Rules: You can configure IP-based restrictions to allow only specific sources to access your MongoDB database.
Conclusion
Congratulations! You have successfully deployed a full-stack JAMstack application using DigitalOcean MongoDB and Netlify. Your application now features a practical React frontend that interacts with MongoDB.
Thanks for learning with the DigitalOcean Community. Check out our offerings for compute, storage, networking, and managed databases.
About the author
Anish is a Sr Technical Content Strategist and Team Lead at DigitalOcean with 7+ years of experience as an SRE at Nutanix and Cloud consultant at AMEX, and technical writing at DOCN, and shipping deep infra and AI inference tutorials that help developers deploy production‑ready applications on DigitalOcean.
Still looking for an answer?
This textbox defaults to using Markdown to format your answer.
You can type !ref in this text area to quickly search our full set of tutorials, documentation & marketplace offerings and insert the link!
 This work is licensed under a Creative Commons Attribution-NonCommercial- ShareAlike 4.0 International License.
Become a contributor for community
Get paid to write technical tutorials and select a tech-focused charity to receive a matching donation.

DigitalOcean Documentation
Full documentation for every DigitalOcean product.

Resources for startups and AI-native businesses
The Wave has everything you need to know about building a business, from raising funding to marketing your product.
The developer cloud
Scale up as you grow — whether you're running one virtual machine or ten thousand.

Start building today
From GPU-powered inference and Kubernetes to managed databases and storage, get everything you need to build, scale, and deploy intelligent applications.
