By Adrien Payong and Shaoni Mukherjee

Introduction
GPU acceleration has revolutionized deep learning, scientific computing, and machine learning, enhancing performance over traditional CPU computations. This guide shows you how to install CUDA and cuDNN for GPU, enabling tasks like neural network training, large-scale data analysis, and complex simulations. We’ll discuss compatibility considerations, troubleshooting advice, and best practices for ensuring a smooth GPU setup for CUDA. By adhering to this guide, you’ll use the full capabilities of GPU for faster and more efficient computational processes.
Prerequisites
Having a solid grounding in some concepts will improve your understanding of this guide:
- Basic Computer Proficiency: Ability to navigate your OS (whether it’s Windows or Linux) and complete basic tasks related to file management.
- Familiarity with Command-Line Tools
- Understanding of GPUs: A general understanding of GPUs and their advantages over CPUs, particularly regarding parallel processing and applications in machine learning.
- Basic Understanding of Machine Learning/Deep Learning: Familiarity with popular frameworks such as TensorFlow or PyTorch and their utilization of GPUs to speed model training.
- Programming Fundamentals: Some experience with languages like Python since the guide incorporates code snippets to verify installation and framework configuration.
- Understanding of System Architecture: Awareness of whether your system is 64-bit, along with understanding the difference between drivers, libraries, and software dependencies.
- Understanding of Environment Variables: A basic understanding of how to set environment variables (for instance, PATH and LD_LIBRARY_PATH) is important to configure the software.
Key takeaways:
- Installing NVIDIA’s CUDA toolkit is essential for enabling GPU acceleration on your system, as it includes the drivers, compiler, and libraries needed for programs (like TensorFlow or PyTorch) to interface with the GPU and run computations in parallel.
- After setting up the base CUDA environment, you must install cuDNN (CUDA Deep Neural Network library) which provides optimized implementations of neural network operations; this involves downloading the version of cuDNN that matches your CUDA release and copying its files into the CUDA directories so that deep learning frameworks can utilize those optimizations.
- The guide walks through checking your GPU and OS compatibility, downloading and running the CUDA installer (or using a package manager where appropriate), setting environment variables (such as PATH and LD_LIBRARY_PATH on Linux) so the system can find CUDA, and then verifying the installation with tools like nvcc --version or a sample GPU-accelerated program.
- With CUDA and cuDNN properly installed, your machine can leverage the full power of NVIDIA GPUs for acceleration, dramatically speeding up compute-intensive tasks like model training, video rendering, or any other parallelizable workload compared to running on a CPU alone.
What are CUDA and cuDNN
CUDA (Compute Unified Device Architecture) is a groundbreaking platform for parallel computing created by NVIDIA. It provides programmers and researchers direct access to NVIDIA GPUs’ virtual instruction set. CUDA improves the efficiency of complex operations such as training AI models, processing large datasets, and conducting scientific simulations.
cuDNN (CUDA Deep Neural Network library) is a specialized, GPU-accelerated library that provides essential building blocks for deep neural networks. It’s designed to deliver high-performance components for convolutional neural networks, recurrent neural networks (RNNs), and other complex deep learning algorithms. By implementing cuDNN, frameworks such as TensorFlow and PyTorch can take advantage of optimized GPU performance.
In short, NVIDIA’s CUDA installation lays the groundwork for GPU computing, whereas cuDNN provides targeted resources for deep learning. This combination enables remarkable GPU acceleration for tasks that a traditional CPU could otherwise require days or weeks to complete.
System Requirements and Preparations
Before you start the NVIDIA CUDA installation or cuDNN installation steps, please ensure your system fulfills the following requirements:
- CUDA-Enabled NVIDIA GPU: Verify if your GPU is included in NVIDIA’s list of CUDA-enabled GPUs. While most recent NVIDIA GPUs support CUDA, it’s wise to check.
- If using Linux, launch a terminal and execute
lspci | grep—i nvidiato identify your GPU. Then, check its CUDA compatibility on NVIDIA’s official site. - Sufficient Disk Space: Setting up CUDA, cuDNN, and the necessary drivers may require several gigabytes of storage. You must have a minimum of 5–10 GB of free disk space available.
- Administrative Privileges: Installation on Windows and Ubuntu requires admin or sudo rights.
- NVIDIA GPU Drivers: You need to install the latest drivers on your machine. While this can often be included in the CUDA installation process, it is advisable to verify that you have the latest drivers directly from NVIDIA’s website.
To get deeper into the GPU capabilities, explore our article related to Nvidia CUDA with H100.
Installing CUDA and cuDNN on Windows
This section provides a detailed guide on installing CUDA and cuDNN on a Windows system.
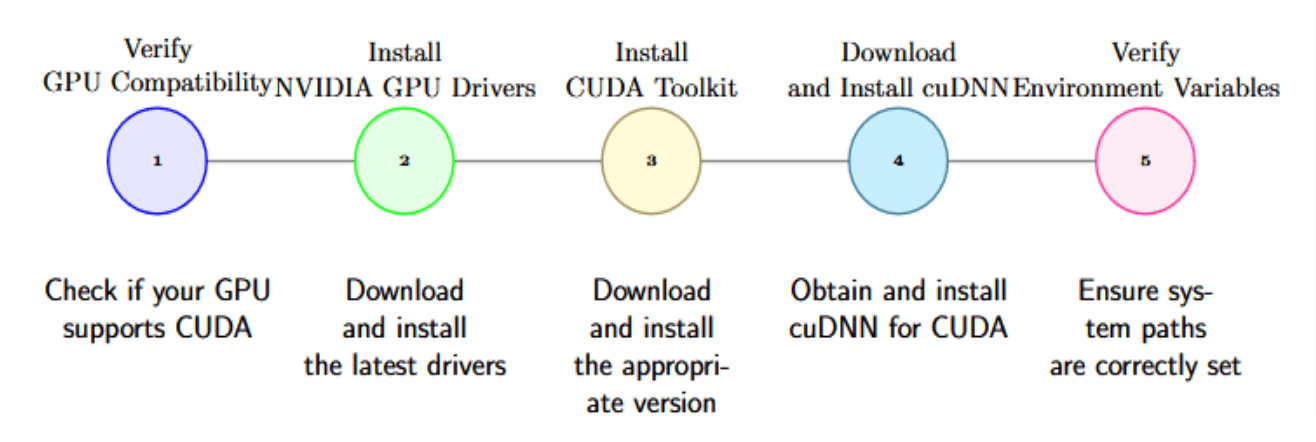
Step 1: Verify GPU Compatibility
To determine your GPU model and check if it is compatible with CUDA, right-click on the Start Menu, choose Device Manager, and then expand the Display Adapters section to locate your NVIDIA GPU. After finding it, head over to the NVIDIA CUDA-Enabled GPU List to verify whether the specific GPU model supports CUDA for GPU acceleration.
Step 2: Install NVIDIA GPU Drivers
To download and set up the latest NVIDIA drivers, go to the NVIDIA Driver Downloads section and choose the correct driver for your GPU and Windows version. Then, execute the downloaded installer and follow the instructions on your screen. After you’ve installed the driver, make sure to restart your system to apply the changes.
Step 3: Install the CUDA Toolkit
To start, go to the CUDA Toolkit Archive and select the version that aligns with your project needs. If you’re using guidelines like “How to install CUDA and cuDNN on GPU 2021,” it might be wise to choose a version from that timeframe to maintain compatibility with previous frameworks.
You will choose your operating system, such as Windows, with the architecture, typically x86_64. You will also indicate your Windows version, whether Windows 10 or 11.
After selection, you can download either the local .exe installer or the network installer. Next, execute the downloaded installer and proceed through the installation prompts. During this process, ensure you choose all essential components, such as the CUDA Toolkit, sample projects, and documentation, to set up a comprehensive development environment.
The installer will copy the necessary files to the default directory: C:\\Program Files\\NVIDIA GPU Computing Toolkit\\CUDA\\vX.X. In this case, X.X represents the specific version of CUDA you are installing.
Finally, while the installer generally manages environment variables automatically, it’s important to check them. Open the command prompt and execute the following commands to confirm that the CUDA\_PATH and PATH variables point to the correct CUDA directories:
*echo %CUDA\_PATH%*
*echo %PATH%*
Step 4: Download and Install cuDNN on Windows
- Register as an NVIDIA Developer: To gain access, you need to set up an account on the NVIDIA Developer website to access cuDNN downloads.
- Check Compatibility: It’s important to ensure the cuDNN version aligns with your installed CUDA version. If you have, for example, CUDA 11.8, search specifically for cuDNN 8 builds that indicate they support CUDA 11.8.
Using the Installer
Download the cuDNN installer for Windows and run it, following the on-screen prompts. During installation, choose either Express or Custom installation based on your preference.
Manual Installation
Unzip the downloaded file for manual installation and place it in a temporary folder. Then copy:
bin\\cudnn\*.dll to C:\\Program Files\\NVIDIA\\CUDNN\\vx.x\\bin,
include\\cudnn\*.h to C:\\Program Files\\NVIDIA\\CUDNN\\vx.x\\include,
lib\\x64\\cudnn\*.lib to C:\\Program Files\\NVIDIA\\CUDNN\\vx.x\\lib.
Replace ‘x.x’ with your version number.
Lastly, update your system’s PATH variable by adding C:\\Program Files\\NVIDIA\\CUDNN\\vx.x\\bin to ensure you can access cuDNN executables properly.
Verification
Check the folder contents to verify that the cuDNN files are correctly placed. You should find a cudnn64_x.dll file in the bin directory and .h header files in the include directory.
Step 5: Environment Variables on Windows
Although the CUDA installer typically manages environment variables automatically, it is wise to verify that all configurations are accurate:
-
Open System Properties
- Right-click on This PC (or Computer) and choose Properties.
- Go to Advanced System Settings, and then click on Environment Variables.
-
Check CUDA_PATH
- In the section labeled System variables, search for CUDA_PATH.
- It should direct to:
C:\\Program Files\\NVIDIA GPU Computing Toolkit\\CUDA\\vX.X. Replace X.X with the version of CUDA that is installed (e.g., v11.8).
-
Path Variable
In the same section, under System variables, find and select Path.
Check that the following directory is included:
C:\\Program Files\\NVIDIA GPU Computing Toolkit\\CUDA\\vX.X\\bin. You may also find:C:\\Program Files\\NVIDIA GPU Computing Toolkit\\CUDA\\vX.X\\libnvvp. If it’s not there, add it manually to help the system locate CUDA executables. -
Add cuDNN If Needed
Generally, copying cuDNN files into the appropriate CUDA folders (bin, include, lib) is sufficient. If you keep cuDNN in a different location, add that folder path to your Path variable so Windows can find the cuDNN libraries.
Installing CUDA on Ubuntu
This section shows how to install the CUDA Toolkit on your Ubuntu system. It covers repository setup, GPG key verification, and package installation.
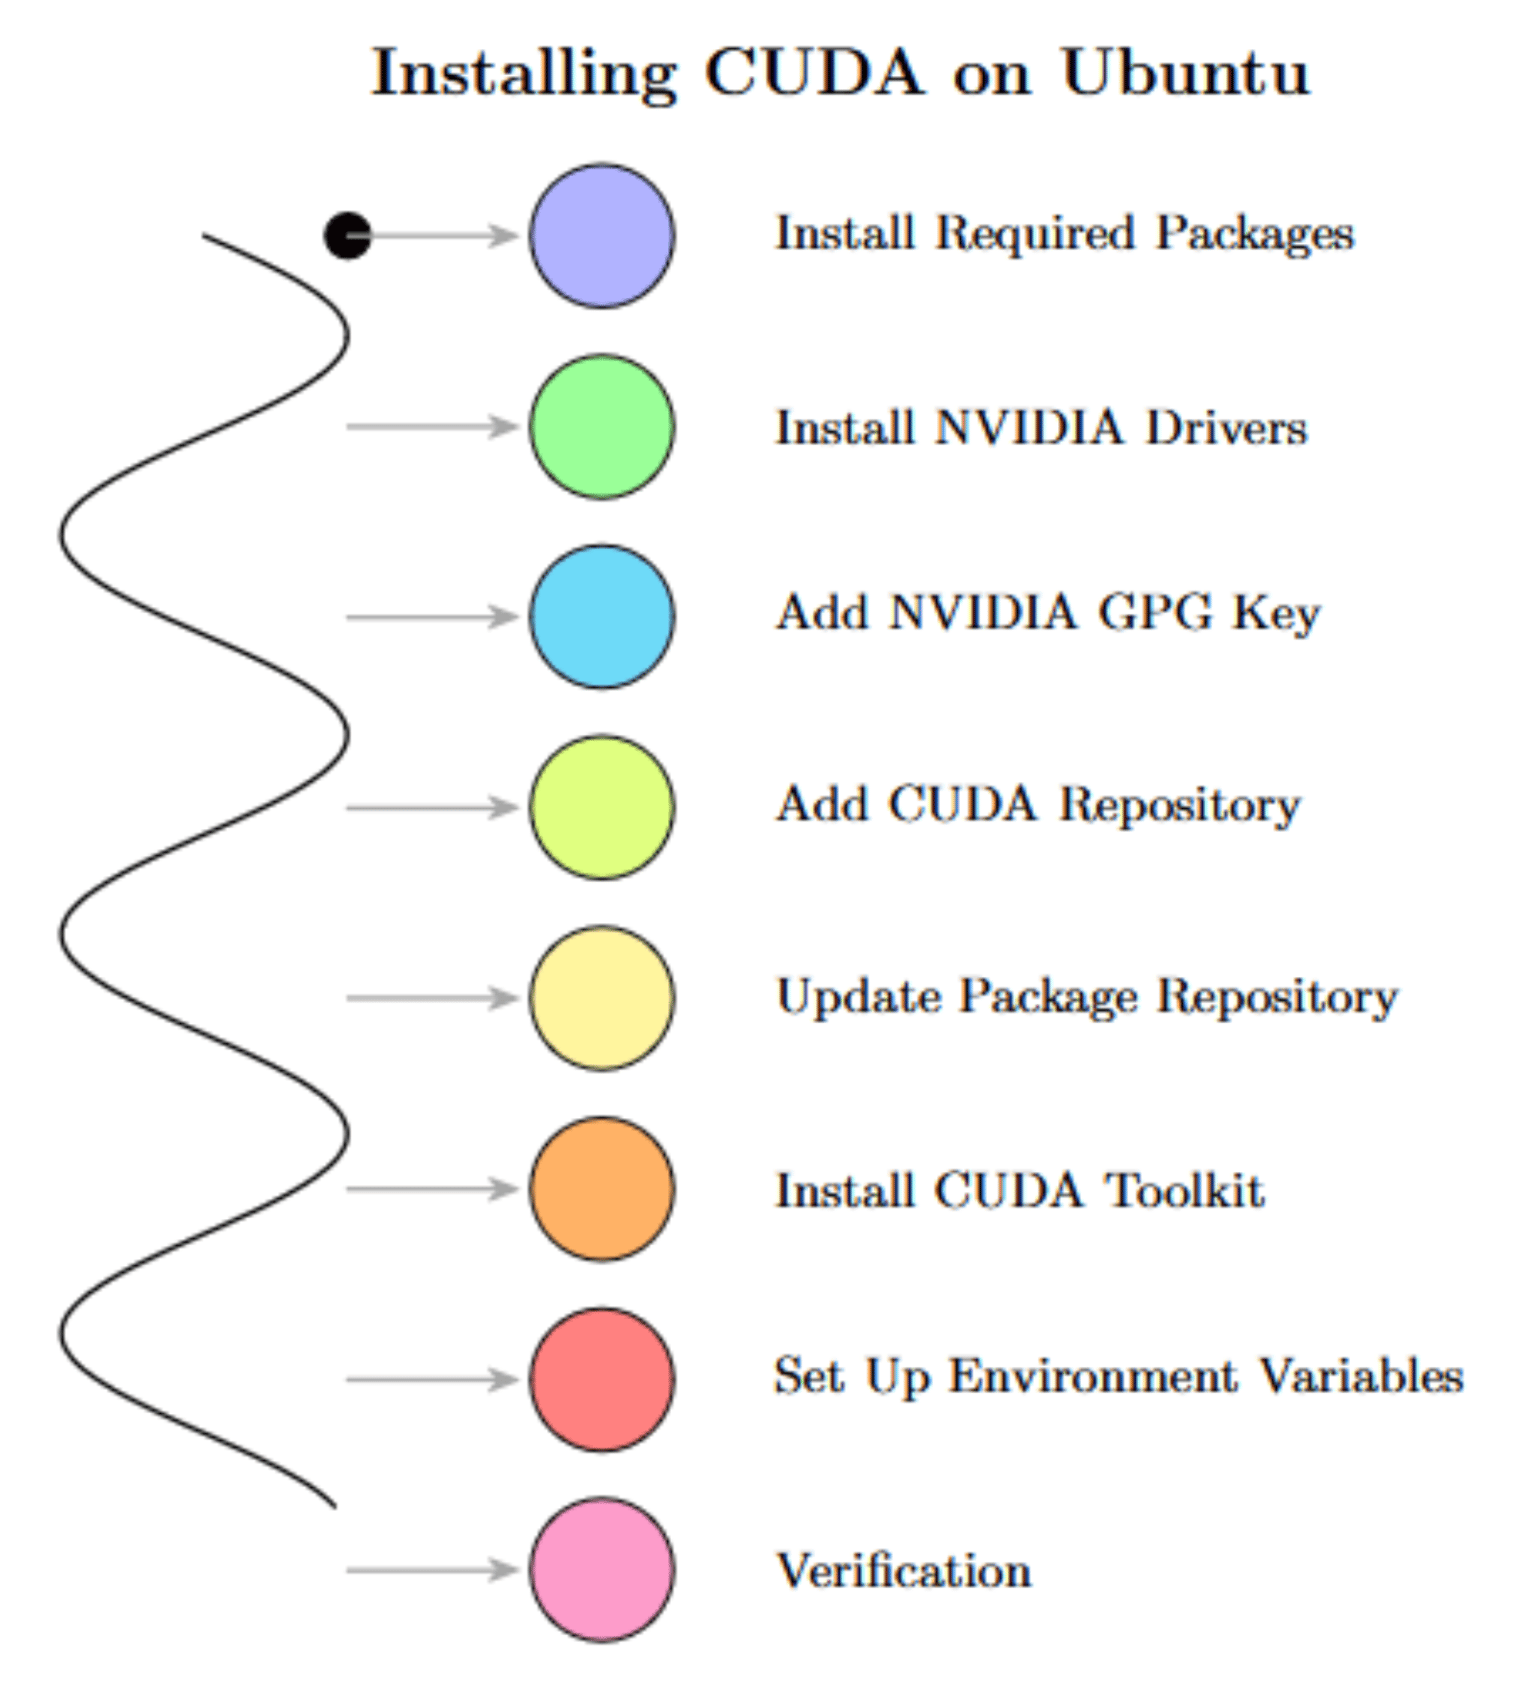
Step 1: Install Required Packages
Ensure that curl is installed on your system:
sudo apt update
sudo apt install curl
Step 2: Install NVIDIA Drivers
Before installing CUDA, it’s essential to have the appriproriate NVIDIA drivers intalled—to do so:
sudo ubuntu-drivers autoinstall
Then, make sure to reboot your system after driver installation
sudo reboot
Step 3: Add the NVIDIA GPG Key
To ensure the authenticity of packages from the NVIDIA repository, add the NVIDIA GPG key
curl -fsSL https://developer.download.nvidia.com/compute/cuda/repos/ubuntu2204/x86_64/3bf863cc.pub | sudo gpg --dearmor -o /usr/share/keyrings/nvidia-cuda-keyring.gpg
The curl -fsSL https://developer.download.nvidia.com/compute/cuda/repos/ubuntu2204/x86_64/3bf863cc.pub command uses curl to retrieve the public key from the designated URL. The flags included are:
- -f: Silently fail in the event of server errors.
- -s: Operate in silent mode (no progress indicators or error notifications).
- -S: Show error notifications when -s is used.
- -L: Follow redirects.
The | sudo gpg --dearmor -o /usr/share/keyrings/nvidia-cuda-keyring.gpg segment takes the output from the curl directive into gpg, which converts the key from ASCII to binary format and saves it in the chosen location. The sudo command guarantees you have the required permissions.
The resulting binary key is stored in /usr/share/keyrings/nvidia-cuda-keyring.gpg, allowing the Ubuntu system to verify the package integrity from NVIDIA’s CUDA repository.
Step 4: Add the CUDA Repository
Incorporate the CUDA repository that corresponds to your Ubuntu version. For example, for Ubuntu 22.04 you can run:
echo "deb [signed-by=/usr/share/keyrings/nvidia-cuda-keyring.gpg] https://developer.download.nvidia.com/compute/cuda/repos/ubuntu2204/x86_64/ /" | sudo tee /etc/apt/sources.list.d/cuda-repository.list
echo "deb \[signed-by=/usr/share/keyrings/nvidia-cuda-keyring.gpg\] https://developer.download.nvidia.com/compute/cuda/repos/ubuntu2204/x86\_64/: This command sets up a line that indicates the repository URL and the keyring for package signing.| *sudo tee /etc/apt/sources.list.d/cuda-repository.list: This command sends the output from echo to tee, which writes it into the specified file or creates it if it doesn’t exist. The sudo ensures you have permission to alter system files.
There are many repository tags for different Ubuntu versions and you can adjust the URL as required if you use a different Ubuntu version (e.g., ubuntu2004 or ubuntu1804).
Step 5: Update the Package Repository
Now, you can update your package list to include the new repository:
sudo apt update
This guarantees that Ubuntu can recognize and fetch packages from the NVIDIA CUDA repository.
Step 6: Install the CUDA Toolkit
Install the CUDA Toolkit with the following command:
sudo apt install cuda
This command will install all the CUDA components necessary for GPU acceleration, including compilers and libraries. It’s important to note that this will install the latest version of CUDA. If you’re looking for a particular version, you’ll need to specify it, such as sudo apt install cuda-11-814.
Step 7: Set Up Environment Variables
To ensure CUDA is available whenever you open a new terminal session, add these lines to your ~/.bashrc file:
export PATH=/usr/local/cuda/bin${PATH:+:${PATH}}
export LD_LIBRARY_PATH=/usr/local/cuda/lib64${LD_LIBRARY_PATH:+:${LD_LIBRARY_PATH}}
The first line places /usr/local/cuda/bin at the beginning of your PATH, making the nvcc compiler accessible.
The second line appends /usr/local/cuda/lib64 to your LD_LIBRARY_PATH, assisting the system in locating CUDA libraries. The specific paths will depend on the installed version of CUDA.
Note: The .bashrc file is a hidden shell script found within your home directory that is executed each time you initiate a new interactive terminal session within the Bash shell. It includes commands for setting up your environment, like environment variables, aliases, and functions, which customize and manage your shell behavior each time you launch a terminal.
Finally, reload your .bashrc so the new enviornment variables take effect right away:
source ~/.bashrc
Step 8: Verification
Verify that CUDA was installed successfully:
nvcc --version
If CUDA is correctly installed, this command will display the installed CUDA version.
By completing these steps, you’ve successfully installed CUDA on Ubuntu, set up the essential environment variables, and prepared your system for GPU-accelerated applications.
Installing cuDNN on Ubuntu
Thanks to NVIDIA’s package manager support, installing cuDNN on Linux has been simplified. Here is a brief guide that outlines both the recommended package manager method (for Ubuntu/Debian systems) and the manual installation process in case packages are unavailable for your specific distribution.
Note: If the package manager is available for your Linux distribution, it tends to be the easiest and most manageable option. Also, when performing a manual installation, pay careful attention to file paths, versions, and permissions to ensure that cuDNN works flawlessly with your existing CUDA configuration.
Step 1: Download cuDNN
- Go to the official NVIDIA cuDNN download page.
- Sign in to your NVIDIA Developer account (or create one if you don’t have it).
- Choose the cuDNN version that corresponds with your installed CUDA version.
- Download the Linux package (usually provided as a .tar.xz file) if you intend to install it manually, or take note of the version strings if you prefer to use your package manager.
Step 2: Install cuDNN
Option A: Using the Package Manager
For Ubuntu or Debian-based distributions, NVIDIA recommends installing cuDNN via apt:
sudo apt-get install libcudnn8=8.x.x.x-1+cudaX.X
sudo apt-get install libcudnn8-dev=8.x.x.x-1+cudaX.X
- Swap 8.x.x.x with the actual cuDNN version you have downloaded.
- Replace X.X to match your installed CUDA version (for example, cuda11.8).
Option B: Manual Installation
If the package manager is unavailable or not supported in your distribution, first extract the archive using this command:
tar -xf cudnn-linux-x86_64-x.x.x.x_cudaX.X-archive.tar.xz
Update x.x.x.x (cuDNN version) and X.X (CUDA version) to correspond with the versions stated in your archive’s name.
Then, copy the cuDNN files using the following command:
sudo cp cudnn-*-archive/include/cudnn*.h /usr/local/cuda/include/
sudo cp -P cudnn-*-archive/lib/libcudnn* /usr/local/cuda/lib64/
sudo chmod a+r /usr/local/cuda/include/cudnn*.h /usr/local/cuda/lib64/libcudnn*
This series of instructions copy the cuDNN header files (cudnn\*.h) to the CUDA include folder and copy the cuDNN library files (libcudnn\) to the CUDA library folder. By using the \-P option, any symbolic links will be maintained during this copy. chmod a+r grants read permissions to all users for these files, thereby ensuring they are accessible across the system.
Step 3: Update the Shared Library Cache
Regardless of whether you used the package manager for installation or manually copied the files, it’s important to refresh the library cache of your system:
sudo ldconfig
This step ensures that your operating system recognizes the newly added cuDNN libraries.
Step 4: Verify the Installation
To verify if cuDNN has been installed correctly, you can check the version details in cudnn.h:
cat /usr/local/cuda/include/cudnn.h | grep CUDNN_MAJOR -A 2
This command will display the cuDNN version installed on your system by extracting specific lines from the cudnn.h header file. The component grep CUDNN_MAJOR -A 2 narrows the output to display the major version number alongside the subsequent two lines, usually indicating the minor and patch version numbers.
If the installed cuDNN version is 8.9.2, the executed command may yield:
#define CUDNN_MAJOR 8
#define CUDNN_MINOR 9
#define CUDNN_PATCHLEVEL 2
Step 5: Update Enviornment Variables
Finally, add the CUDA binary and library directories to your PATH and LD_LIBRARY_PATH so your system can locate cuDNN and CUDA files.
First, edit (or create) the ~/.bashrc file:
export PATH=/usr/local/cuda/bin:$PATH
export LD_LIBRARY_PATH=/usr/local/cuda/lib64:$LD_LIBRARY_PATH
Then, apply the changes in the current shell session:
source ~/.bashrc
Version Compatibility and Framework Integration
Various deep learning frameworks require specific CUDA and cuDNN versions. Below is a general guideline:
| Framework | Supported CUDA Versions | Supported cuDNN Versions | Notes |
|---|---|---|---|
| Tensorflow | 11.2 - 12.2 | 8.1+ | TensorFlow 2.15 is compatible with CUDA 12.2. Prior versions may require specific CUDA versions. |
| PyTorch | 11.3 - 12.1 | 8.3.2+ | PyTorch 2.1 is compatible with CUDA versions 11.8 and 12.1. The exact versions will vary based on the PyTorch release. |
| MXNet | 10.1 - 11.7 | 7.6.5 - 8.5.0 | MXNet 1.9.1 supports up to CUDA 11.7 and cuDNN 8.5.0. |
| Caffee | 10.0 - 11.x | 7.6.5 - 8.x | Caffe typically requires manual compilation. It is advisable to verify specific version requirements. |
It is essential to consistently refer to the official documentation for each framework, as compatibility may change with subsequent releases.
Additional Notes
- The latest version of TensorFlow (version 2.16.1) has simplified the installation of the CUDA library on Linux with pip.
- PyTorch binaries come pre-packaged with specific versions of CUDA and cuDNN…
- MXNet requires accurate matching of the CUDA and cuDNN versions.
- Installing JAX with CUDA and cuDNN support can be complex and often demands specific combinations of versions.
Using CUDA and cuDNN with Popular Frameworks
Modern deep learning tools work great with CUDA and cuDNN, providing significant speed improvements on systems equipped with GPUs. Here’s a quick rundown on setting up TensorFlow, PyTorch, and other popular libraries to get the most out of GPU acceleration.
Tensorflow GPU Setup
Install TensorFlow with GPU Support
pip install tensorflow[and-cuda]
This command installs TensorFlow along with necessary CUDA dependencies. For Windows users, GPU support is generally enabled through WSL2(Windows Subsystem for Linux 2) or via the TensorFlow-DirectML-Plugin.
Verify GPU Recognition
import tensorflow as tf
print(tf.config.list_physical_devices('GPU'))
If TensorFlow detects your GPU, you should see at least one physical device mentioned in the results.
Common TensorFlow Errors**
- DLL load failed: This usually means cuDNN or CUDA isn’t set up properly in your system PATH.
- Could not load dynamic library: This often happens when there’s a mismatch between the installed CUDA/cuDNN versions and those expected by TensorFlow.
PyTorch CUDA Configuration
Install PyTorch
pip install torch torchvision torchaudio --index-url https://download.pytorch.org/whl/cu121
This command will install the latest compatible versions of torch, torchvision, and torchaudio built for CUDA 12.1. You must make sure you have the appropriate CUDA 12.1 drivers installed on your system for optimal performance.
Check GPU Availability
import torch
print(torch.cuda.is_available()) # Should return True if everything is correct
A True output means PyTorch can recognize your GPU.
OptiMulti-GPU Setup
If you have multiple GPUS, you can perform computations using torch.nn.DataParallel or DistributedDataParallel. To see how many GPUs PyTorch identifies, run:
torch.cuda.device_count()
Other Frameworks (MXNet, Caffee, etc.)
MXNet
First, install the GPU version:
pip install mxnet-cu``x
The placeholder cu11x should be replaced with the actual version, suchc as cu110 for CUDA 11.0 or cu113 for CUDA 11.3
Next, check how many GPUs you have acces to
import mxnet as mx
print (mx.context.num_gpus())
If you see a non-zero result, that means MXNet can access your GPUs.
Caffee
- Usually, you’ll compile this from the source and set up your CUDA and cuDNN paths in the Makefile.config file.
- Some users prefer to install Caffe via Conda but make sure your CUDA and cuDNN versions align with the library’s requirements.
Following these steps, you can easily set up GPU acceleration for different deep learning frameworks, taking full advantage of CUDA and cuDNN for faster training and inference.
To learn about advanced PyTorch debugging and memory management, read our article on PyTorch Memory and Multi-GPU Debugging.
Installing cuDNN with Python Wheels via pip
NVIDIA provides Python wheels for easy installation of cuDNN through pip, simplifying the integration process into Python projects. This method is particularly advantageous for those working with deep learning frameworks like TensorFlow and PyTorch.
Prerequisite
- Python Environment: Make sure Python is installed on your system. To prevent conflicts, it’s recommended that you use a virtual environment for managing dependencies.
- CUDA Toolkit: Install the appropriate version of the CUDA Toolkit that is compatible with both your GPU and the cuDNN version you plan to use.
Step 1: Upgrade pip and wheel
Before installing cuDNN, ensure that pip and wheel are updated to their latest versions:
python3 -m pip install --upgrade pip wheel
Step 2: Installing cuDNN
To install CUDA 12, use the following command:
python 3 -m pip install nvidia-cudnn-cu12
To install Cuda 11, use the following command:
python 3 -m pip install nvidia-cudnn-cu11
For a specific version of cuDNN (e.g. 9.x.y.z), you can specify the version number:
python3 -m pip install nvidia-cudnn-cu12==9.x.y.z
Troubleshooting Common Issues
This section outlines common issues encountered with CUDA and cuDNN and provides their causes along with respective solutions.
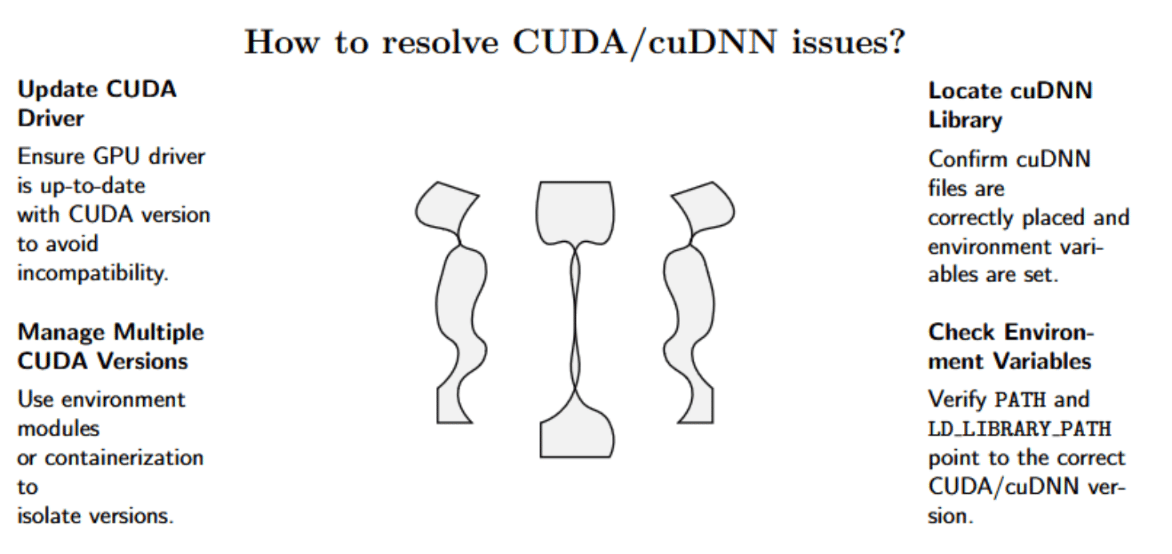
Cuda Driver Version Insufficiency
- Cause: The GPU driver in use is outdated compared to the version required for the CUDA Toolkit on your system.
- Solution: Update your driver to a version that is at least as recent as recommended for your CUDA version. Afterward, restart your system and attempt the operation again.
cuDNN Library Not Found
- Cause: The cuDNN files might be incorrectly located, or your environment variables are not set up properly.
- Solution: Ensure that
cudnn64\_x.dll(for Windows) orlibcudnn.so(for Linux) is placed within the same directory as your CUDA installation. Also, verify thatLD\_LIBRARY\_PATHorPATHincludes the directory where these libraries reside.
Multiple CUDA Versions on the Same Machine
You can install various CUDA versions (like 10.2 and 11.8) simultaneously, but be aware of the following:
- Path issues: Only one version can take precedence in your environment
PATH. - Framework Configuration: Certain frameworks may default to the first
nvccthey recognize. - Recommendation: Use environment modules or containerization techniques (like Docker) to isolate different CUDA versions.
Enviornment Variable Conflicts
You might encounter library mismatch errors if your PATH or LD_LIBRARY_PATH points to an old or conflicting CUDA version. Always check that your environment variables correspond to the correct paths for the specific CUDA/cuDNN version you plan to use.
FAQs
How to install CUDA on a GPU?
Begin by downloading and installing the latest NVIDIA GPU driver suitable for your operating system. Next, head to NVIDIA’s official website to get the CUDA Toolkit, and proceed to run the installation. Don’t forget to restart the system once you have completed the installation.
How to set up CUDA and cuDNN?
First, proceed with installing the CUDA Toolkit and downloading cuDNN from the NVIDIA Developer portal. Copy the cuDNN files into the CUDA directories (namely, bin, include, and lib) and adjust environment variables as required.
Can I use CUDA on my GPU?
As long as your GPU is an NVIDIA GPU that supports CUDA. You can verify this by referring to NVIDIA’s official list or inspecting your GPU’s product page details.
How to install CUDA 11.8 and cuDNN?
Start with a compatible driver installation, then download the CUDA 11.8 installer. Afterward, download cuDNN version 8.x that aligns with CUDA 11.8, and make the cuDNN files placed in the correct directories.
How do I check if my GPU is CUDA enabled?
On a Windows system, you can check for an NVIDIA GPU in the Device Manager. For Linux users, execute the command: lspci | grep \-i nvidia. Finally, compare your GPU model with the specifications listed on NVIDIA’s website.
Is CUDA a GPU driver?
No, CUDA itself is a parallel computing platform. You need to install the NVIDIA driver to communicate properly with GPU hardware.
What are CUDA and cuDNN used for in AI and ML?
CUDA enables parallel computing tasks on the GPU, while cuDNN optimizes deep neural network processes, such as convolutions.
How do I check if my GPU supports CUDA?
Find your GPU model on the NVIDIA Developer site or consult the list of CUDA-enabled GPUs. Generally, most modern NVIDIA GPUs support CUDA.
What is the difference between the CUDA Toolkit and cuDNN?
The CUDA Toolkit provides essential libraries, a compiler, and tools necessary for general GPU computing, while cuDNN is a specialized library for deep neural network operations.
How do I resolve the cuDNN library errors that were not found?
Make sure that the cuDNN files (like .dll for Windows or .so for Linux) are correctly copied in the designated folders (e.g., /usr/local/cuda/lib64 on Linux), and verify that your environment variables point to those directories.
Can I install multiple versions of CUDA on the same machine?
Yes, it is possible. Each version should reside in its respective directory (for example, C:\Program Files\NVIDIA GPU Computing Toolkit\CUDA\v11.2, v11.8, etc.). You will need to update the PATH and other environmental variables when switching between versions.
Common CUDA installation errors and troubleshooting solutions 2025
Common CUDA issues include:
- Driver conflicts: Uninstall existing NVIDIA drivers before CUDA installation, use clean installation options.
- PATH issues: Ensure CUDA bin directory is in system PATH, verify with nvcc --version.
- Library conflicts: Check LD_LIBRARY_PATH on Linux, ensure cuDNN versions match CUDA versions.
- Compiler incompatibilities: Use supported GCC versions, install appropriate Visual Studio on Windows.
- Permission errors: Run installers with appropriate privileges, check file permissions.
- Version mismatches: Verify framework compatibility with installed CUDA version. Use virtual environments to isolate different CUDA configurations. Docker containers eliminate most installation issues.
How to manage multiple CUDA versions for different AI projects?
Managing multiple CUDA versions requires environment isolation:
- Conda environments: Create separate environments with specific CUDA toolkit versions using conda install cudatoolkit=11.8.
- Docker containers: Use NVIDIA Docker with different base images for each CUDA version.
- Virtual environments: Combine with symbolic links or environment modules for version switching.
- Environment modules: Use module load cuda/12.0 on HPC systems.
- Manual switching: Create shell scripts to modify PATH and LD_LIBRARY_PATH variables. Document project-specific CUDA requirements and maintain compatibility matrices. Consider using development containers (devcontainers) for consistent team environments across different projects and CUDA requirements.
Conclusion
Installing CUDA and cuDNN is essential in unlocking the full capabilities of NVIDIA GPUs for tasks like deep learning, scientific simulations, and processing large datasets. By adhering to the detailed instructions provided in this guide, you’ll streamline the installation of CUDA cuDNN on both Windows and Ubuntu. This will result in accelerated model training, optimized data handling, and improved computational power.
When properly configured, with version compatibility checks and performance optimization, your GPU environment will be ready to support renowned frameworks such as TensorFlow, PyTorch, and MXNet. Whether you’re a beginner or have advanced knowledge, using CUDA and cuDNN can boost your efficiency. This will allow you to approach complex AI and machine learning challenges with improved speed and efficiency.
Thanks for learning with the DigitalOcean Community. Check out our offerings for compute, storage, networking, and managed databases.
About the author(s)
I am a skilled AI consultant and technical writer with over four years of experience. I have a master’s degree in AI and have written innovative articles that provide developers and researchers with actionable insights. As a thought leader, I specialize in simplifying complex AI concepts through practical content, positioning myself as a trusted voice in the tech community.
With a strong background in data science and over six years of experience, I am passionate about creating in-depth content on technologies. Currently focused on AI, machine learning, and GPU computing, working on topics ranging from deep learning frameworks to optimizing GPU-based workloads.
Still looking for an answer?
This textbox defaults to using Markdown to format your answer.
You can type !ref in this text area to quickly search our full set of tutorials, documentation & marketplace offerings and insert the link!
 This work is licensed under a Creative Commons Attribution-NonCommercial- ShareAlike 4.0 International License.
Become a contributor for community
Get paid to write technical tutorials and select a tech-focused charity to receive a matching donation.

DigitalOcean Documentation
Full documentation for every DigitalOcean product.

Resources for startups and AI-native businesses
The Wave has everything you need to know about building a business, from raising funding to marketing your product.
The developer cloud
Scale up as you grow — whether you're running one virtual machine or ten thousand.

Start building today
From GPU-powered inference and Kubernetes to managed databases and storage, get everything you need to build, scale, and deploy intelligent applications.
